Free online trainings
24
Sep
Eramba Detailed Risk & Compliance Advanced

Incident Management

Record, track and close security incidents in one place. Owners, deadlines, evidence and reporting for NIS2 Article 21(b) incident handling.

  • Documentation
  • Duration13m 10s
  • LanguagesEN

Introduction

Summary

Incident Management helps you document security incidents, coordinate their follow-up, and retain evidence of the actions taken.

For example, an employee might report a suspicious email. Your team needs to establish what happened, determine whether an incident occurred, record its response, and identify any improvements needed afterwards.

This course explains the module’s main concepts and guides you through a complete test incident. You will prepare access, define handling stages, configure notifications, record an incident, collect evidence, and verify the process through to closure.

After completing the test, you will be ready to adapt the configuration to your organisation and manage real incidents.

Typical Scenarios

The Incident module is used to:

  • Manage your cybersecurity incidents
  • Systematically analyse them using predefined analysis stages
  • Follow response plans for known incidents

Supported Versions

Incident Management is available in the Community and Enterprise editions.

Some supporting features have separate edition requirements. For example, Customisations are available in Enterprise. Check the relevant common-feature documentation before following optional configuration steps.

Theory

Module Relationships

Incident Management is located under Security Operations / Incident Management.

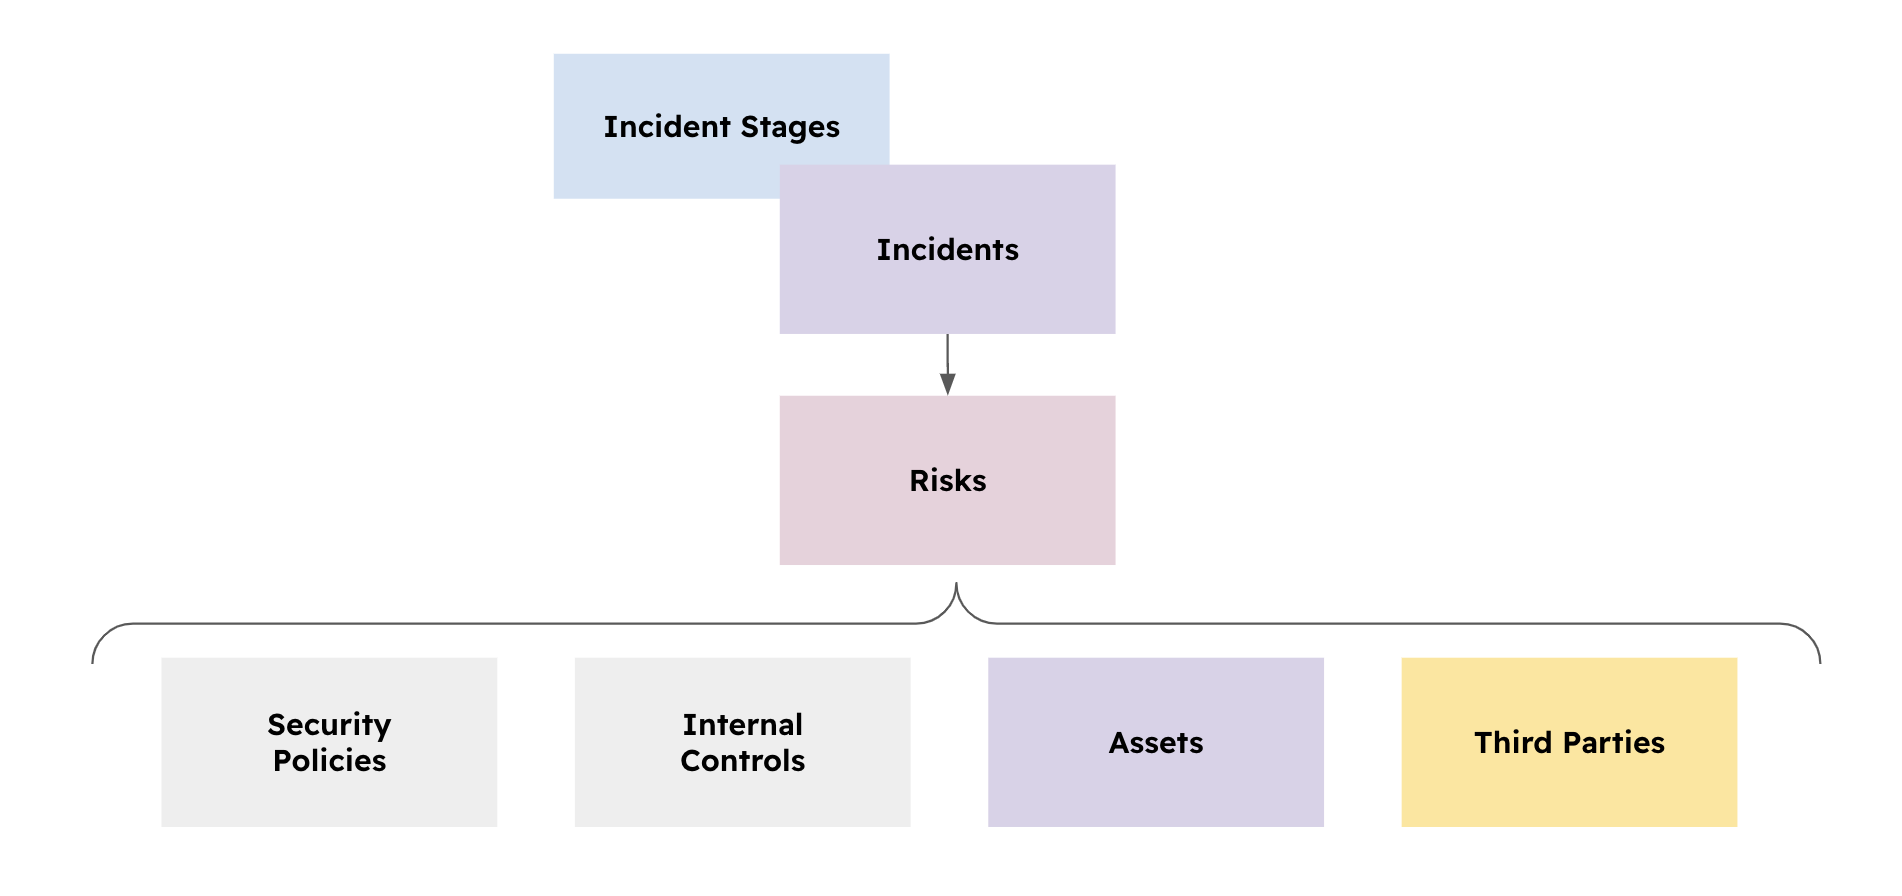
The module can operate independently. Its main records are incidents and their associated stages.

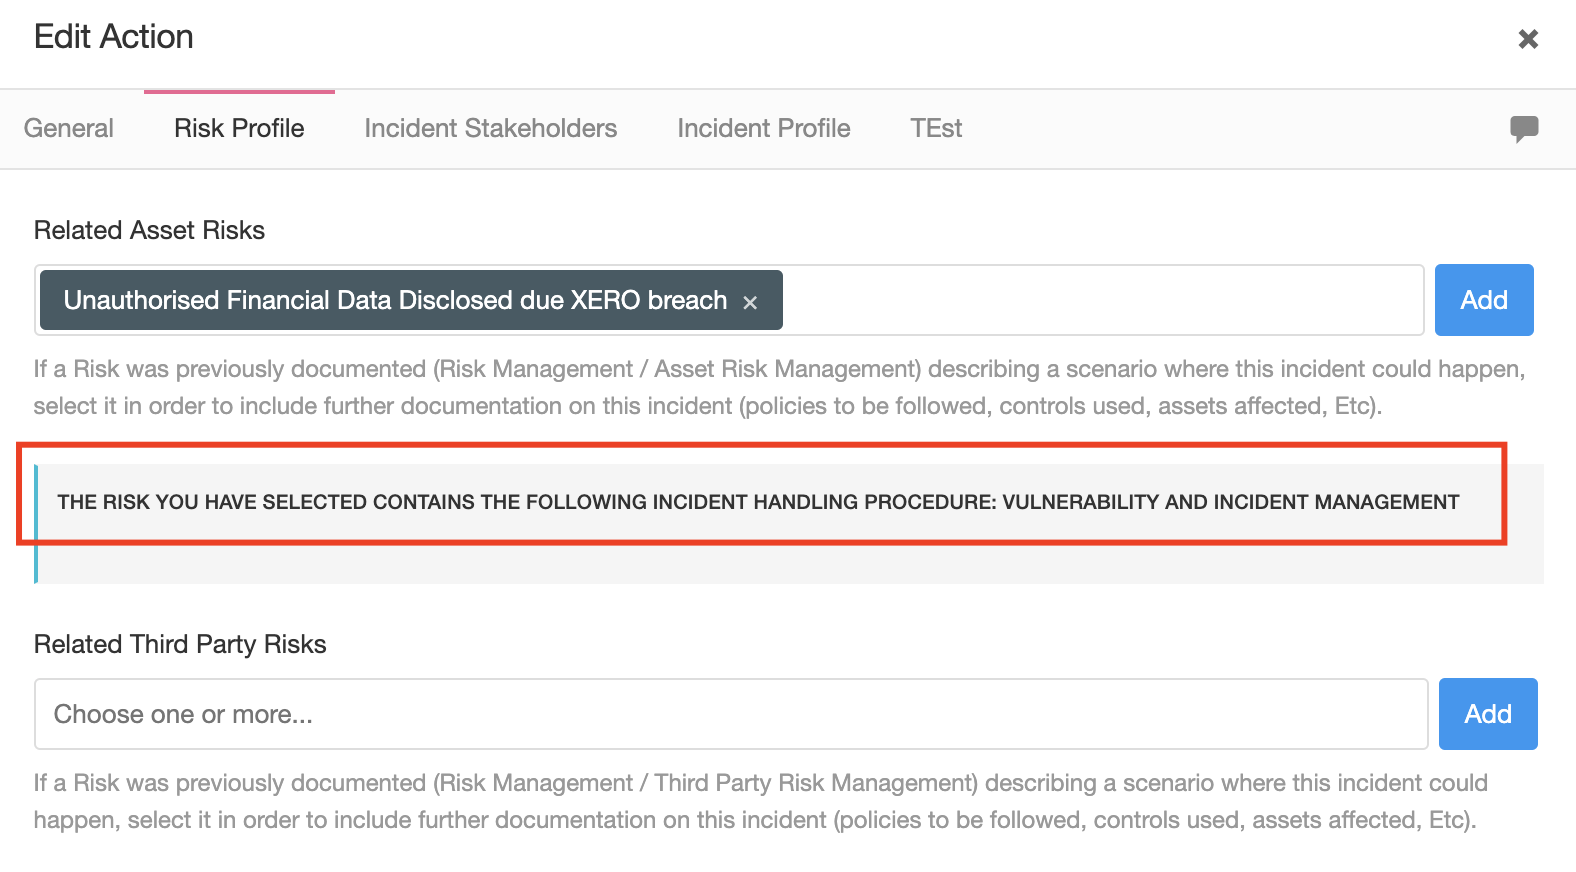
You can optionally associate an incident with Risks. Where those Risks contain response plans (from the Policy module), they provide instructions relevant to the incident.

See the Risk Management documentation if you intend to use this relationship.

Incidents & Events

Records have three classifications:

  • Incident: a confirmed incident.
  • Possible Incident: an issue that requires investigation before confirmation.
  • Event: an occurrence worth recording that has not resulted in an incident.

Use the information available when selecting the classification. Update it if the investigation changes your conclusion.

For example, initially record a suspicious email as a Possible Incident. If investigation confirms that an employee disclosed credentials, update the classification to Incident. If investigation establishes that no incident occurred, record that conclusion and use the appropriate classification.

The classification describes what happened. It does not indicate whether the team has finished handling the record.

Stages

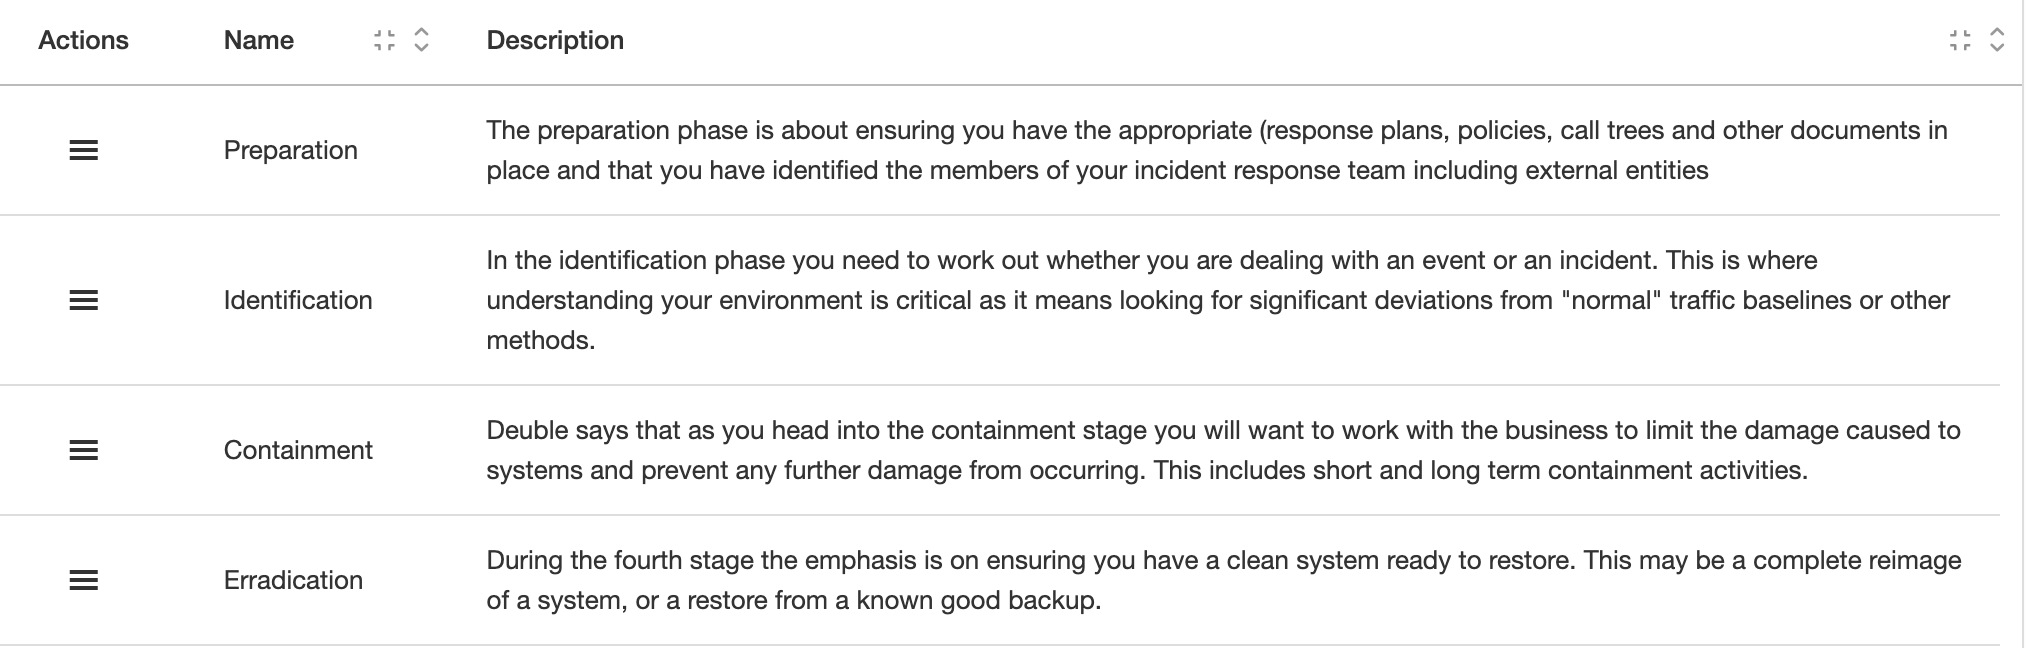
Stages describe the work expected when handling an incident. Each has a title and description.

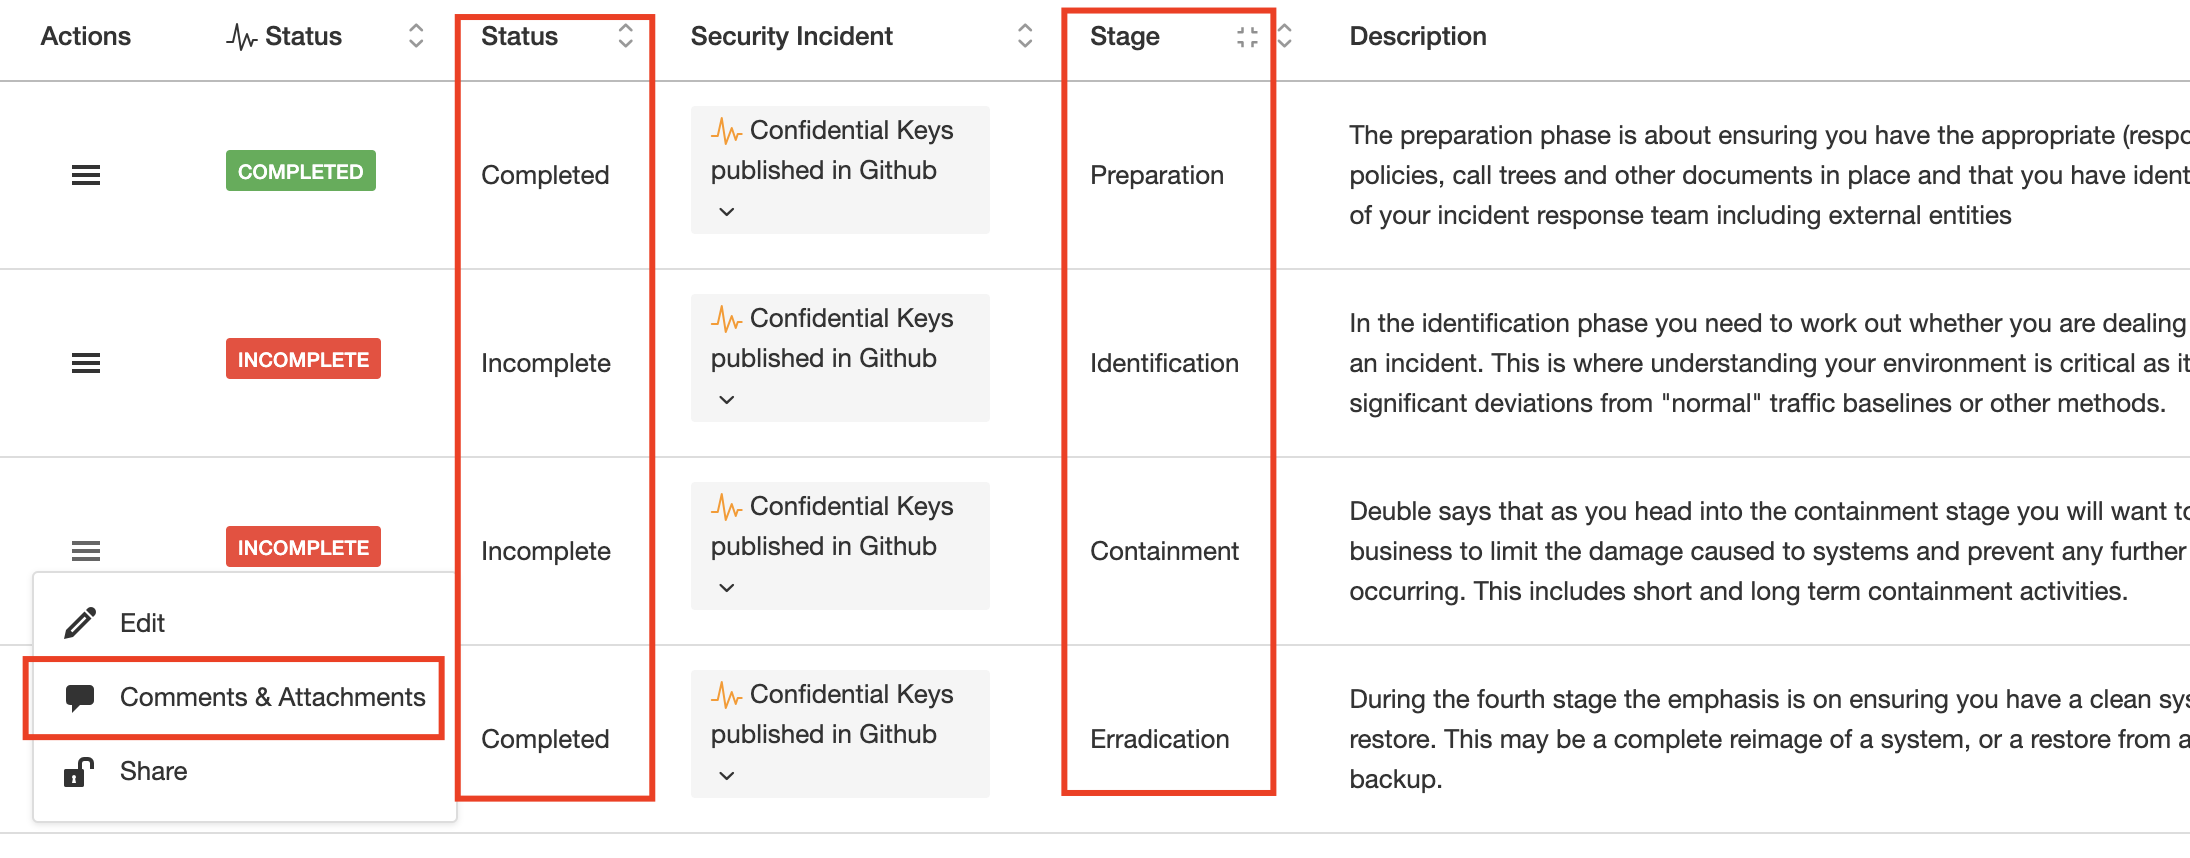
Stages configured in the module’s settings are assigned to new incidents. Handlers can add comments and attachments as evidence, then mark each stage complete. An incident with incomplete stages cannot be closed.

A useful stage description should explain what to do and what evidence is needed before completion.

For example:

  • Title: Investigation
  • Description: Establish what happened, which systems or people were affected, and the known impact. Record the evidence reviewed, the conclusions reached, and any remaining uncertainty.

Keep stages broad enough to apply across the incidents your organisation records. Put scenario-specific instructions in response plans.

The stage list is a record of required work. Your organisation’s response procedure should explain priorities, escalation, and which activities may happen in parallel.

Incident Lifecycle & Status

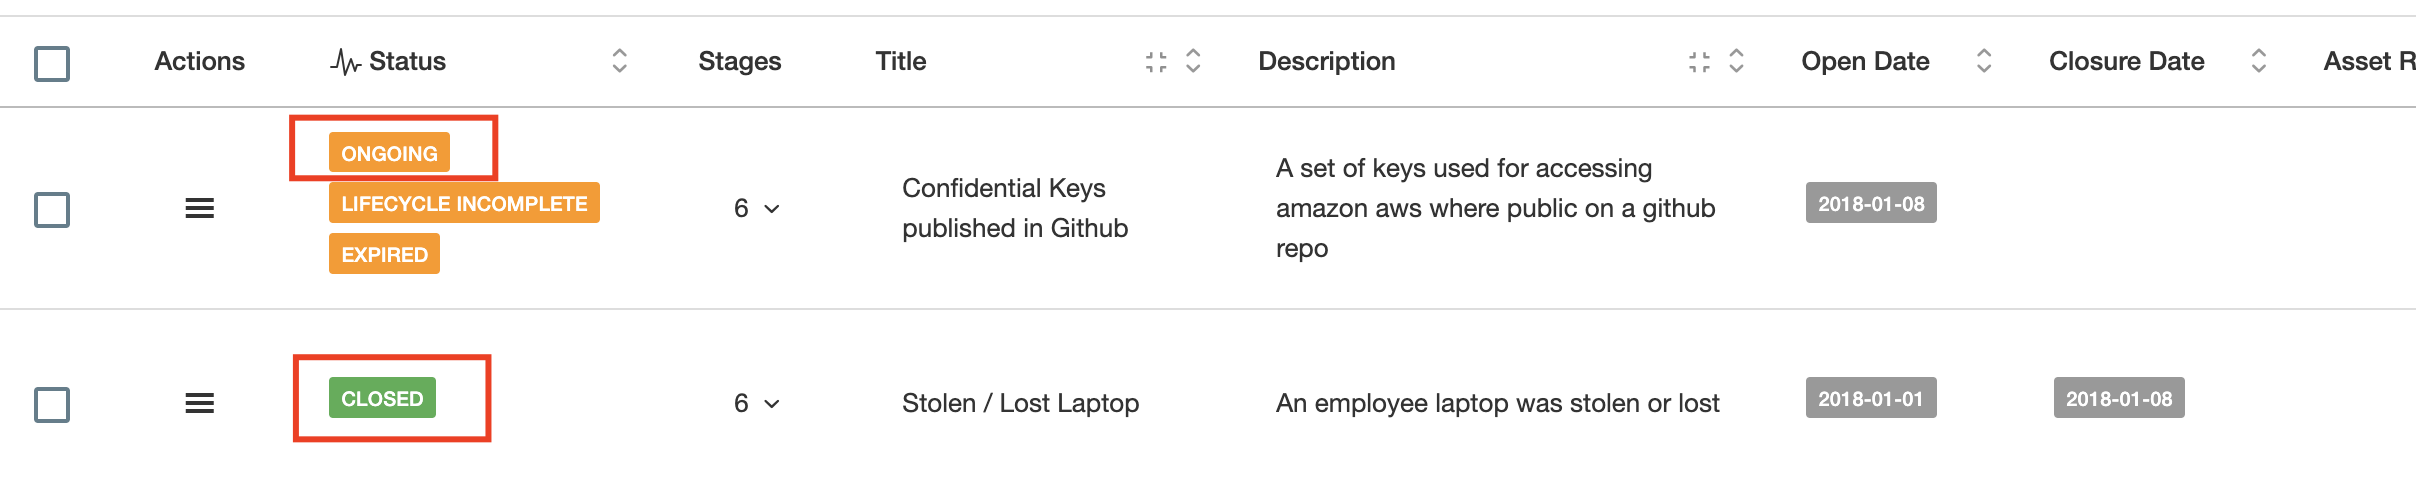
An incident begins in the Open state. Closing it records a Closure Date.

The module also displays status labels:

LabelMeaning
OngoingThe incident is open.
Lifecycle IncompleteOne or more stages remain incomplete.
ClosedThe incident is closed and its stages are complete.

Completing the stages and closing the incident are separate actions.

For example, a handler might finish the investigation and response, complete the stages, and leave the incident open while the GRC team checks the final record.

Keep three questions separate:

  • Classification: what kind of occurrence is this?
  • Stage completion: has the required work been documented?
  • Open or closed state: has handling of the record finished?

Risk & Response Plan

A Risk describes something that could happen. An incident records something that has happened or requires investigation.

Where an incident corresponds to a documented Risk, associate the records and review the available response instructions.

For example, a confirmed account compromise might relate to a Risk describing unauthorised access following credential theft. The response plan could explain which team to contact and which procedures to follow.

The association helps the handler find relevant guidance. The response itself still needs to be carried out and documented.

Afterwards, review whether the incident changes your understanding of the Risk. Consider whether its impact, likelihood, treatment, or response instructions need updating.

Implementation

During implementation, you will record and handle a test incident from start to finish.

Use the example “TEST — Suspected phishing email” and fictional evidence. Complete the workflow using both a GRC account and a test collaborator account so you can check each person’s experience.

Use email addresses whose inboxes you can access. Review notification recipients before creating the test incident.

Access Management

Before continuing, review the Access Management documentation.

  1. If this is a new eramba installation, complete the initial Admin account setup, including its password and email address. Use an organisation-managed email address.
  2. Create a group for your GRC team. Name it according to your department. If an appropriate group already exists, reuse it. (How-To)
  3. Create individual user accounts for the GRC team carrying out the implementation, or use their existing accounts. (How-To) Configure each account as follows:
    • Groups: assign the Admin group and the GRC group identified in step 2.
    • Portal: enable the Main portal.
    • Authentication: use local authentication unless you have already configured an external authentication method.
    • Email: use the team member’s working email address.
  4. Create a dedicated group for testing, such as Incident Test Team. This group will be assigned as the Incident Contact on the test incident. (How-To)
  5. Create a test collaborator account. Use it to check access and the process for providing incident updates. (How-To) Configure it as follows:
    • Groups: assign Incident Test Team, "System Group - View Incidents" group and "Comments & Attachment" group.
    • Portal: enable only the Main portal.
    • Authentication: configure a sign-in method you can use during testing. If you use local authentication, set a password for the account.
    • Email: use an address whose inbox you can access.
  6. Log out of the Admin account and continue using your individual GRC account.
  7. Optionally configure SAML, Google OAuth, or LDAP authentication. Confirm that the test collaborator can sign in using your chosen method. (How-To)

For this test, the collaborator will view the incident and provide comments and attachments. The GRC user will edit the incident, complete its stages, and close it.

Stages Definition

Before continuing, review Stages in this course.

  1. For the test, create four stages. These are example titles and instructions; replace them with your organisation’s agreed process before production use.
  2. Go to Security Operations / Incident Management and open the stage configuration under Settings. (How-To)
  3. Create the following stages one by one:
    1. Title: Initial Assessment, Description: Record the report, assess the available information, select a classification, and identify the team responsible for follow-up.
    2. Title: Investigation, Description: Establish what happened, identify affected systems or people, and document the evidence, impact, and conclusions.
    3. Title: Response and Recovery, Description: Record the actions taken, their results, and how the team checked that the immediate issue was addressed.
    4. Title: Lessons Learned, Description: Summarise the outcome and identify improvements, owners, and follow-up actions.
  4. Review the saved stages. Confirm that all four titles and descriptions are correct.
  5. If stages already exist, review them before making changes. Check the scope of any option that applies changes to existing incidents.

Set Up Basic Notifications

Before continuing, review the Notifications documentation.

Configure these notifications before creating the test incident.

  1. In the Incident module, open Common Features / Notifications and configure: (How-To)
    • New Item Created: notify the relevant contacts when an incident is created.
    • All incident stages completed: notify the GRC Contact that the incident is ready for review and closure.
  2. In the Stages module, open Common Features / Notifications and configure: (How-To)
    • New comment/attachment: notify the relevant contacts when someone provides an update.
    • Incident stage completed: notify the relevant contacts when a stage is completed.
  3. For each notification, make sure settings are correct:
    • Recipients: default roles should be ok for most organisations.
    • Subject and body: explain what happened and whether action is required.
    • Link: include the supported link to the incident or stage.
    • Enabled: enable the notification.

During the test workflow, we will trigger each notification and confirm that the intended recipients receive it and can open its link. (How-To)

Incident Creation

Before continuing, review Incidents and Events and Incident Lifecycle & Status.

  1. Go to Security Operations / Incident Management and select Add Item. (How-To)
  2. Create the incident:
    • Title: TEST — Suspected phishing email.
    • Description: An employee reported a suspicious email asking them to sign in to a website. It is not yet known whether they followed the link or entered credentials. This is a fictional implementation test.
    • Classification: Possible Incident.
    • GRC Contact: select the GRC group prepared earlier.
    • Incident Contact: select Incident Test Team.
    • Open Date: use the date of the exercise.
    • Status: leave the incident open.
  3. Optionally associate a test Risk containing response instructions. If you are not testing this relationship, leave it unselected. (How-To)
  4. Save the incident.
  5. Open its associated stages and confirm that all four stages are present: (How-To)
    • Initial Assessment.
    • Investigation.
    • Response and Recovery.
    • Lessons Learned.
  6. Check that the incident is open and the stages are incomplete.
  7. If an incident-creation notification was configured, check the test recipients’ inboxes. You might need to flush the email queue to trigger immediate email delivery.

You now have a test incident ready for access, collaboration, and closure testing.

Test Incident Workflow

Before continuing, complete Set Up Basic Notifications and Incident Creation. Use fictional information throughout the test.

As the Test Collaborator

  1. Check the New Item Created email. Open its link in a separate browser session and sign in with the test collaborator account. Confirm that the incident and its stages are accessible. (How-To)
  2. Open the Initial Assessment stage and add a Comment & Attachment simulating feedback. (How-To)

As the GRC User

  1. Sign in with your GRC account. Confirm that the collaborator’s feedback is visible and the New comment/attachment notification reaches its configured recipients.
  2. Add feedback simulating the assessment, investigation, and response. Mark the first three stages complete and change the incident’s Classification to Incident. (How-To)
  3. Confirm that the Incident stage completed notifications reach their configured recipients.
  4. Leave Lessons Learned incomplete and attempt to close the incident. Confirm that closure is blocked. (How-To)
  5. Add feedback to Lessons Learned and complete the stage. Confirm that the GRC Contact receives All incident stages completed, while the incident remains open.
  6. Close the incident by changing Status from Open to Close. The Close Date will automatically populate with today’s date, and the status labels will reflect the closure. (How-To)

For each notification, check the recipient’s inbox and open the link using that recipient’s account. Allow email processing to run before checking delivery.

Basic Module Configuration

Before continuing, review User Interface and Customisations.

Using your GRC account, apply the following configurations to the Incidents and Stages tabs, where supported by your edition.

  1. Adjust the form fields using Customisations. (How-To)
  2. Configure your default views and select useful columns: (How-To)
    • Incidents: title, classification, contacts, open date, closure date, and statuses.
    • Stages: associated incident, stage title, and completion information.
  3. Configure default views for other users. (How-To)
  4. Optionally pin useful system views. (How-To)
  5. Optionally create additional views for open incidents, incomplete stages, and closed incidents. (How-To)
  6. Optionally configure Dynamic Status rules to highlight records requiring attention. (How-To)
  7. Optionally create a report showing incidents and outstanding stages. (How-To)
  8. Optionally schedule the report using Notifications: (How-To)
    • Recipients: select the appropriate GRC group.
    • Frequency: choose how often to send it.
    • Subject and body: explain what recipients should review.

Check the configured views and any reports using your test records. If scheduled reporting is enabled, confirm that emails reach the intended recipients.

Operational Steps Summary

Complete the test workflow before managing real incidents. Confirm that access, notifications, feedback, stages, and closure work as expected.

For ongoing operation, follow this process:

  1. Prepare access. Create or reuse the appropriate department groups and collaborator accounts. Apply the permissions tested during implementation.
  2. Record the incident. The GRC user documents the available information, selects the classification, and assigns the GRC Contact and Incident Contact.
  3. Review response instructions. Where relevant, associate a Risk and consult its response plan.
  4. Collect feedback. Collaborators review the incident and provide Comments & Attachments on its stages.
  5. Manage the stages. The GRC user reviews feedback, records outcomes, updates the classification where needed, and marks completed stages accordingly.
  6. Follow up on outstanding work. Use views and any configured reports to identify open incidents and incomplete stages.
  7. Review and close. Once all stages are complete, the GRC user checks the evidence and closes the incident.
  8. Track improvements. Assign responsibility for lessons learned and follow-up actions. Review related Risks, Controls, Policies, or response plans where changes are needed.

Repeat these activities for each incident, keeping the record up to date as new information becomes available.

Advanced Configurations (Optional)

The standard implementation is enough to operate Incident Management. This section shows how to combine common features to reduce manual work and identify records requiring attention.

Scenario

Your response team uses Jira to coordinate urgent incidents. When an incident is created in eramba with an Urgent priority, you want a Jira issue created automatically.

The example combines three features:

  • Custom fields record the incident priority and Jira issue reference.
  • Dynamic Status highlights urgent incidents.
  • Automation creates a Jira issue for newly recorded urgent incidents and saves its reference in eramba.

Start with custom fields and Dynamic Status. Add automation when you are ready to connect this process to Jira.

Complete the standard implementation first and test with fictional incidents before processing real data.

Prepare Incident Fields

Before continuing, review the Customisations documentation.

Using your GRC account:

  1. In the Incident module, create these custom fields: (How-To)
    • Incident Priority: Dropdown with Normal and Urgent.
    • Jira Issue Key: Short Text.
  2. Add both fields to your incident view. Leave Jira Issue Key empty for the automation to populate.
  3. Create a fictional incident with Incident Priority set to Normal.

Incident Priority is separate from the existing Incident, Possible Incident, and Event classification.

Configure Dynamic Status

Before continuing, review the Dynamic Status documentation.

  1. Create a Dynamic Status rule: (How-To)
    • Name: Urgent Incident.
    • Condition: Incident Priority is Urgent.
  2. Change your test incident’s priority to Urgent and confirm that the label appears.
  3. Change it back to Normal and confirm that the label disappears.
  4. Optionally create a view showing urgent incidents. (How-To)

The status highlights urgent records. The automation separately checks the priority before creating a Jira issue.

Automate Jira Issue Creation

Before continuing, review the Automations documentation

Create Automation

Prepare and test an event-triggered automation that: (How-To)

  1. Checks that Incident Priority is Urgent.
  2. Checks whether a Jira issue has already been created for this incident.
  3. Creates an issue in the agreed Jira project, including the incident title, description, and eramba link.
  4. Saves the returned issue key in Jira Issue Key.
  5. Records processing results and avoids duplicate issues when retried.

Store Jira credentials using Automation Secrets. Configure the incident’s New Item Created notification to trigger the automation. (How-To)

This requires a script adapted to your Jira configuration and the actions supported by your installation.

Test the Process

Use fictional incidents to check that:

  1. A new Normal incident does not create a Jira issue.
  2. A new Urgent incident creates one Jira issue and stores its key.
  3. The Jira issue contains the expected details and a working eramba link.
  4. Repeating execution does not create duplicates.
  5. A failed step is logged and can be retried without duplicating an issue already created.

Review the automation logs and generated issues before enabling the process for real incidents. (How-To)

This example runs when an incident is created. Changing an existing incident to Urgent requires an additional update trigger.

How-To Guides

We Miss:

  • Course introduction.
  • Configure incident stages.
  • Configure incident notifications.
  • Create an incident.
  • Provide incident feedback as a collaborator.
  • Manage stages and close an incident as the GRC user.
  • Associate a Risk and use its response plan.

Reuse the shared recordings for:

  • Create groups and user accounts.
  • Configure permissions, portals, and authentication.
  • Customise forms and add custom fields.
  • Configure columns, filters, and default views.
  • Pin system views.
  • Configure Dynamic Status rules.
  • Create reports and optionally schedule email delivery.