Introduction
Summary
Online Assessments help you collect information from people inside or outside your organisation using structured questionnaires. You can use them to assess suppliers, gather information for risk assessments, or identify gaps against your organisation’s requirements.
The process brings together two roles: the recipient, who answers the questions and provides supporting evidence, and the assessor, who reviews the responses and records a conclusion. Recipients complete their questionnaires through the Online Assessment portal, while assessors track progress, review answers, and document issues that require follow-up.
You can reuse questionnaires across assessments and adapt them with different answer types, conditional questions, and scoring. Notifications help participants keep track of invitations, submissions, and discussions. Assessments can also be associated with records such as Third Parties, Assets, Risks, or Data Flows, keeping the information connected to the activity being assessed.
Typical scenarios include:
- Supplier assessments: ask suppliers about their practices, review their evidence, and follow up on gaps.
- Internal assessments: collect information from departments to support risk identification and understand how activities are performed.
- Gap assessments: gather evidence about current practices and identify where improvements are needed.
This course explains how Online Assessments work, guides you through a complete test assessment, and shows you how to move into ongoing operation. By the end, you will be able to prepare a questionnaire, invite recipients, review their answers, record results, and track findings.
Supported Versions
This feature is available only in the Enterprise edition.
Workshops
If you are an enterprise customer, you can purchase 8-hour implementation workshops delivered by GRC professionals. Contact support@eramba.org for more information.
Theory
Module Relationships
The Online Assessment (OA) module can operate independently. Depending on your use case, you can associate assessments with records in other modules:
- Supplier assessments: associate the assessment with a Third Party.
- Application or asset assessments: associate the assessment with an Asset.
- Risk assessments: associate the assessment with a Risk.
- Data privacy assessments: associate the assessment with a Data Flow.
These relationships help you keep assessments connected to the records they concern.
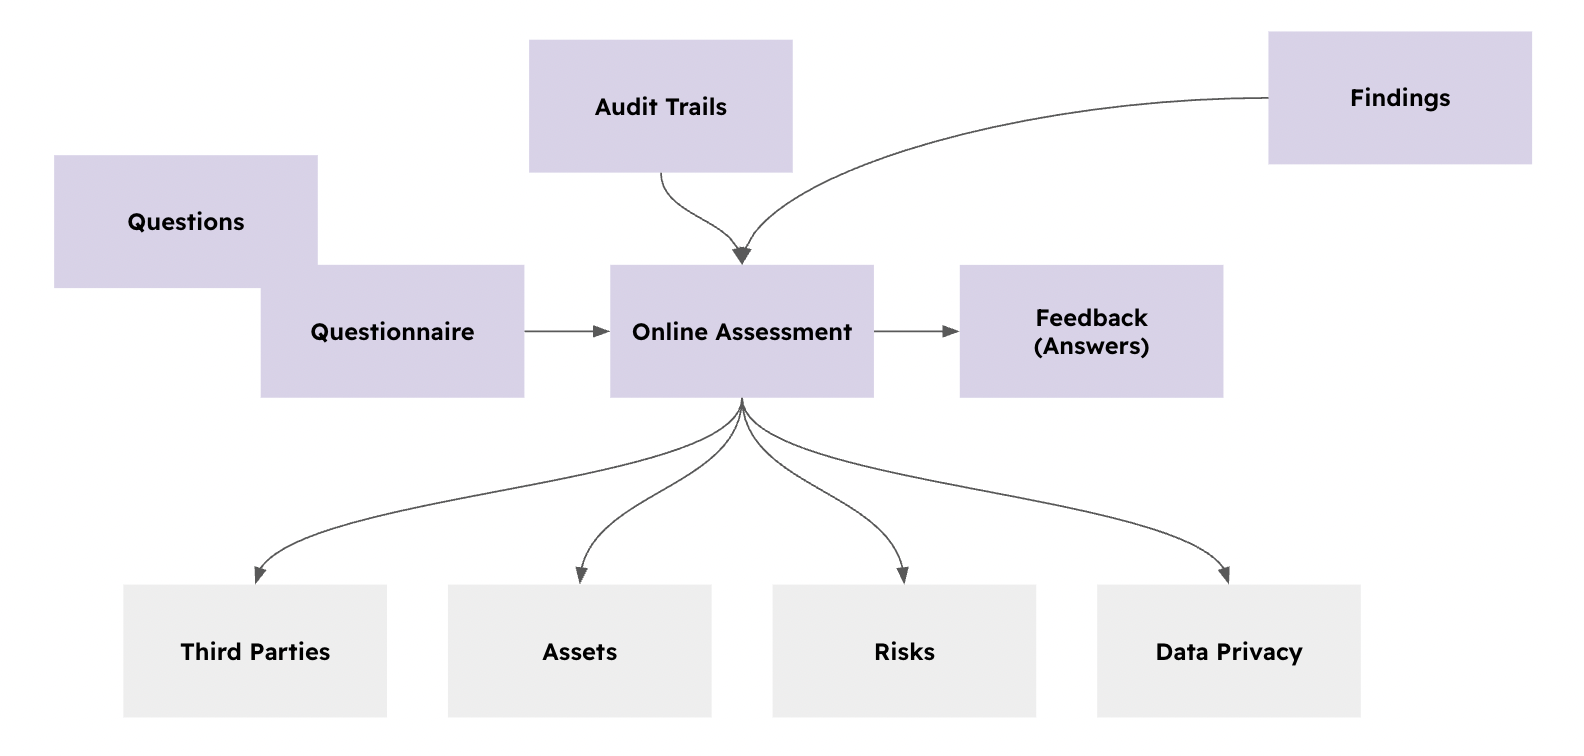
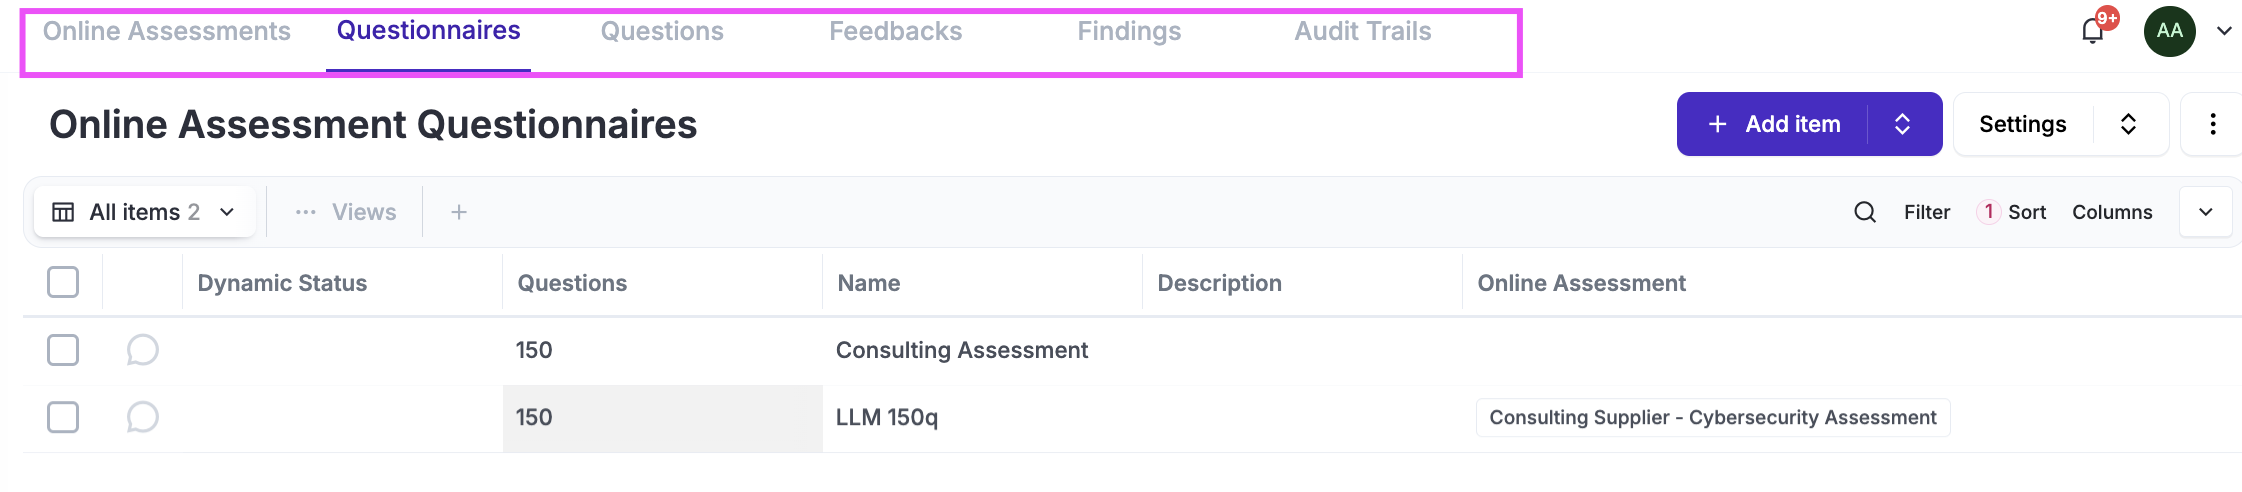
The OA module also includes several tabs that support the assessment process:
- Questionnaires: maintain the library of questionnaires used in your assessments. Each questionnaire contains one or more questions.
- Feedback: view the answers provided by assessment recipients.
- Findings: record issues or gaps that require follow-up.
- Audit Trails: view recorded activity within the module.
Online Assessments
Each time you want someone inside or outside your organisation to complete a questionnaire, create an Online Assessment under Security Operations / Online Assessments.
You can create assessments individually using a form or in bulk using CSV imports. See the CSV Imports documentation for instructions.
The main settings are:
- GRC Assessor and Recipient: identify who reviews the answers and who completes the questionnaire. You can assign users or groups. Notifications must be enabled and configured separately.
- Authentication: choose whether the recipient accesses the OA portal through a magic link or by signing in. A magic link allows access without entering login credentials.
- Questionnaire: select a questionnaire from your library. Once you save the assessment, you cannot change which questionnaire it uses.
- PDF report: optionally allow the recipient to download a report from the portal. Use the Reporting functionality to configure its contents.
- Submit Incomplete: decide whether recipients can submit the assessment before answering every question.
- Start Date and End Date: define when the assessment starts and stops accepting answers. You can also start or stop it manually.
- Recurrence: configure the assessment to repeat automatically. You can choose whether to populate the repeated assessment with previous answers.
After creating an assessment, select it in the Online Assessments list to access actions such as starting or stopping it and obtaining its portal URL.
Questionnaires
Before continuing, review the following common feature documentation: CSV Imports
Questionnaires form a reusable library for your assessments. Prepare them in a spreadsheet and import them into eramba using the questionnaire CSV template. You can use the web interface to make individual changes.
Follow the template instructions carefully. Each row represents a question, and the file must use the required format.
Questionnaires support the following structure and options:
- Chapters: organise questions into sections. Chapters and questions have identifiers, titles, and descriptions.
- Answer types: use dates, dropdowns, multiple-selection dropdowns, open text, or supported combinations of dropdowns and open text.
- Scoring: assign a score to a question and a multiplier to each answer option.
- Conditional questions: display additional questions when a recipient selects a particular answer.
- Warning messages: display guidance based on the selected answer.
For supplier assessments, group suppliers according to the information you need from them before creating your questionnaires. For example, SaaS suppliers and consulting suppliers may need different questions.
Keep questionnaires focused. Every question you ask creates work for both the recipient and the assessor.
Use conditional questions to avoid asking for information that does not apply. For example, ask, “Do you handle personally identifiable information (PII)?” and display the related questions only when the recipient answers Yes.
Scoring can help you identify responses that need attention. Define what higher and lower scores mean, and apply that interpretation consistently throughout the questionnaire.
You can also use an LLM to help draft a questionnaire. Upload the empty CSV template and provide a prompt such as:
“Create a 10-question questionnaire for assessing SaaS suppliers in the eramba Online Assessment module. Use the attached CSV template and follow its instructions. Include relevant security and compliance questions, using dropdowns where appropriate.”
Review the questions and validate the generated file before importing it.
OA Portal
The OA Portal is the website that your OA recipients will access to respond to your questions. Every OA you send out has an associated questionnaire; this is what is shown on the portal.
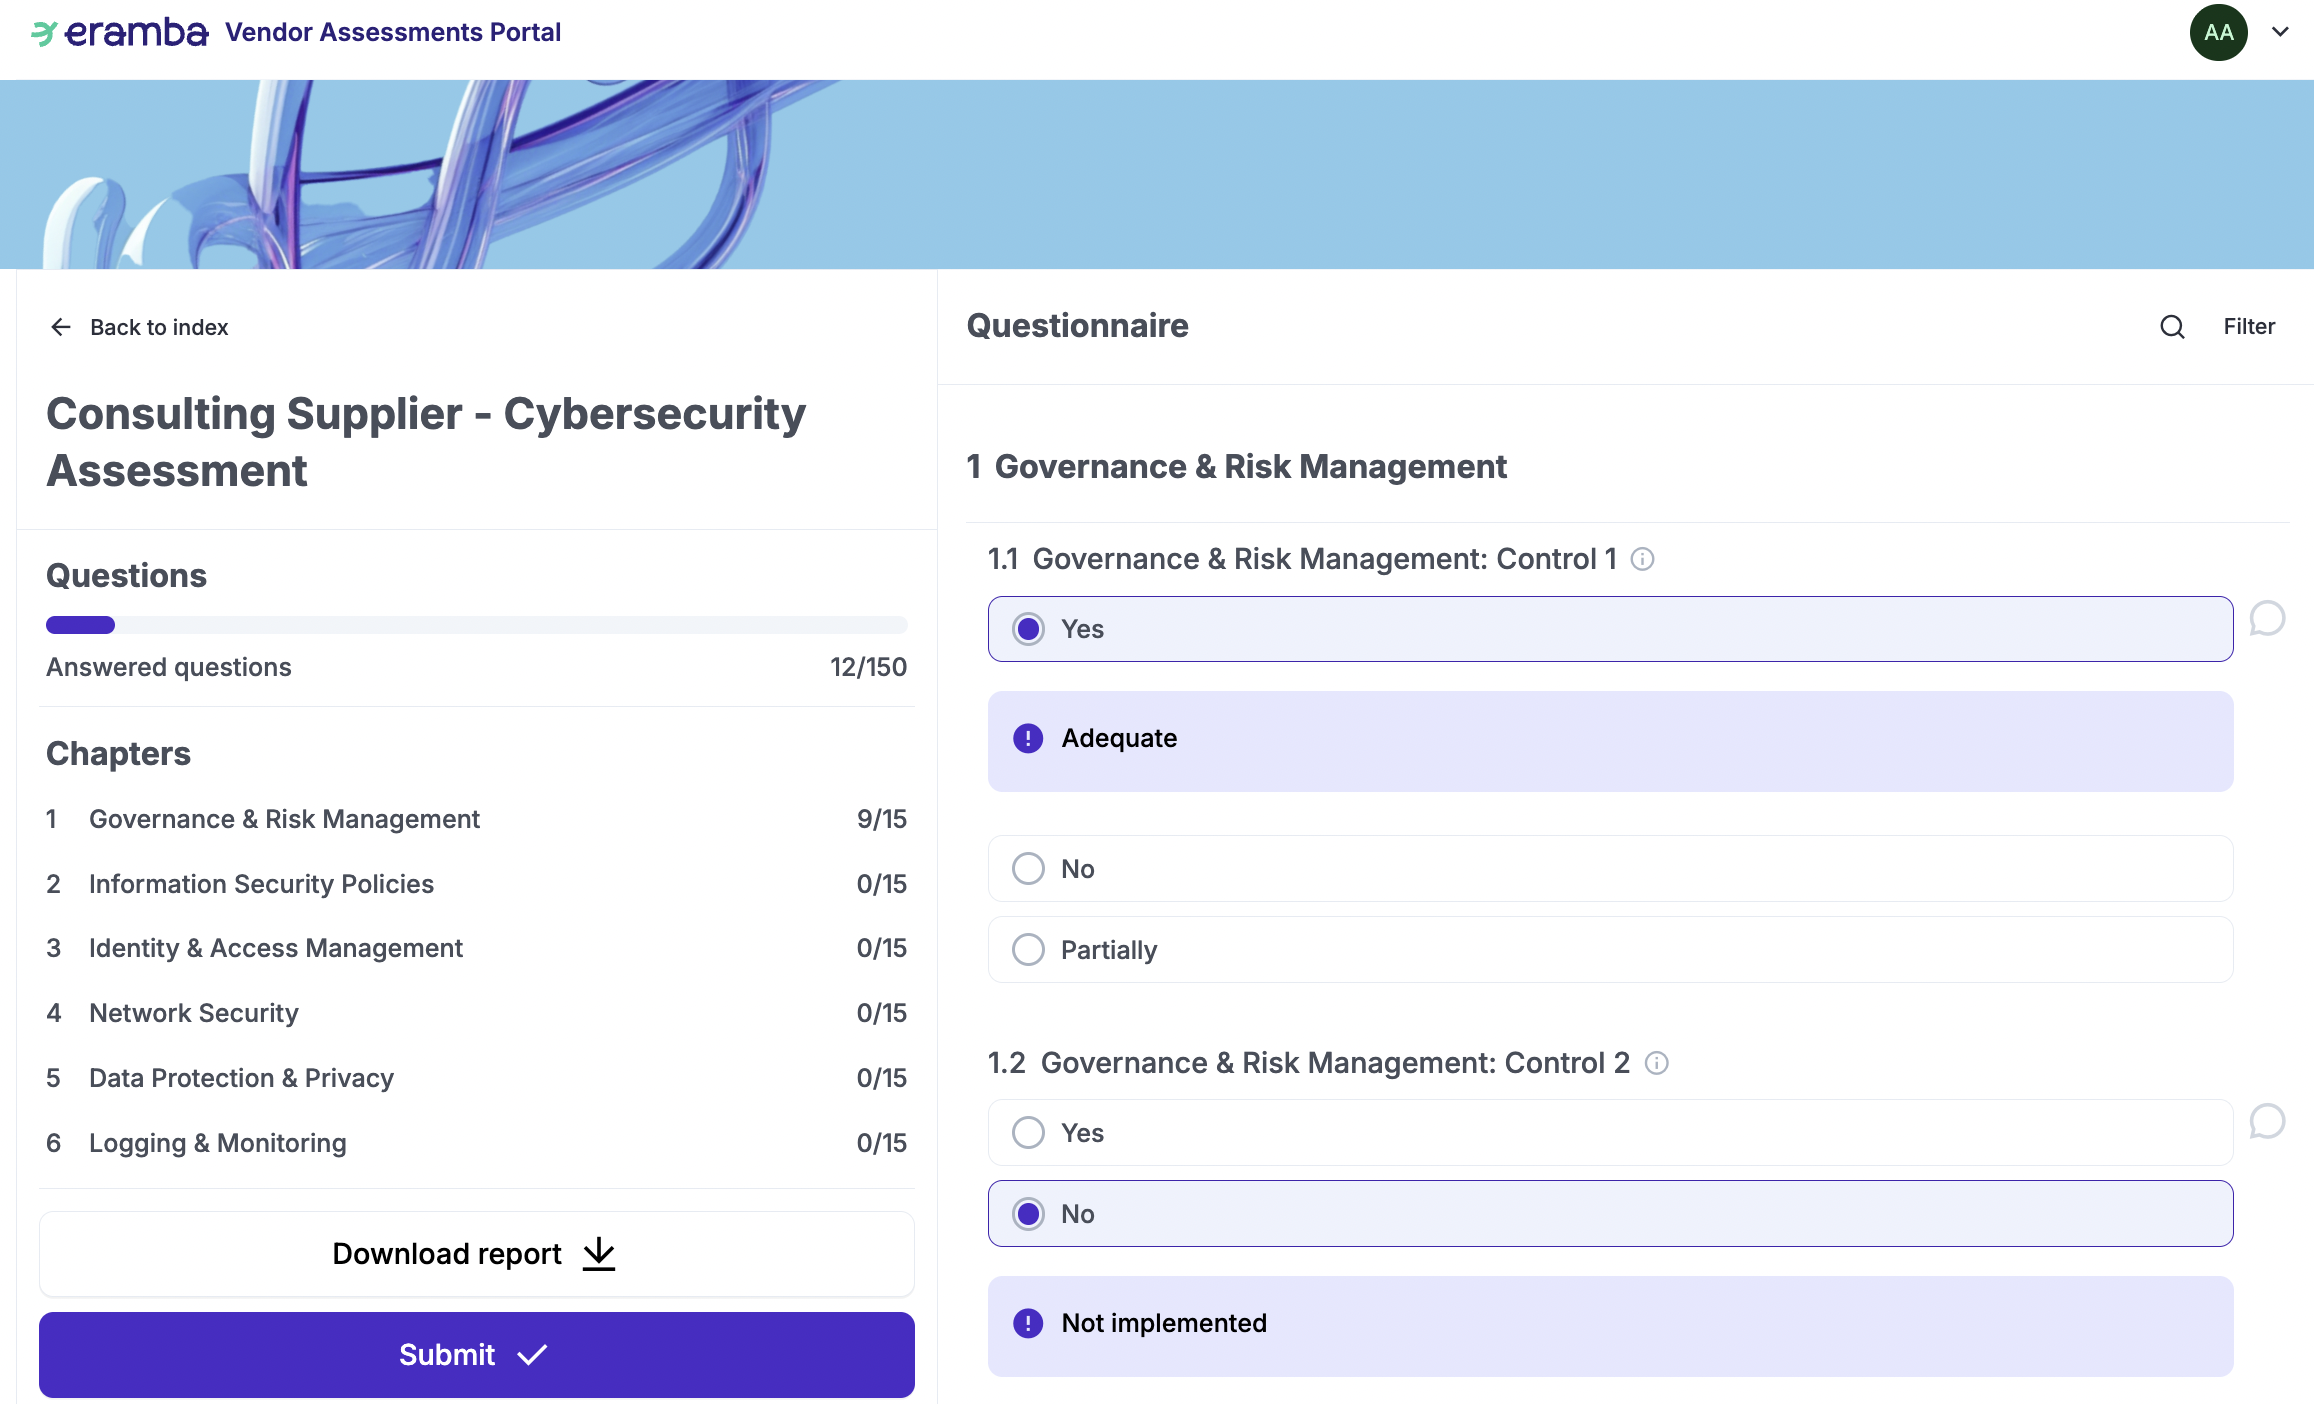
The portal allows recipients to answer questions (which are saved automatically as they are answered), download a report (optional, depending on the OA settings), and submit once ready (the administrator can configure whether this is only possible after all or some questions are answered). The questions shown are derived from your questionnaire settings and can include a multitude of different question types. The recipient can also add attachments if allowed.
Feedback
eramba built in AI agent or MCP clients can easily go over the answers and provide an automated response to your Online Assessments.
The Feedback tab contains the answers provided by assessment recipients. Assessors can review these answers through the Main portal or the OA portal.
To focus on a particular assessment, locate it in the Online Assessments list and use its Feedback shortcut. This filters the feedback to the assessment you selected.
The AI and automation options described later in this course can help analyse responses. Define whether you want them to summarise answers, suggest conclusions, or update particular fields.
OA Review
After a recipient submits an assessment, its status changes to Pending Review. The assessor must review the answers and record a conclusion.
Open the assessment’s feedback and check each answer. The Reviewed column shows which answers have been reviewed; initially, they are marked Not Reviewed.
After reviewing an answer, mark it as Reviewed. You can also use bulk editing to update several answers together.
Once all answers have been reviewed, select the assessment in the Online Assessments list and click Review. Enter your review notes and review date, then save.
The assessment stores its Notes and Review Date. Review notes cannot be edited after the review is complete, so check them carefully before saving.
Findings
After you complete the review, you might want to document issues or gaps that were identified; we do that in the form of Findings. These findings are linked to the specific OA and, optionally, to one or more individual questions within that OA.
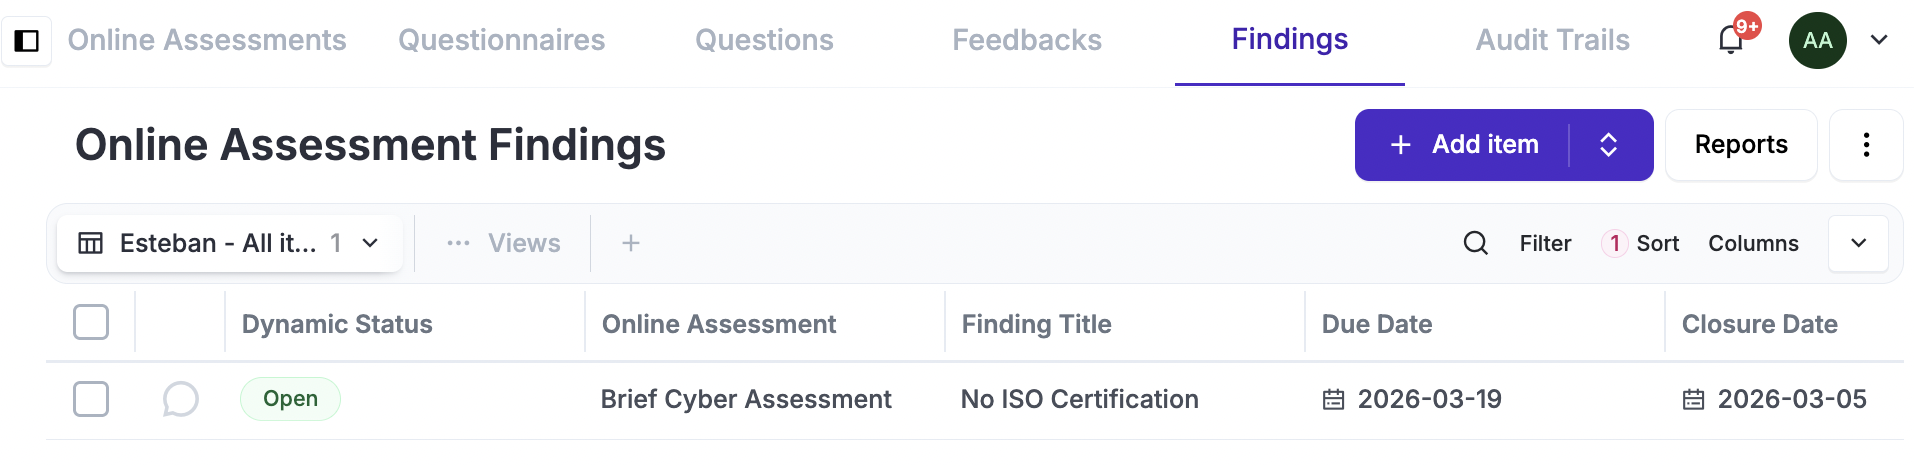
Findings have a Deadline (which can trigger automated notifications) and a Status that can be set to "Open" or "Closed"; this helps you effectively track and manage these findings. Once a Finding is set to "Closed," the "Closure Date" will be automatically updated to reflect that date.
Statuses
Before continuing, review the following common feature documentation: Dynamic Statuses
Online Assessments include predefined dynamic statuses that help you identify their current stage, such as Accepting Answers, Submitted, and Reviewed.
Use these statuses to see which assessments are awaiting responses or require action from the assessor.
Implementation
During implementation, you will complete an assessment from start to finish using a test recipient account. This lets you check the questionnaire, access settings, notifications, and review process before inviting real recipients.
Use email addresses you can access for the test recipient and assessor. Check notification recipients before starting the assessment so that test messages reach only the intended people.
Access Management
Before continuing, review the following common feature documentation: Access Management.
- If this is a new eramba installation, complete the initial Admin account setup, including its password and email address. Use an organisation-managed email address.
- Create a group for your GRC team. Name it according to your department. (How-To)
- If you plan to assess suppliers, optionally create a group for their accounts, such as Suppliers or Vendors. (How-To)
- Create individual user accounts for the GRC team carrying out the implementation. (How-To) Configure each account as follows:
- Groups: assign the Admin group and the GRC group created in step 2.
- Portals: enable the Main and Online Assessments portals.
- Authentication: use local authentication unless you have already configured an external authentication method.
- Create a test recipient account. (How-To) Use it to test permissions and as a reference when configuring future recipient accounts. Configure it as follows:
- Groups: assign No Permissions Allowed and, optionally, the supplier group created in step 3.
- Portal: enable only the Online Assessment portal.
- Authentication: leave authentication disabled if you intend to use magic-link access. Enable local authentication and set a password if you intend to test authenticated access.
- Email: use an address whose inbox you can access so you can verify notification delivery.
- Log out of the Admin account and continue using your individual GRC account.
- Optionally configure SAML, Google OAuth, or LDAP authentication. (How-To)
- Enable the OA portal under System / Settings / Authentication.
At this stage, create only the accounts needed for implementation and testing.
Questionnaire
Before continuing, review the following common feature documentation: CSV Import.
Prepare your questionnaires as CSV files and import them into eramba. Use the web interface for individual corrections where needed. If you use an LLM to help prepare the CSV, review both the questions and the file structure before importing it.
- Identify the groups you intend to assess, such as SaaS suppliers or departments within your organisation.
- Prepare an appropriate questionnaire for each group using the CSV template. Follow the CSV Imports documentation for formatting instructions. (How-To)
- Import the questionnaires through Online Assessments / Questionnaires / Import. (How-To)
- Check the imported questions and their settings. If corrections are needed, edit them through the web interface. During this preparation stage, you can also delete the test questionnaire and import a corrected version. (How-To)
Set Up Basic Notifications
Before continuing, review the following common feature documentation: Notifications.
Enable the basic notifications that support the assessment process. These notifications are disabled by default and must be configured in the relevant module under Common Features / Notifications.
For each notification, check its recipients and adjust the subject and body. Make sure any portal link matches the intended recipient’s access method. During implementation, use your test recipient and GRC team accounts.
- In the Online Assessments module, open Common Features / Notifications and enable the Warning notification Online Assessment has been Initiated. Configure it to notify the recipient when the assessment starts.
- In the Online Assessments module, open Common Features / Notifications and enable the Warning notification Online Assessment has been Submitted. Configure it to notify the assessor when the answers are ready for review.
- In the Feedback module, open Common Features / Notifications and configure the Comments & Attachments notifications for the assessor and recipient. Check the recipients and portal links separately for each notification.
When you complete the test assessment in the following steps, confirm that:
- Starting the assessment sends the recipient an invitation.
- Submitting the assessment notifies the assessor.
- Adding a comment or attachment notifies the intended participants.
- Each email contains a working link to the appropriate portal.
Create Third Party (Optional)
Before continuing, review the following supporting module documentation: Business Units, Assets and Third Parties
- Create a Third Party in the Organisation / Third Party module. Set its contact to the test account created earlier. (How-To)
Create Test OA
It is recommended to first create a test OA to ensure you fully understand how the module works, in particular if you have enabled notifications.
- Create an OA, paying particular attention to the following fields:
- Assessor Contact: select your GRC group and confirm that your account belongs to it.
- Recipient: select the test recipient account.
- Authentication: choose the access method you intend to test. For authenticated access, make sure you have the test account’s password. We recommend using non-authenticated access through a magic link.
- Submit Incomplete: enable this if you want to test submission without answering every question. Before using real recipients, also test the setting you intend to use in operation.
- Questionnaire: select the questionnaire you prepared.
- Timeline: set the Start Date and End Date to tomorrow.
- Recurrence: leave recurrence disabled for this initial test.
- Start the assessment manually so you can test it immediately rather than waiting until tomorrow. You can also stop the assessment manually at any time. (How-To)
- Flush the notification email queue using the procedure in the how-to guide, then check the test recipient’s inbox for the invitation. (How-To)
- Access the OA as the Recipient. Confirm that the invitation link opens the OA portal using the expected access method. (How-To)
- Complete and submit the assessment. Test the answer types, conditional questions, and any enabled comments or attachments. Confirm that the assessor receives the submission notification. (How-To)
- Access the OA as the Assessor. (How-To)
- Review each answer in the OA portal and mark it as Reviewed. (How-To) You can also review answers through the Main portal, where bulk editing lets you mark several answers as reviewed together. (How-To)
- Once all answers have been reviewed, select the assessment’s checkbox and click Review. Enter your assessment notes and review date, check them carefully, and save. Review notes cannot be edited after the review is complete. (How-To)
The test is complete when the recipient can access and submit the questionnaire, the assessor can review it, and the expected notifications reach the correct inboxes.
Understanding OA Statistics
The OA has by default a set of columns that show important information:
MISSING SCREENSHOT/VIDEO
- Missing Answer: this shows the percentage of questions not responded, it factors conditional questions (remember that you could set 100 question of which 90 are not shown)
- Score: there are three options, current, total and conditional. They show the maximum possible score (assuming no conditionals) and score based on conditional questions.
- Reviewed: this is important as it shows the % of questions that are missing your review, without this you can not fully complete the OA process.
Record OA Result (Optional)
Before continuing, review the following common feature documentation: Customisations.
You may want to record an assessment result, such as Pass/Fail, or a risk level, such as High, Medium, or Low.
You can store the result on the assessment itself or on an associated record, such as a Third Party or Asset. You may also want to record the last assessment date and the next assessment date.
Use custom fields to capture the information your organisation needs:
- Decide where each result should be stored: on the OA, on associated records, or on both. Create the required custom fields in the relevant modules. (How-To)
- Update your views to display the custom fields created in the previous step. (How-To)
- Optionally configure Dynamic Status rules to highlight records based on their custom field values. (How-To)
Unless you configure automations, you must update these fields manually.
Feedback Findings (Optional)
If an assessment identifies an issue or gap that requires follow-up, record it as a finding.
- In the Findings module, create a finding and associate it with the assessment. Where relevant, link it to the specific questions that identified the issue. Describe what needs to be addressed, assign an owner, and set a deadline. (How-To)
Use the finding’s status to track whether the issue remains open or has been closed.
Basic Module Configurations
Before continuing, review the following common feature documentation: User Interface and Customisations
Using your GRC account, apply the following configurations to each module used in your implementation, such as Online Assessments, Feedback, Findings, and Third Parties.
- Adjust the form fields using Customisations. (How-To)
- Configure your default views and select useful columns: (How-To)
- Online Assessments: title, assessor, recipient, dates, and statuses.
- Feedback: associated assessment, question, answer, and review status.
- Findings: associated assessment, deadline, and status.
- Third Parties: name, contact, and any assessment result fields you created.
- Configure default views for other users. (How-To)
- Optionally pin useful system views. (How-To)
- Optionally create additional views for assessments awaiting responses, assessments pending review, and open findings. (How-To)
- Optionally configure Dynamic Status rules to highlight records requiring attention. (How-To)
- Optionally create a report showing assessment progress, results, and outstanding findings. (How-To)
- Optionally schedule the report using Notifications: (How-To)
- Recipients: select the appropriate GRC group.
- Frequency: choose how often to send it.
- Subject and body: explain what recipients should review.
Check the configured views and any reports using your test records. If scheduled reporting is enabled, confirm that emails reach the intended recipients.
Operational Steps Summary (Optional)
Repeat the test assessment until you are comfortable with the complete process. Confirm that access, questionnaires, notifications, and reviews work as expected before inviting real recipients.
For supplier assessments, follow this process:
- Create the supplier’s recipient account. Use the permissions and authentication settings described in this guide. Enter the recipient’s actual email address.
- Create or select the Third Party. Assign the supplier’s recipient account as its contact.
- Create the assessment. Select the appropriate questionnaire, assign the assessor and recipient, and associate the assessment with the Third Party. Set the start and end dates and, if required, configure recurrence.
- Start the assessment. Start it manually or allow it to start automatically on its configured Start Date. Confirm that the recipient receives the invitation.
- Monitor progress. Track outstanding responses and approaching deadlines. Follow up with recipients who need assistance or have not submitted their assessment.
- Review the submitted answers. Check the responses and supporting evidence, request clarification where needed, and mark each answer as reviewed.
- Complete the OA review. Record your assessment conclusion and review date. Check your notes before saving, as they cannot be edited afterwards.
- Record the results. If you configured result fields on the OA or Third Party, update them to reflect your conclusion.
- Follow up on findings. Where issues require action, create findings with owners and deadlines. Monitor them until they are resolved and closed.
- Plan the next assessment. Decide when the supplier should be assessed again. Use recurrence if configured, or record the next assessment date through your chosen process.
Advanced Configurations (Optional)
The standard implementation is enough to operate Online Assessments. This section shows how to combine common features to reduce manual work and identify records requiring attention.
Scenario
We will use a supplier onboarding scenario: Finance maintains a supplier list, and your GRC team needs to record new suppliers in eramba and assess them.
The example combines three features:
- Custom fields store supplier details, such as the Finance Supplier ID, address, and country.
- Dynamic Status highlights Third Parties with missing supplier details so the GRC team can identify and complete them.
- Automations periodically read the Finance list, identify new suppliers, and create their Third Party records and associated Online Assessments.
Start with custom fields and Dynamic Status, maintaining supplier records manually. Add automation only if the volume of suppliers or frequency of updates justifies it.
Complete the standard implementation before following this example. Review the linked common-feature documentation and test with fictional suppliers before processing real data.
Prepare Supplier Fields
Before continuing, review the Customisations documentation.
Using your GRC account:
- In the Third Party module, create fields for details not already covered by existing fields: (How-To)
- Finance Supplier ID: Short Text.
- Supplier Address: Paragraph.
- Supplier Country: Short Text.
- Add these fields to your Third Party view. (How-To)
- Create a fictional supplier with a Finance Supplier ID and address. Leave Supplier Country empty for the next test.
Use the identifier assigned by Finance to match suppliers consistently. Do not rely on the supplier name alone.
Configure Dynamic Status
Before continuing, review the Dynamic Status documentation.
- In the Third Party module, create a Dynamic Status rule: (How-To)
- Name: Supplier Details Incomplete.
- Conditions: Finance Supplier ID, Supplier Address, or Supplier Country is empty.
- Logic: match any of these conditions.
- Confirm that the label appears on your test supplier.
- Complete Supplier Country and confirm that the label disappears.
- Optionally create a view showing suppliers with this label so the GRC team can follow up. (How-To)
This status identifies missing information. It does not prevent record creation or stop an assessment unless you explicitly implement that behaviour.
Automate Supplier Onboarding
Before continuing, review the Automations documentation.
Create Automation
Prepare and test a recurrent automation that: (How-To)
- Reads the Finance list and matches suppliers using Finance Supplier ID.
- Creates new Third Parties and populates their supplier fields.
- Creates or matches recipient accounts using the agreed access settings.
- Creates an associated OA using the agreed assessment configuration.
- Records successes and failures, avoiding duplicate Third Parties or assessments when rerun.
The Supplier Details Incomplete status highlights records whose required supplier fields remain empty. The GRC team uses the filtered view to resolve these gaps.
This requires a script adapted to your Finance source and the record-creation actions supported by your installation.
Test the Process
Use fictional suppliers to check that:
- A new supplier produces the expected Third Party and OA.
- Missing supplier details produce the expected Dynamic Status.
- Completing those details removes the label.
- Running the automation again does not create duplicates.
- A failed step is logged and can be retried without duplicating records already created.
Review the automation logs and generated records before enabling the recurring schedule. (How-To)
How-To Guides
Access Management — reusable across courses
- Create a group.
- Create a GRC team user account and assign groups, portals, and authentication.
- Create an OA recipient account for magic-link or authenticated access.
- Configure SAML authentication.
- Configure Google OAuth authentication.
- Configure LDAP authentication.
Questionnaires
- Prepare an OA questionnaire CSV, including chapters, answer types, scoring, and conditional questions.
- Import an OA questionnaire.
- Edit questionnaire questions through the web interface.
- Delete a test questionnaire and import a corrected version.
Assessment workflow
- Create a Third Party and assign its contact.
- Start and stop an OA.
- Flush the notification email queue.
- Access an assessment as the recipient.
- Complete and submit an assessment.
- Access an assessment as the assessor.
- Review answers through the OA portal.
- Review answers through the Main portal, including bulk editing.
- Complete the final OA review and record assessment notes.
- Create a finding and link it to an assessment and specific questions.
Customisation and views — reusable across courses
- Create custom fields to record assessment results.
- Configure Dynamic Status rules based on custom field values.
- Customise module forms.
- Create a default view and configure its columns.
- Configure a default view for other users.
- Pin system views.
- Create additional filtered views.
Advanced automations — optional
- Configure an automation to analyse submitted answers using an LLM and update result fields.
- Configure an integration to create a Third Party and optionally an OA from another system.
Additional guides I recommend adding markers for
These actions appear in the implementation but currently lack their own (How-To) marker:
- Enable the OA portal.
- Create an OA and configure its recipients, questionnaire, authentication, dates, and recurrence.
- Configure and test OA invitation, submission, and feedback notifications.
- Understand OA statistics and scoring, using a worked example.
For shared features, an existing recording can satisfy the requirement—link to it from this course. The introductory video is separate from this checklist.