OVF Installation
Learn how to install eramba community or enterprise using and OVF image compatible with VMWARE, AWS, Azure, Etc.
Skills & Support
Even on our VMWARE install guides, you will require Linux know-how, a proper virtualization infrastructure running in AWS, Azure or your Premises and attention to detail. If you think you might not have these resources then ask for help to your IT departments.
We can not support community users with install related questions, thousands of installs take place every year so we know the software works. Read the FAQ to understand what your options are.
If you are an Enterprise customer and are having trouble feel free to drop us an email to support@eramba.org and we'll try to help you. While installing eramba for you is not part of our service we do try to help under certain conditions. Review our FAQ.
Introduction
Eramba comes pre-installed on an OVF image that runs a standard Ubuntu Linux system, and on top of that, our Docker images. You can import the OVF image to any compatible system such as AWS, Azure and VMWARE platforms.
While the OVF has all installed, there will still be adjustments to be made in particular in regards to TLS certificates, so you will need some Linux knowledge to make these changes.
Hardware Requirements
The docker engine needs to be configured so the following requirements are available to the images:
-
Minimum Requirements:
-
64-bit kernel and CPU support for virtualization
-
1 vCPUs
-
At least 4 GB of RAM plus 10 GB on Swap
-
-
Recommended Requirements:
-
64-bit kernel and CPU support for virtualization
-
2 vCPUs
-
8 GB of RAM
-
As for storage required for eramba data (this is database plus attachments you upload to the system) we recommend at least 3 GB.
OVF Compatibility
The OVF image we provide is version 14.x, you need to check in the case of VMWARE if this version is compatible with your ESX environement.
Download
If you are trying to download the community, please use the links below:
https://downloadseramba.s3.eu-west-1.amazonaws.com/CommunityVM/3280/eramba.ovf
https://downloadseramba.s3.eu-west-1.amazonaws.com/CommunityVM/3280/eramba.mf
https://downloadseramba.s3.eu-west-1.amazonaws.com/CommunityVM/3280/eramba-disk1.vmdk
If you are trying to download enterprise, use your license keys to download the software from https://downloads.eramba.org/
Login Credentials
After importing the image, you need to log in to the Linux system running there. The Ubuntu default login credentials are username “eramba” and password “eramba”, you can later “sudo bash” to access root privileges.
Set a fixed IP Address
The VM will, by default, use DHCP to obtain an IP. If that works (depends on where you load the VM, etc.), eramba will show you the IP as soon as you log in. If you don't see an IP, you need to review the settings you used when you loaded the VM or try setting up a fixed ip (as per ubuntu guides).
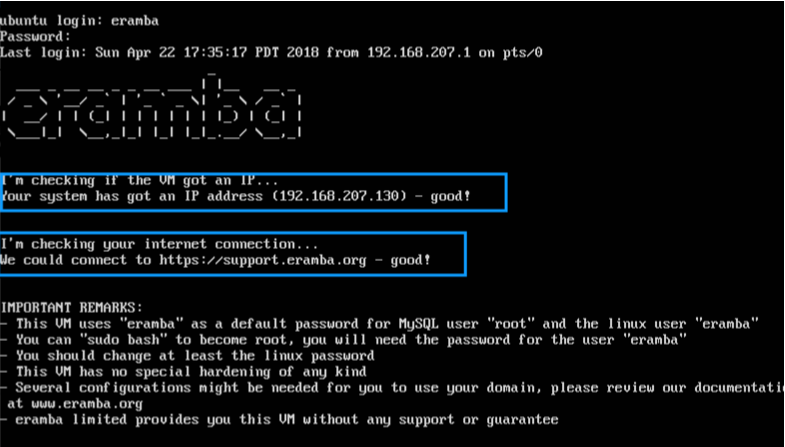
Although you can use a DHCP leased IP to run the system, we recommend you obtain a fixed IP from your system administrator and set that in the Linux system. Please review Ubuntu configuration guides on how to set a fixed IP.
Internet Connectivity
You need to ensure the VM can reach our update servers. This is required to register your app, get updates, and send error logs to us. To test your outgoing connections, you can run the following:
curl https://support-v3.eramba.org/ping.html
You need to "successfully" connect to our servers to use eramba, you can not use eramba in "offline" mode.
If you are behind a proxy, then you need to define proxy settings in the:
/docker/.env
You need to edit the proxy settings on the file:
USE_PROXY= #1 for yes, 0 for no
PROXY_HOST=
PROXY_PORT=
USE_PROXY_AUTH= #1 for yes, 0 for no
PROXY_AUTH_USER=
PROXY_AUTH_PASS=
*if you are behind the proxy, you have to setup proxy for docker client as well. Please refer to docker documentation here.
Public Address Settings
You have to setup the public address that eramba will be using, it will be the IP address of your host machine or the DNS settings you configured.
It has to be done again in env file.
/docker/.env
by default, it is set to
PUBLIC_ADDRESS=https://localhost:8443
TLS and Apache Settings
By default, eramba has a self-signed certificate and runs on port 8443 (Encrypted). If you want to use your certificates or tweak the Apache configuration, you need to replace the following files:
- /apache/ssl/mycert.crt
- /apache/ssl/mycert.key
- /apache/vhost-ssl.conf
If you are using a certificate file with the name mycert.crt/key, change them in the location above. No other modifications are needed.
If you are using certificate files with different names, you will also need to adjust the docker-compose.simple-install.yml file.
Until you configure a proper certificate, every time you log into eramba, you will see a warning on your browser regarding the "self-signed" certificate being used.
Database Credentials
You can update MySQL credentials from defaults.
Edit the .env file and update the following variables DB_PASSWORD and MYSQL_ROOT_PASSWORD. These will be the passwords used by eramba and the password for the root account in MySQL.
DB_PASSWORD=Your_DB_user_P@ssw0rd
MYSQL_ROOT_PASSWORD=Your_MysQl_ROOt_P@ssw0rd
Install Community
You need to install the community using Dockers. Go to the docker directory:
cd /home/docker/
Run the composer that will get Community installed:
docker compose -f docker-compose.simple-install.yml up -d
Let the command finish, and eramba will be running.
We recommend you contact your Linux administrator, update your credentials, and harden the system to your standards.
Install Enterprise
Go to the docker directory:
cd /home/docker/
Run the composer that will get eramba enterprise installed:
docker compose -f docker-compose.simple-install.yml -f docker-compose.simple-install.enterprise.yml up -d
Let the command finish, and eramba will be running.
Container Logs
As the container, networks and volumes are created and started, you should be looking at the logs of the different containers to see when and how they complete their job. They will run different processes after starting, and these processes must complete, in particular, the eramba container. You can tail logs from the eramba container with the command:
docker logs -f eramba
Typically the last process running on the container is Apache, so if you see that process running (even with a hostname warning), only then should you try login into eramba using the web browser.
Using connection: default
Dry-run mode: disabled
-------------------------------------------------------------------------------
Waiting for database...
Connection to Mysql could not be established: SQLSTATE[HY000] [2002] Connection refused
Using connection: default
Dry-run mode: disabled
-------------------------------------------------------------------------------
Starting the init process...
Database is currently not empty.
Database appears to be up to date.
Running post process...
All done.
AH00558: apache2: Could not reliably determine the server's fully qualified domain name, using 172.19.0.4. Set the 'ServerName' directive globally to suppress this message
[Mon Nov 14 08:30:35.120253 2022] [ssl:warn] [pid 1] AH01909: 172.19.0.4:443:0 server certificate does NOT include an ID which matches the server name
AH00558: apache2: Could not reliably determine the server's fully qualified domain name, using 172.19.0.4. Set the 'ServerName' directive globally to suppress this message
[Mon Nov 14 08:30:35.158371 2022] [ssl:warn] [pid 1] AH01909: 172.19.0.4:443:0 server certificate does NOT include an ID which matches the server name
[Mon Nov 14 08:30:35.162398 2022] [mpm_prefork:notice] [pid 1] AH00163: Apache/2.4.53 (Debian) PHP/8.1.7 OpenSSL/1.1.1n configured -- resuming normal operations
[Mon Nov 14 08:30:35.162443 2022] [core:notice] [pid 1] AH00094: Command line: 'apache2 -D FOREGROUND'
Login Screen - Community
You should now be able to login to eramba using https://localhost:8443 (or your DNS name https://yourdns.com)
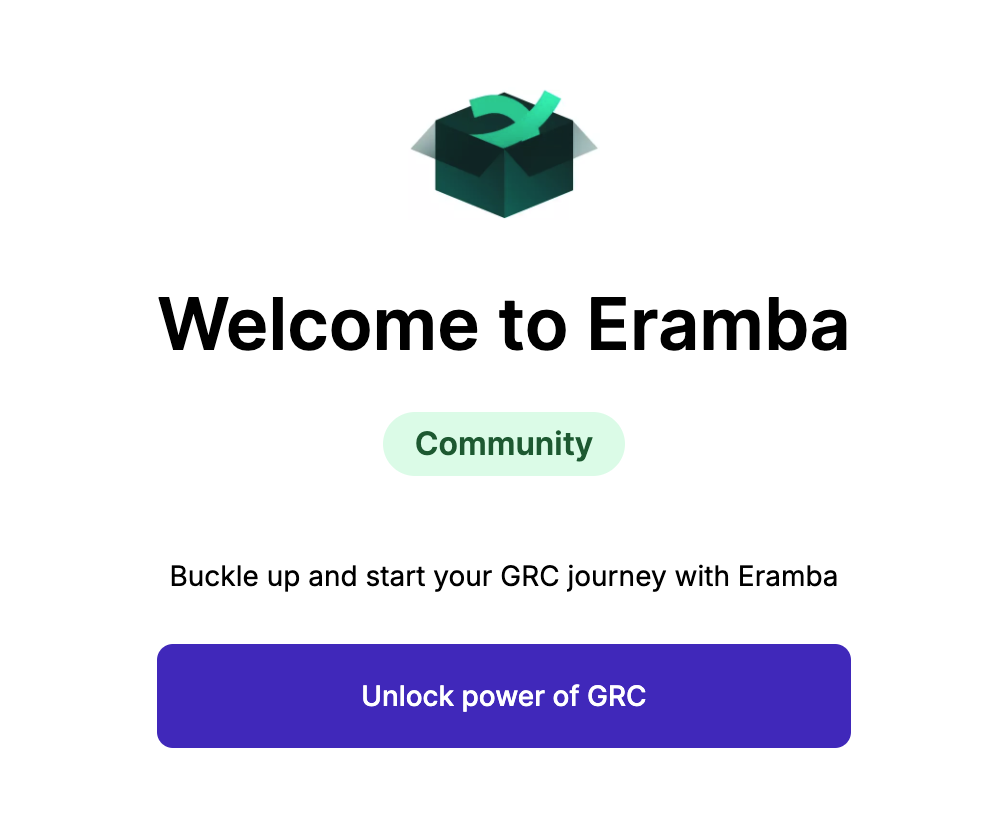
Click on the Unlock power of GRC and you will be prompted to set the following:
- Password
- Admin Email
- Country
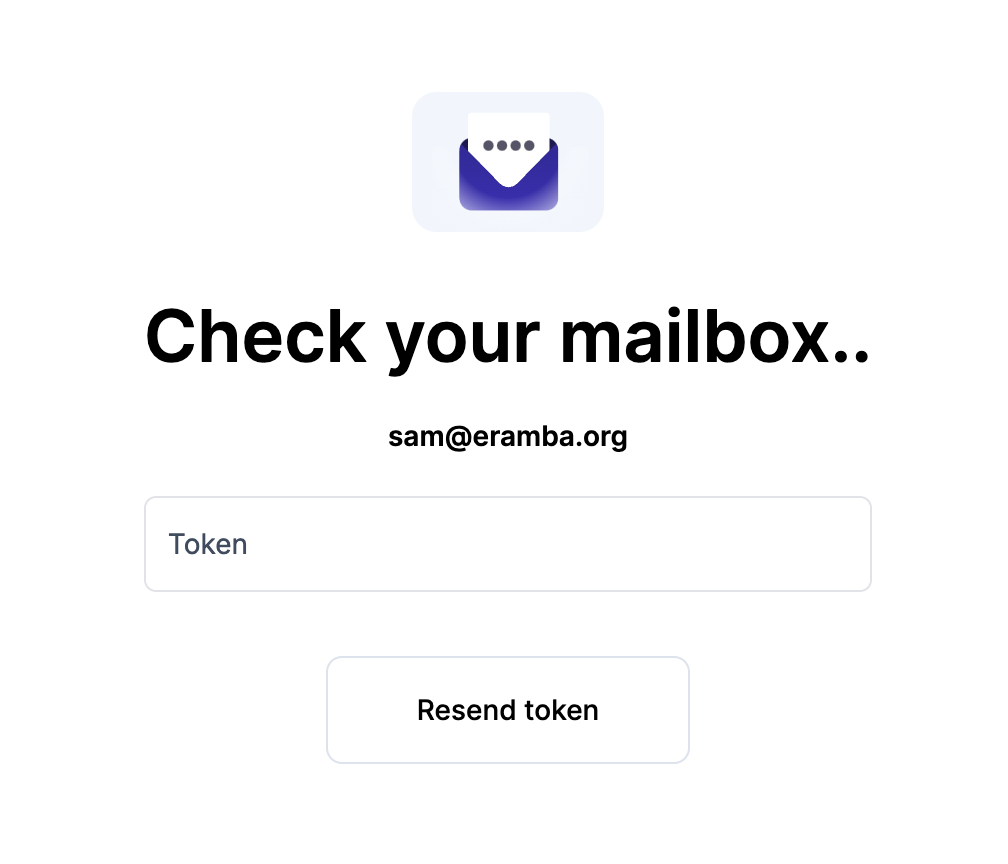
You will receive an activation token to the email that you just inserted.
Now you are set!
Login Screen - Enterprise
You should now be able to login to eramba using https://localhost:8443 (or your DNS name https://yourdns.com)

Click on the Unlock power of GRC and you will be prompted to set the following:
- Password
- Admin Email
- Country
Now you are set. Now you need to complete the Basic Configurations guide.