Course Introduction
Access Management in eramba defines how users authenticate, what they are allowed to do, and what data they are allowed to see across the platform.
Primarly this course requires you to undertand "Theory". Implementing a core eramba "Use Case" require this module, for that reason these "Use Case" guides make constant regerence to this course "Theory" and "How-To" sections.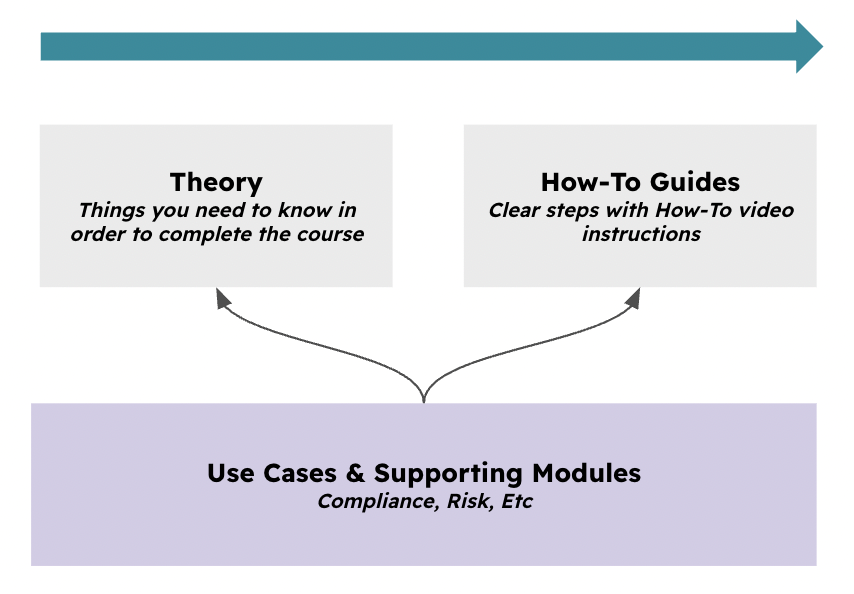
Typical Scenarios
This chapter describes common access management scenarios:
-
Users only view the items that relate to them.
-
Allowing GRC administrators full access across all modules.
-
Granting auditors read-only access to all items, regardless of ownership.
-
Restricting access to specific modules.
-
Controlling which parts of the interface users can interact with and which actions they are allowed to perform.
-
Restricting access between different portals (Main, Policy, Awareness, Account Reviews, Online Assessments).
-
Integrating eramba with external identity providers using SAML, LDAP, or Google OAuth.
Supported Versions
This guide applies to both on-premise and cloud deployments, and is valid for Enterprise and Community versions of eramba.
Scope
Access Management applies globally across eramba.
All "Use Cases" and "Supporting Modules" require access management concepts in slightly different ways; these modules include the steps required to implement access depending on the specific module you are working with.
Theory
Account Types
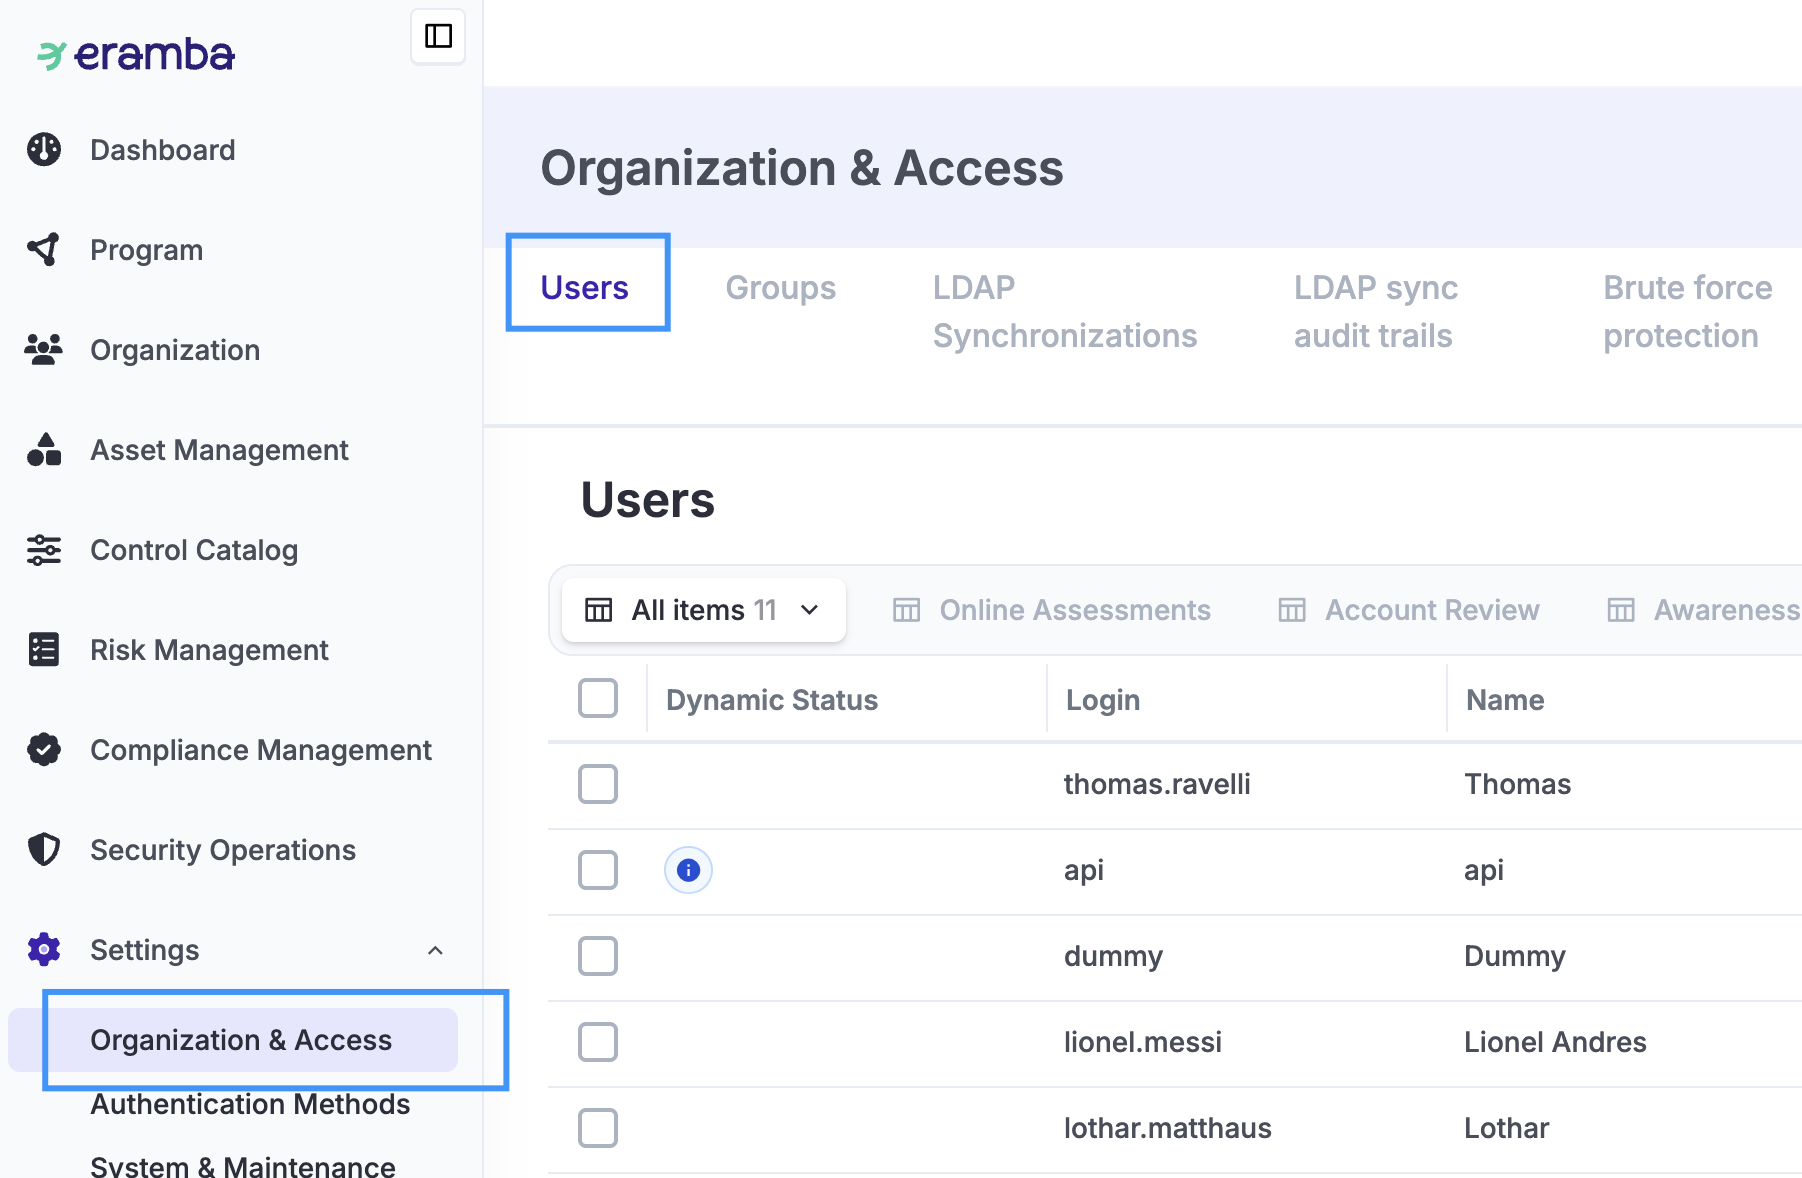
While all accounts are managed from a central place (Settings / Organization & Access / Users), you can think of two groups of accounts:
- GRC Accounts (those that belong to members of the GRC team)
- Others (IT, Sales, Human Resources, Suppliers, etc.)
GRC people are mostly interested in importing information into eramba (risks, controls, policies, etc.), and the “Others” will provide feedback at times of review (control testing, policy reviews, risk reviews, etc.).
When using eramba, you will need to define two things in regard to access management:
- Where they can "Click" (what features they can access)
- What "Data" they can "See" (what Risks, Policies, Etc)
Typically, the GRC department will have much broader access than the “Others.” This course is all about how to control these two aspects.
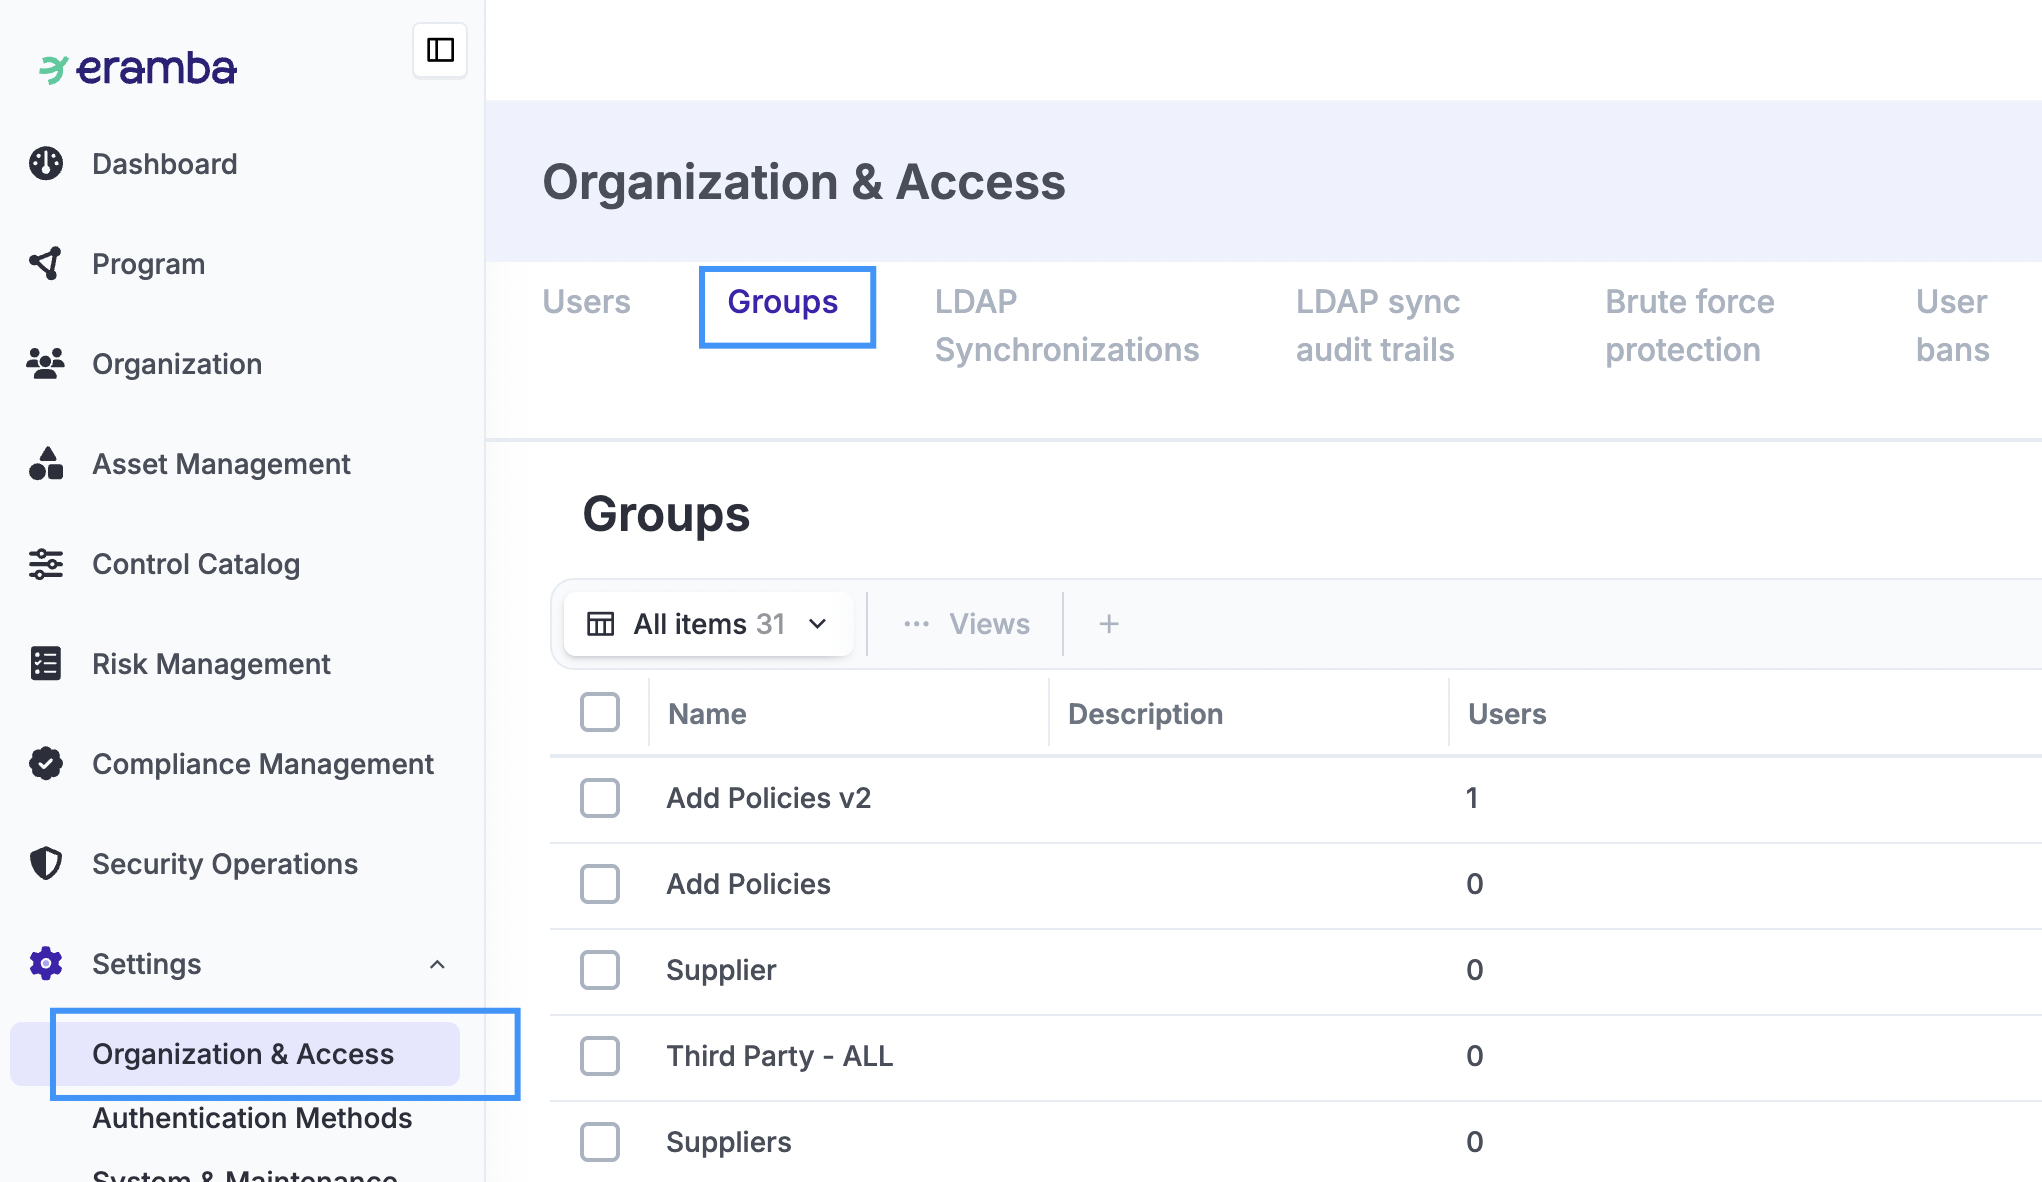
Groups
Groups are the foundation of access management in eramba, the are managed in Settings / Organization & Access / Users. Groups is what controls where people can "Click" and what data they can "See".
Every user account in eramba must have at least two groups, each one of them defining:
-
Where the user works (departments, for example: Finance, HR, IT, Etc) and therefore what data they can see. We will call them "Department" groups.
-
Where the user can access to the system, where they can or can not click. We call them "Permission" groups.
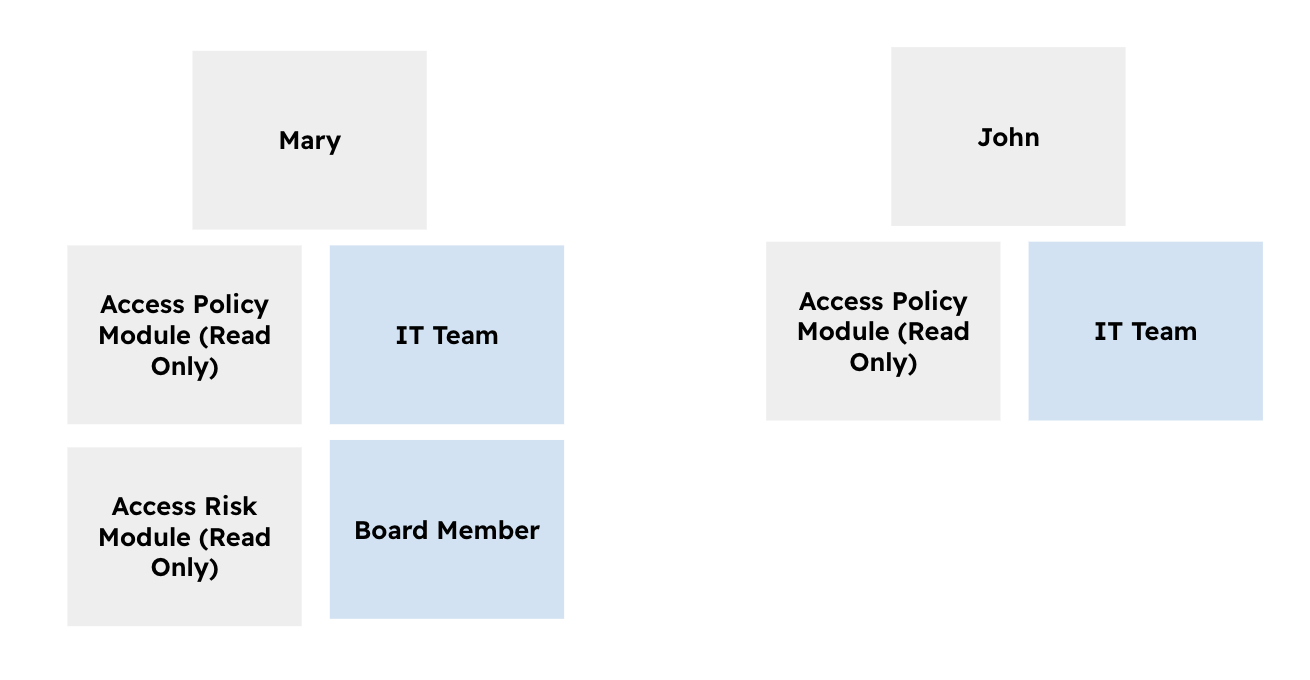
The diagram above illustrates a few typical scenarios:
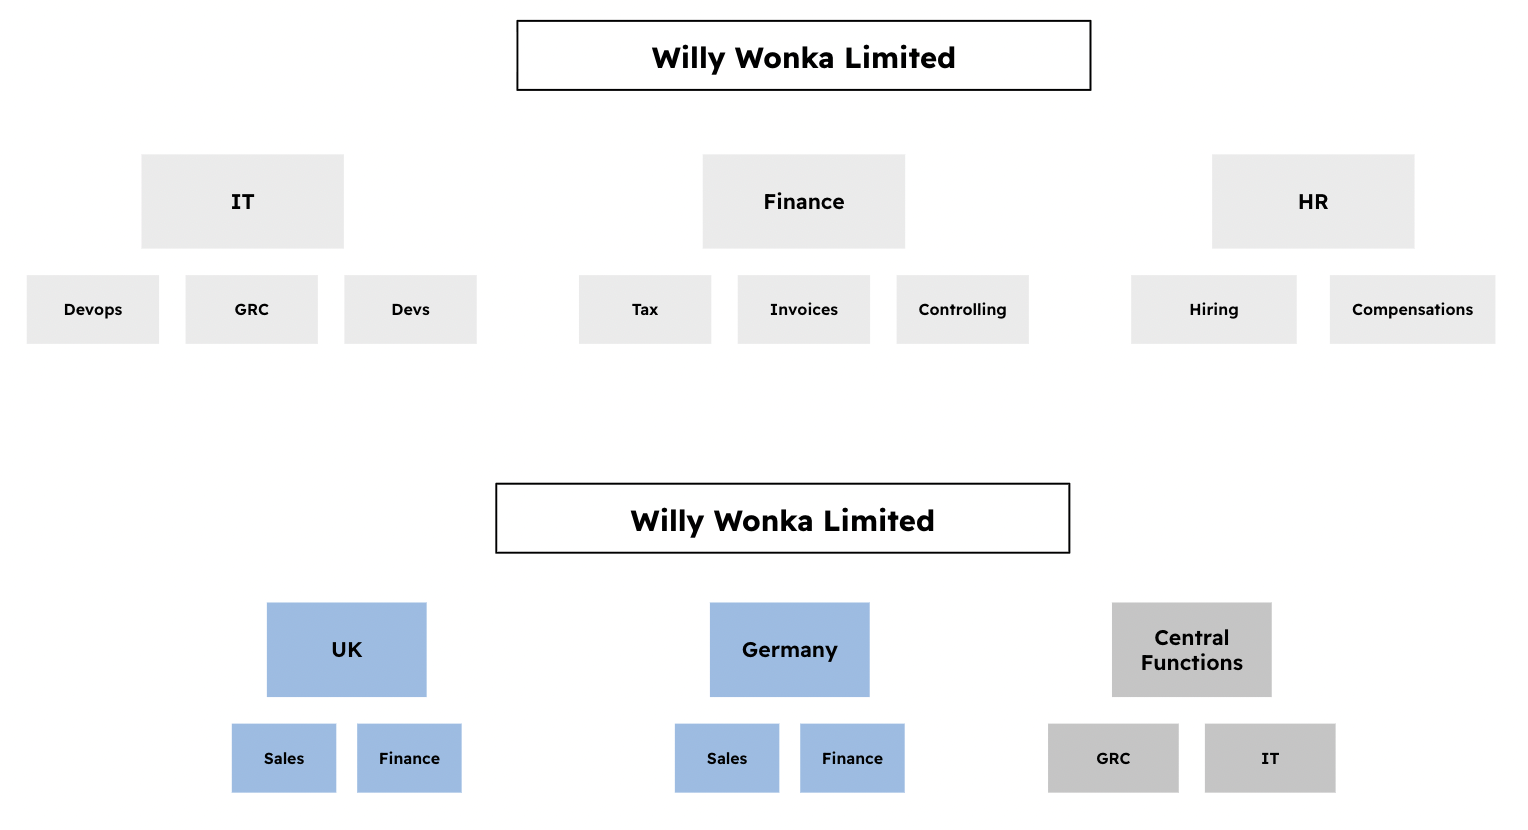
- Mary has four groups assigned to her: two groups describe where she works (for example, IT Team and Board Member), and two groups describe what she is allowed to do in Eramba.
- John has two groups assigned to him: one that describes where he works (IT Team) and one that defines what he can do in Eramba.
When managing groups, Eramba does not distinguish between Department groups and Permission groups. The difference is identified solely by the group name and the naming convention you use.
Visualize Data
Every module in eramba (such as Risks, Controls, Policies, and others) typically defines two “Roles”:
- One role is the “GRC Contact” (where your GRC department/group will typically be assigned).
- The other “Role” will have a different name depending on the module (Policy Reviewer, Control Operator, etc.). Most of the time, this group will be assigned to the “Others” (IT, Sales, Human Resources), depending on the item.
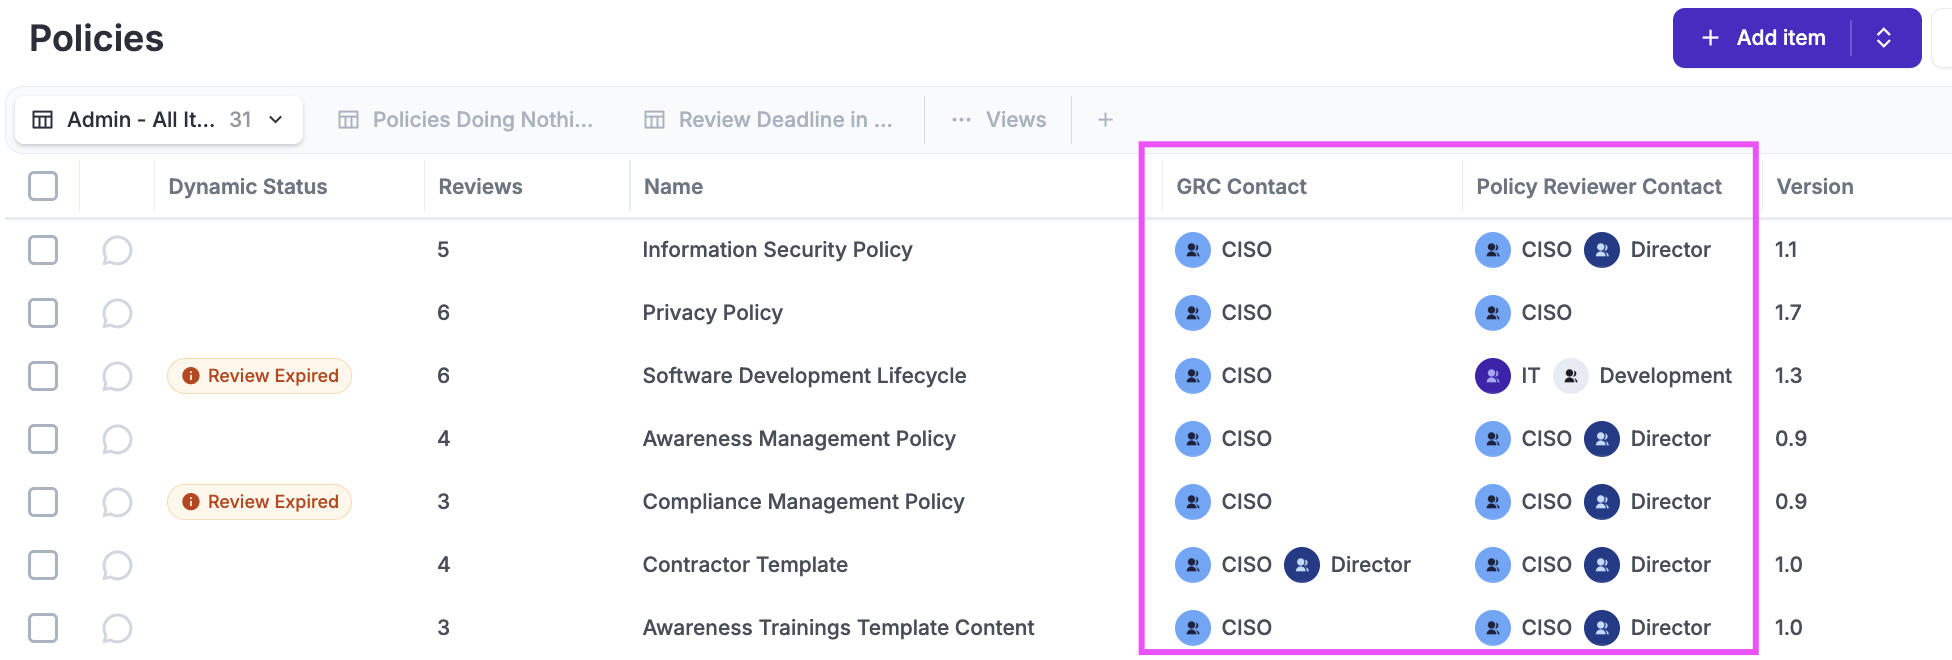
These roles can be renamed, and additional roles can be added if needed, using the common Customization common feature.
When a user accesses any module, eramba will display only the items (policies, risks, etc.) related to the group where that person works. In the image above, if the logged-in user worked in “IT,” eramba would only display the “Software Development Lifecycle” policy to that person because it is the only one related to “IT.”
It is very important that you assign the right “Groups” to your items to make sure people see only the items they need to see, and nothing else. User accounts that are members of the “Admin” group can see all items, no matter who owns them.
When creating Department groups we recommend:
-
Only create "Groups" in eramba for the departments in your organisation you know will own items. If you know Finance has nothing to do with eramba, you do not need a "Finance" group.
-
Use Consistent Naming Conventions: Use clear identifiers to distinguish between locations or functions. For example, use
UK_FinanceorGermany_Finance.
-
Only create “Groups” for departments that have someone who will be able to provide you with “Feedback.” If your IT team is composed of three small teams (Developers, Support, and Networks), but these teams ultimately have no leaders, then it is best to create only one group, “IT,” instead of “IT - Developers,” “IT - Support,” and “IT - Networks.”
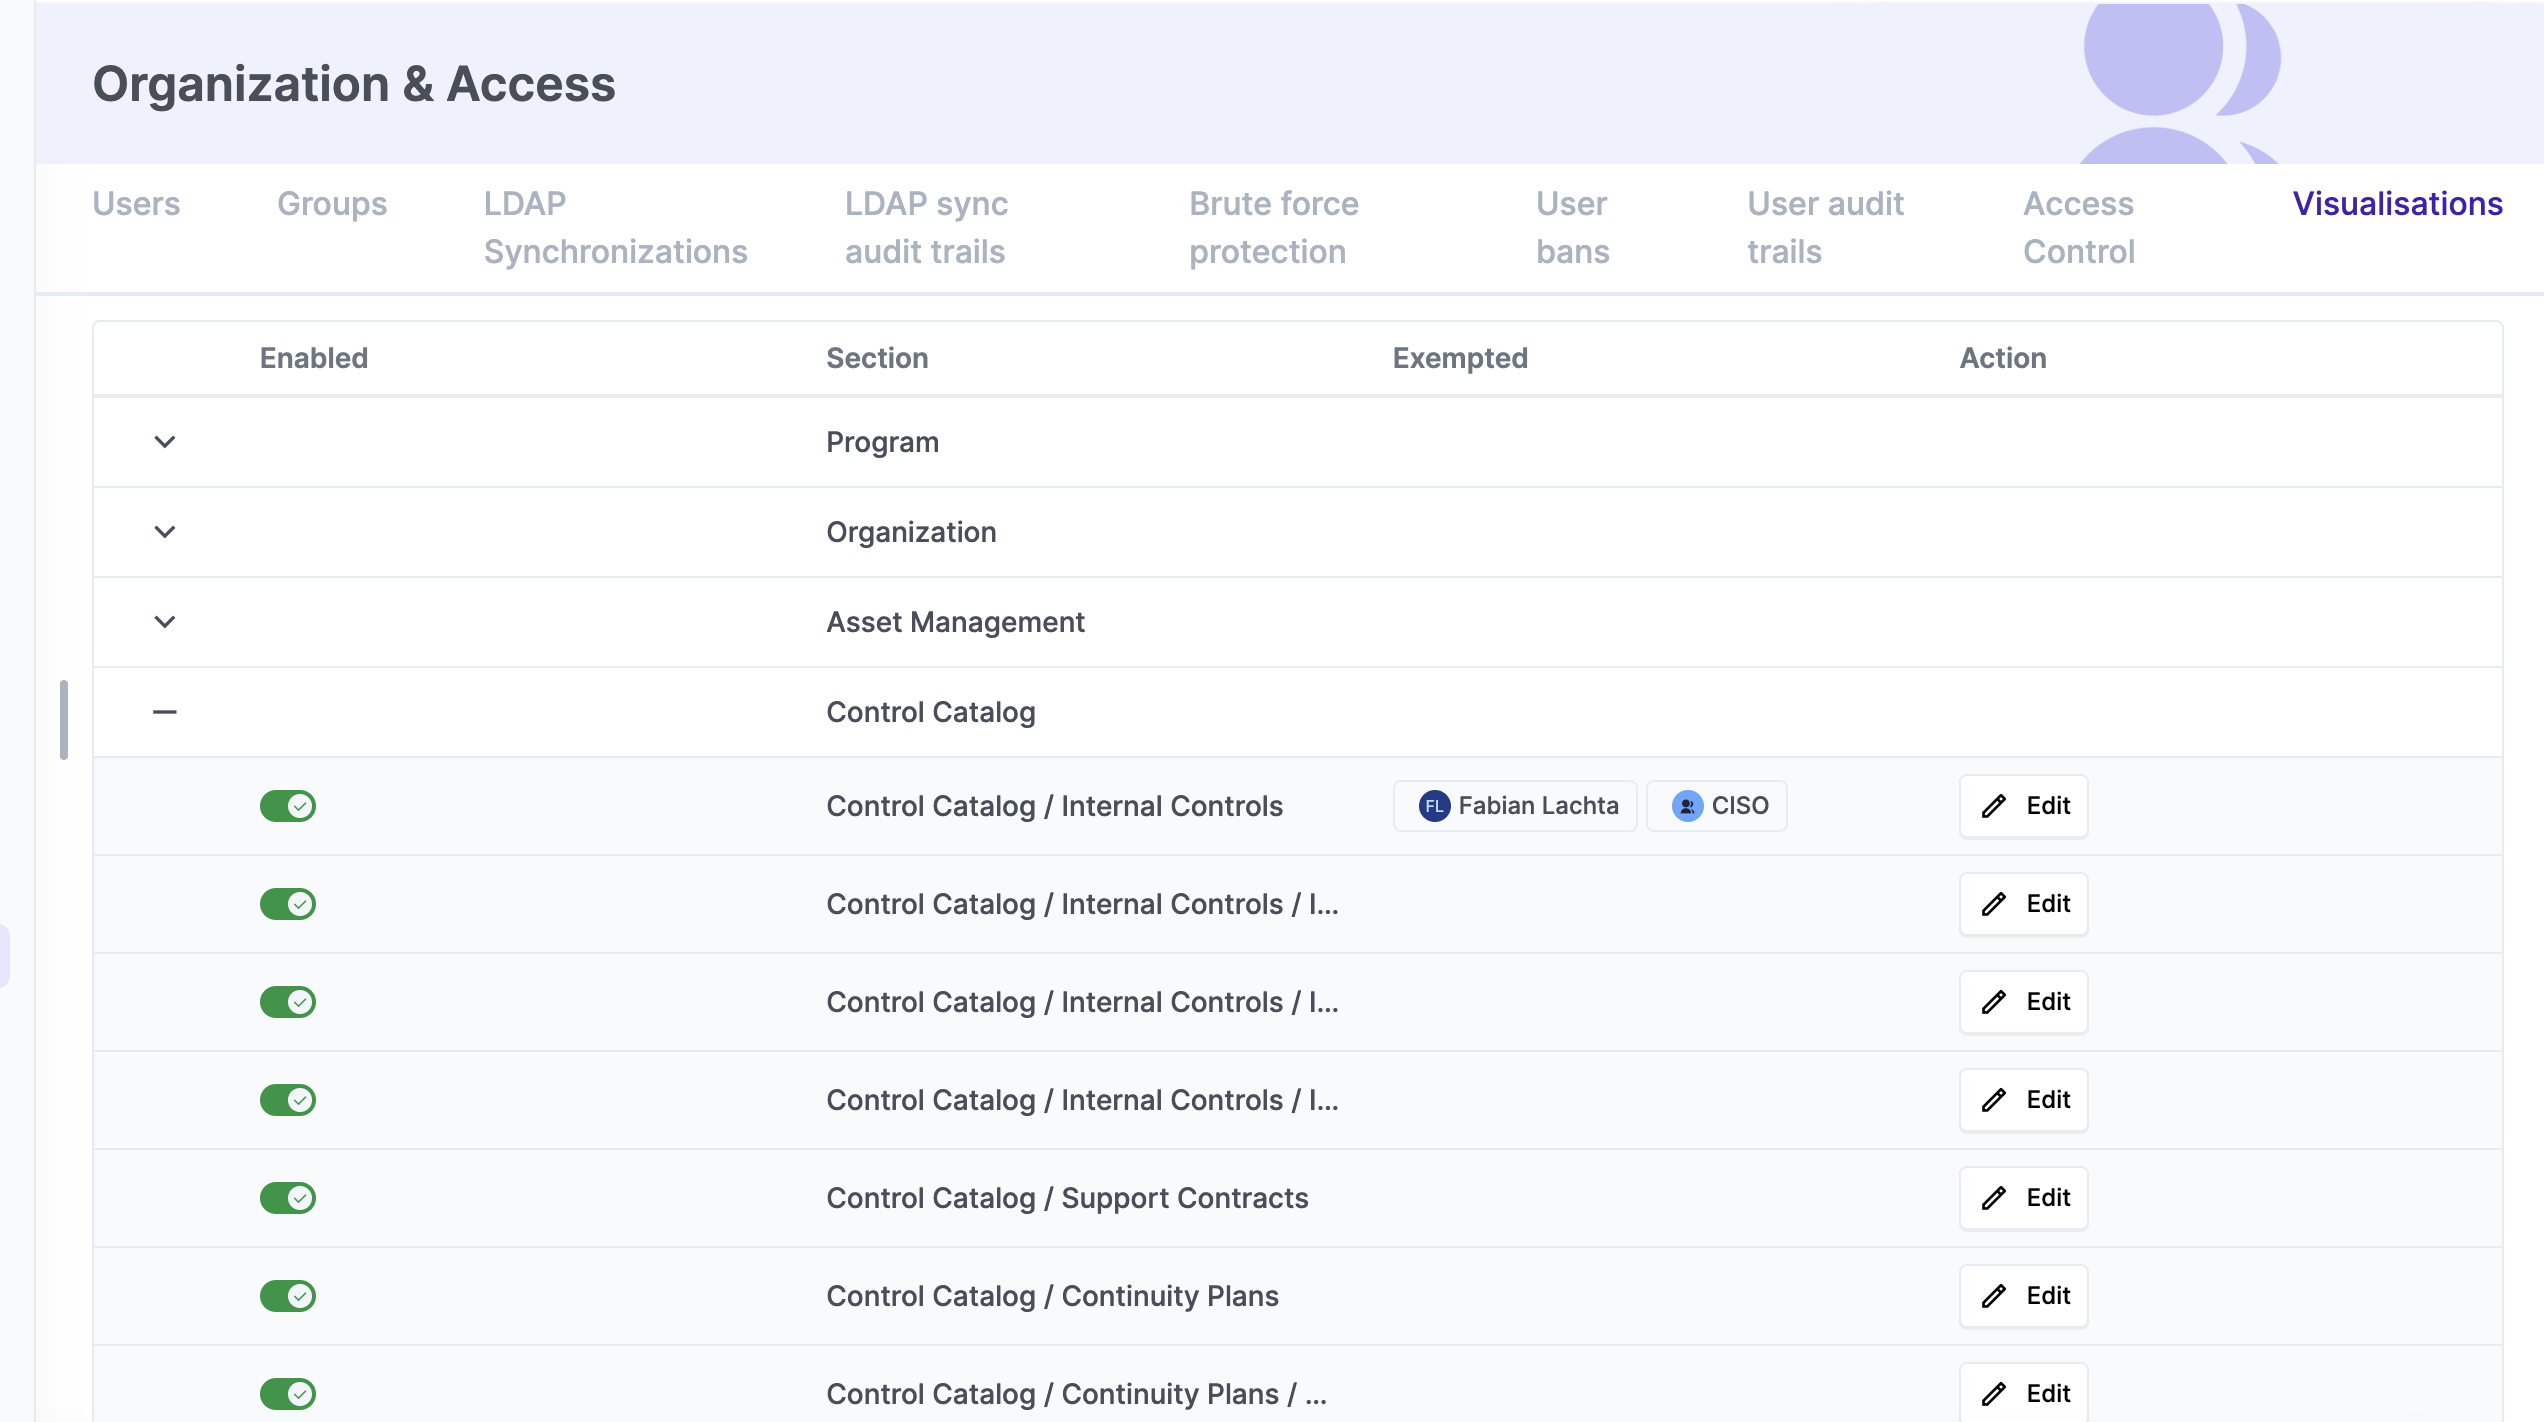
In some instances, you may want a non-admin group member to see all items in a module, even if that person is not related to them. A typical example is External Auditors. To grant such permissions, you need to “Exempt” them from the “Visualization” rule we have been explaining.
Under System / Organization & Access / Visualizations, you can choose which groups/users are exempted from this rule for each module. In the screenshot below you can see that CISO group and the user Fabian Lachta can view all Internal Controls, even if those controls are not assigned to them.
Control Feature Access
When we create a user account, we assign at least two groups: one tells us where the person works (department), and the other tells us where the person can “access” in eramba, meaning where the person can “click.” We will now focus on the latter type of group.
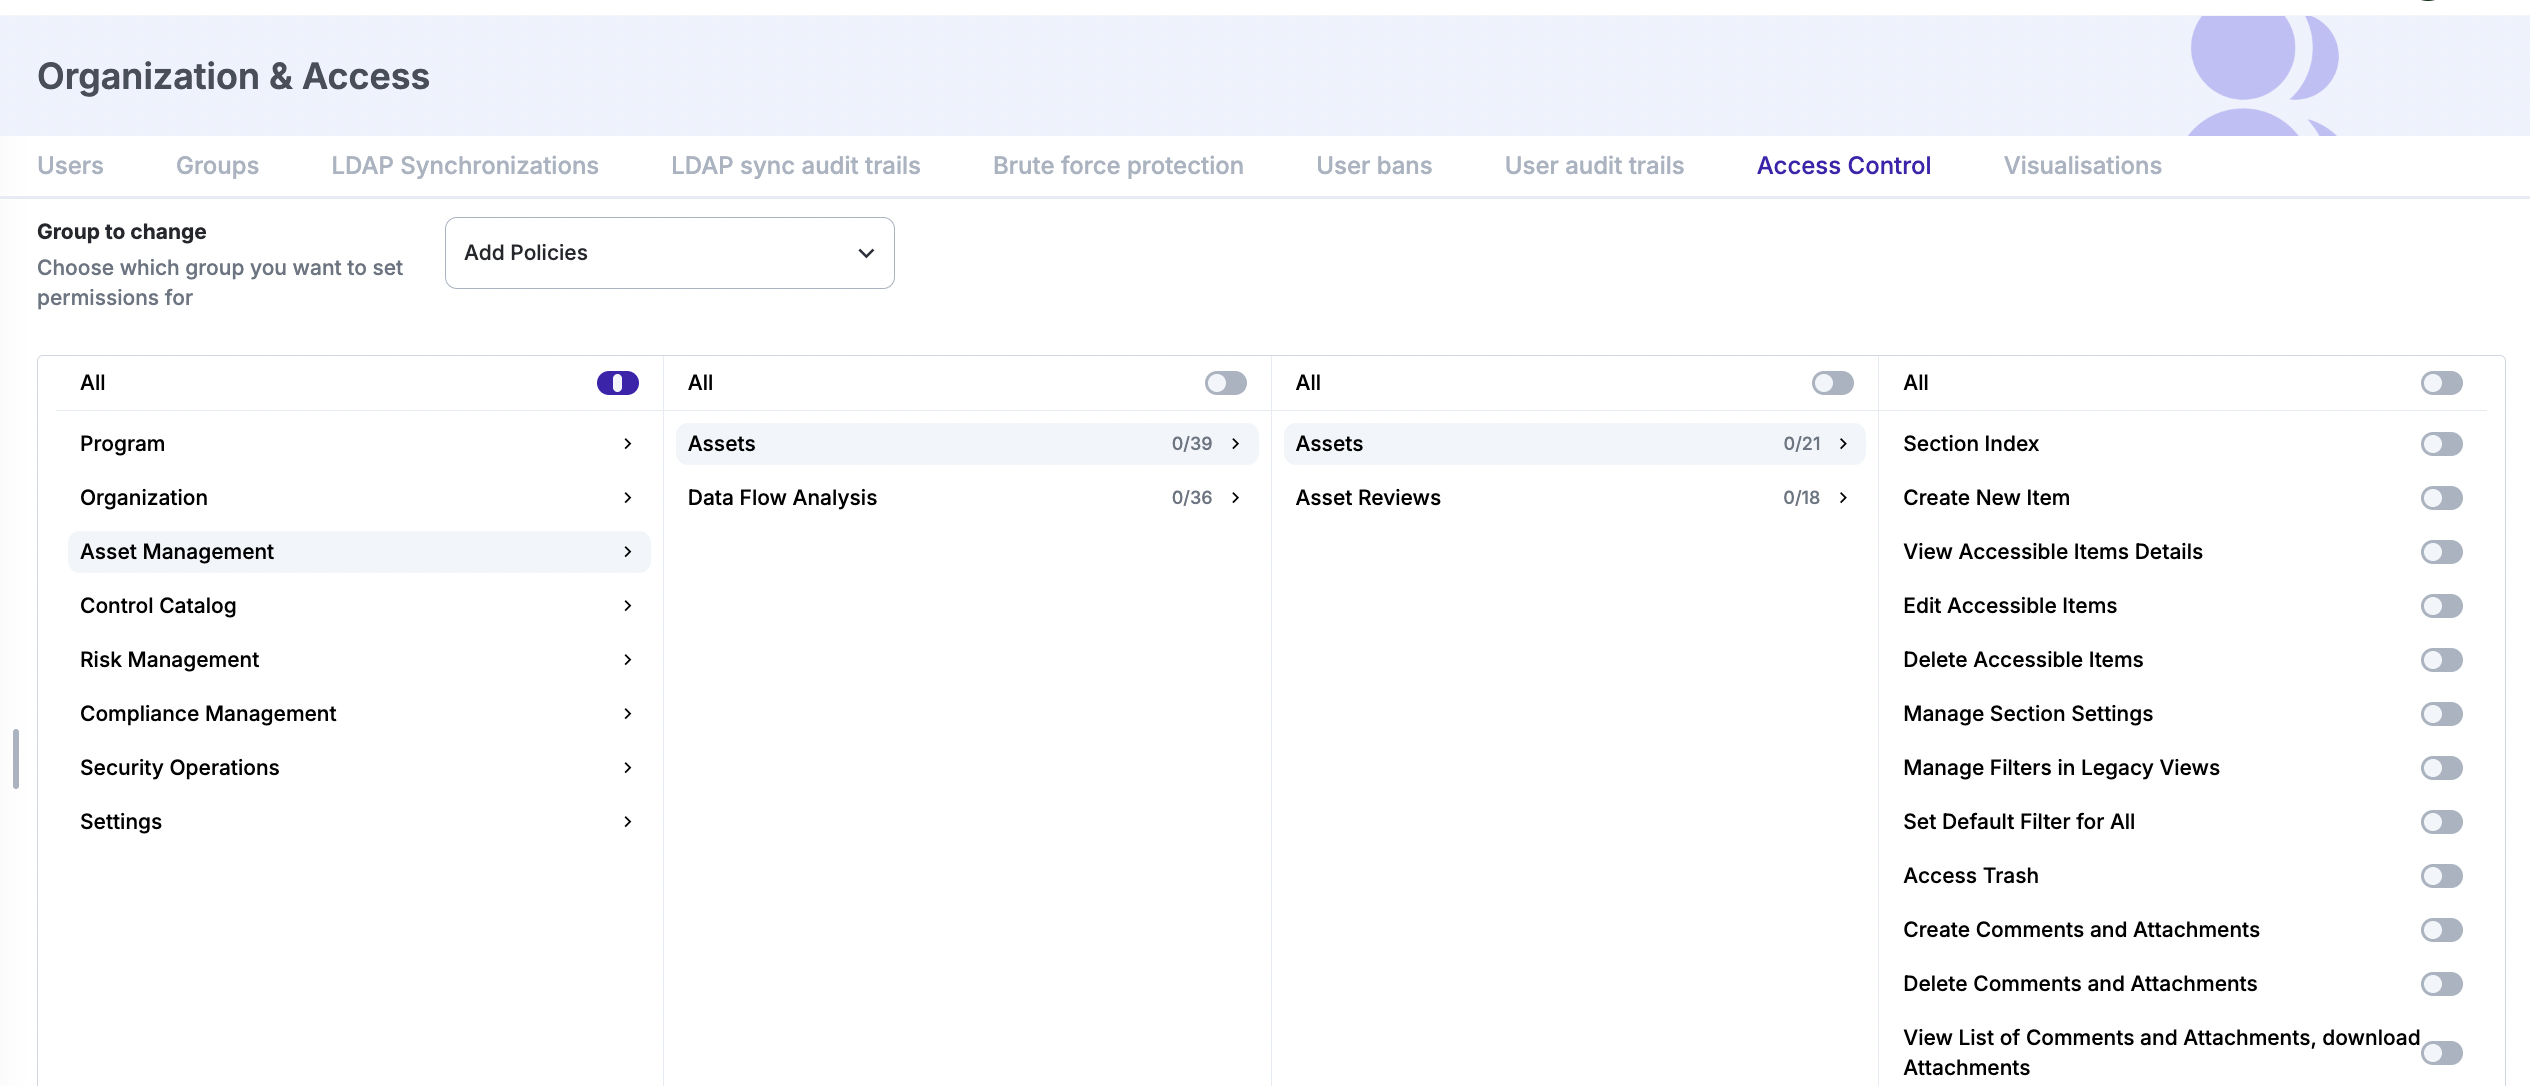
Eramba ships with multiple template groups that limit access to the software (see screenshot below), these groups work almost for everyone and raraly there is a need to create a custom group with custom permissions.
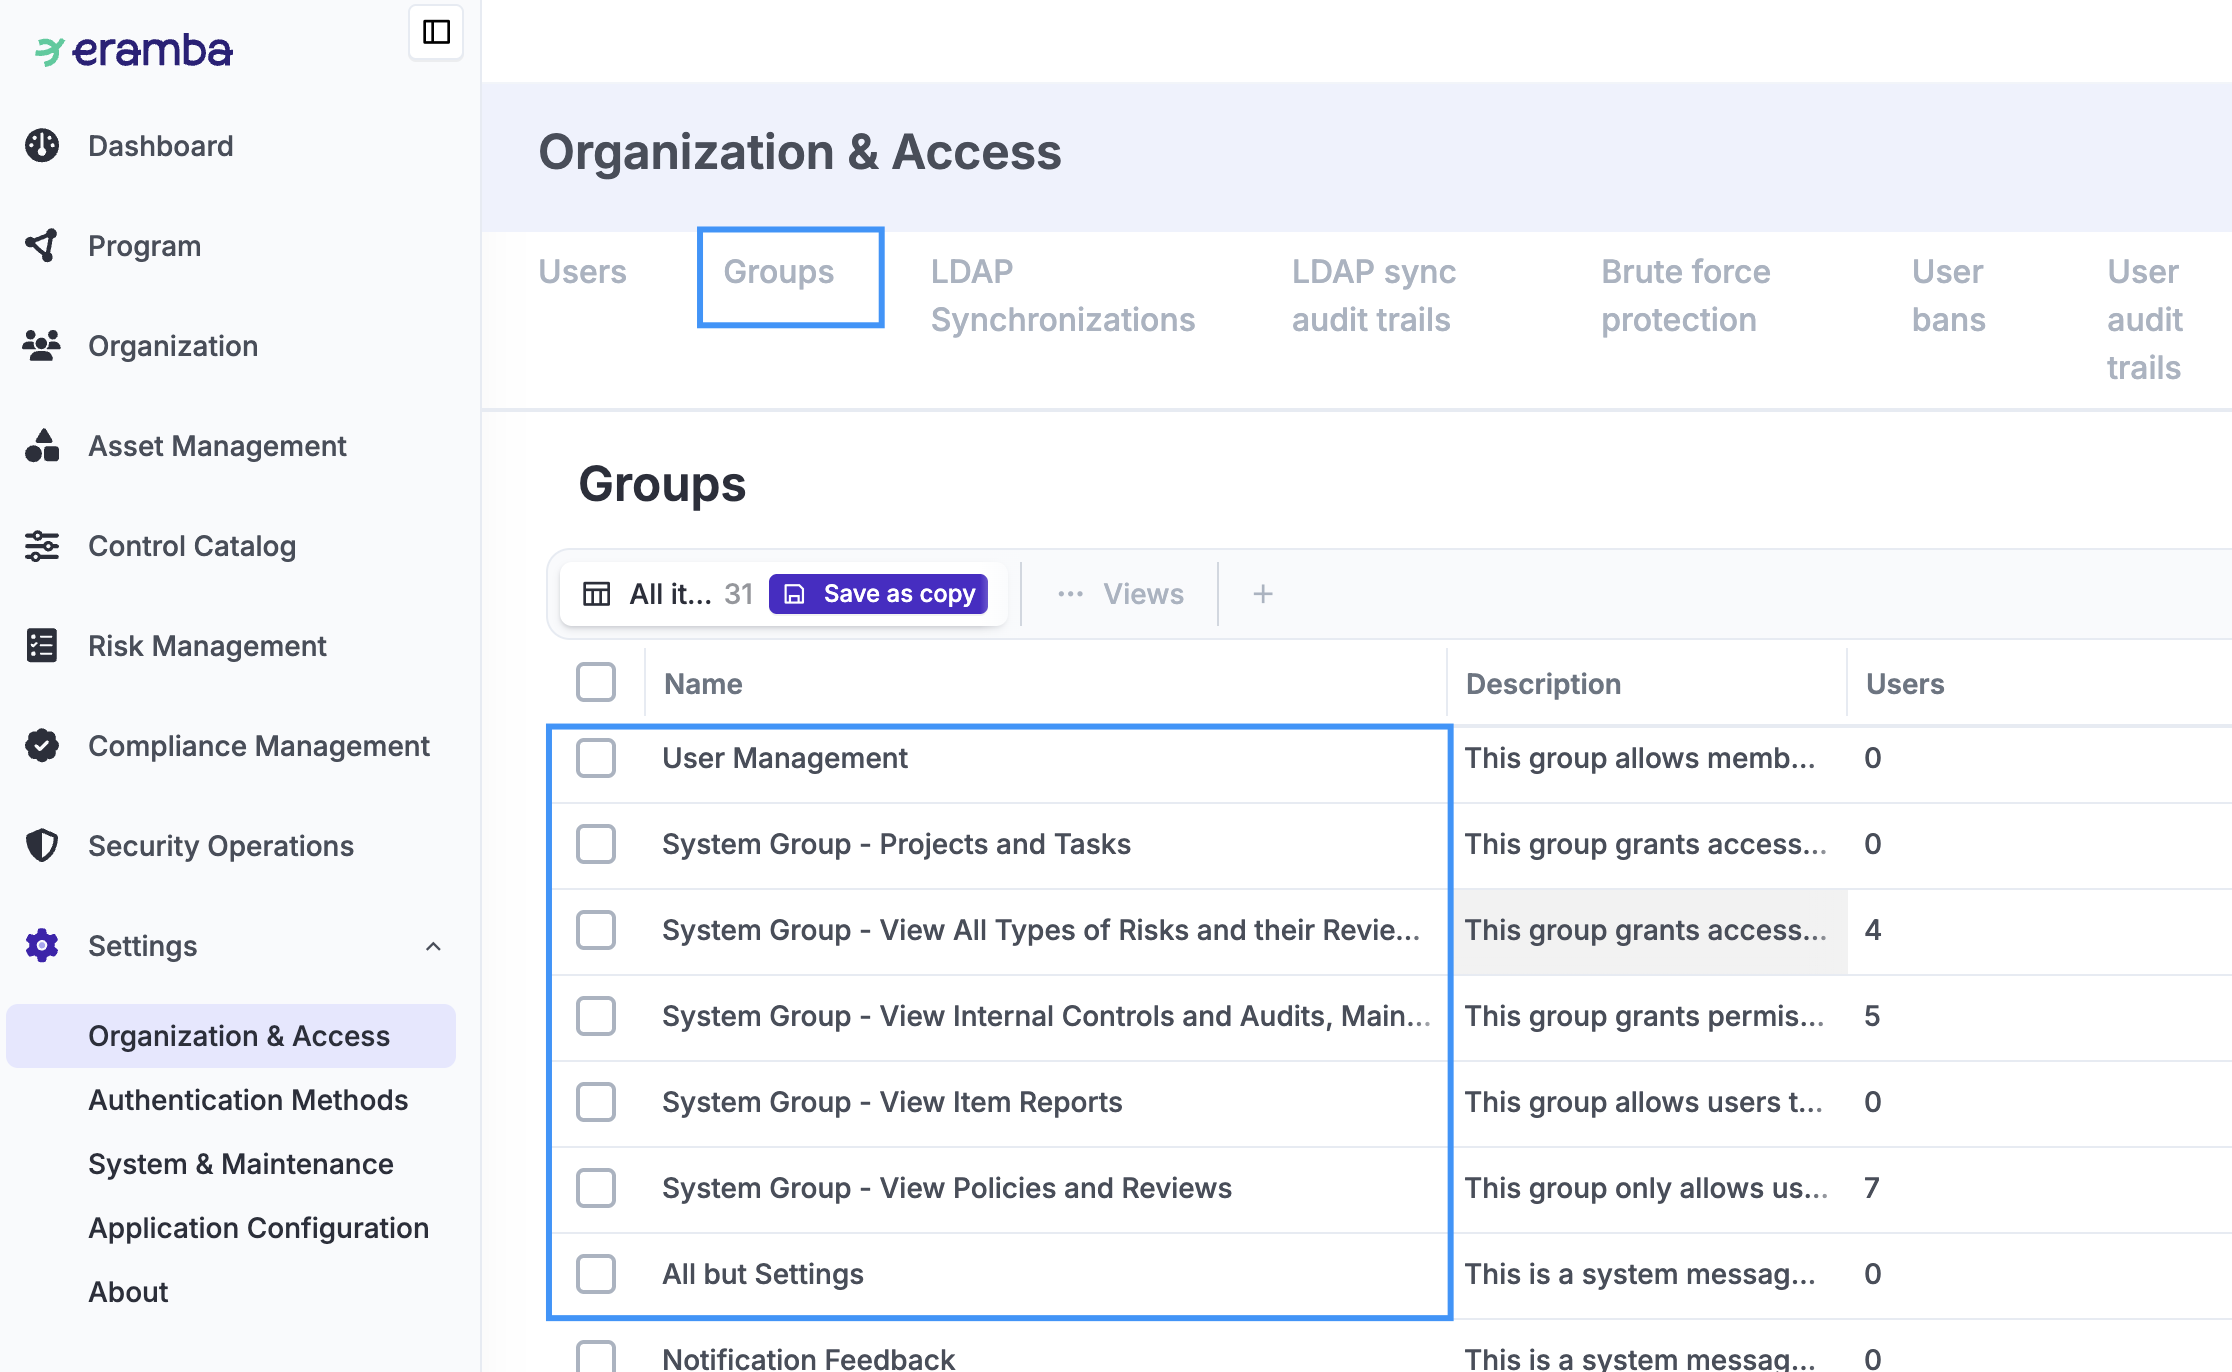
Remember that both “Department” and “Permission” groups reside under the “Group” module. Inside any group, there is a long list of “Access Lists” (hundreds); each one of them is a functionality in eramba (add, delete, access a module, export, etc.).
When creating a new group, all Access Lists inside it will be “Off” by default, disabling access to all features. Only “System” groups (shown in the image above) have specific Access Lists turned “On” to allow what the group is supposed to allow.
To see what Access Control permissions a group has, you need to go to System / Organization & Access / Access Controls. You can there select a group and see what permissions it has enabled and disabled.
Continuing the previous example, Mary has four groups assigned to her. Two of them are Department groups, where all their “Access Lists” are “Off,” and the other two are Permission groups, each with a number of Access Lists turned “On.” The effective access Mary has in eramba is the sum of all granted permissions across her groups.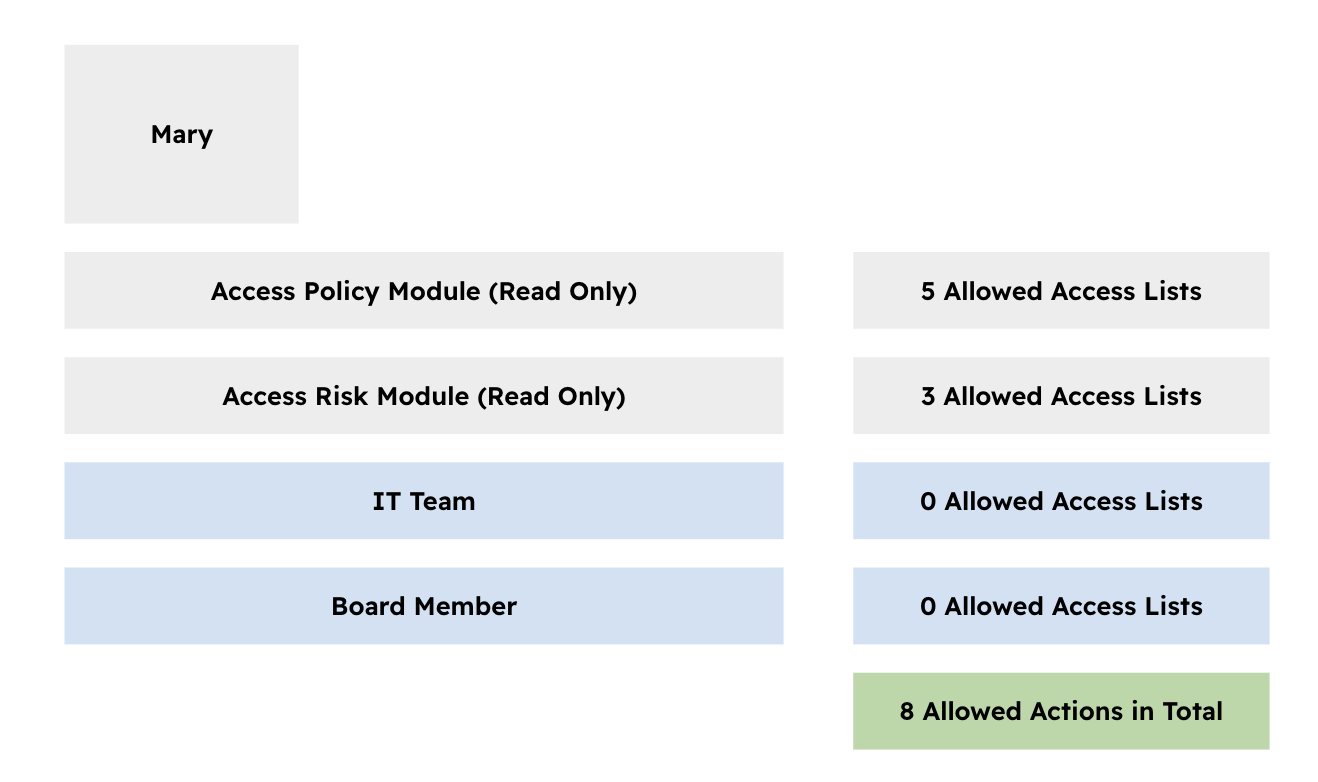
If two Permission groups conflict, granted permissions take precedence. For example, if Group A allows creating Policies and Group B denies it, and Mary is assigned to both groups, she will be able to create Policies.
Portals
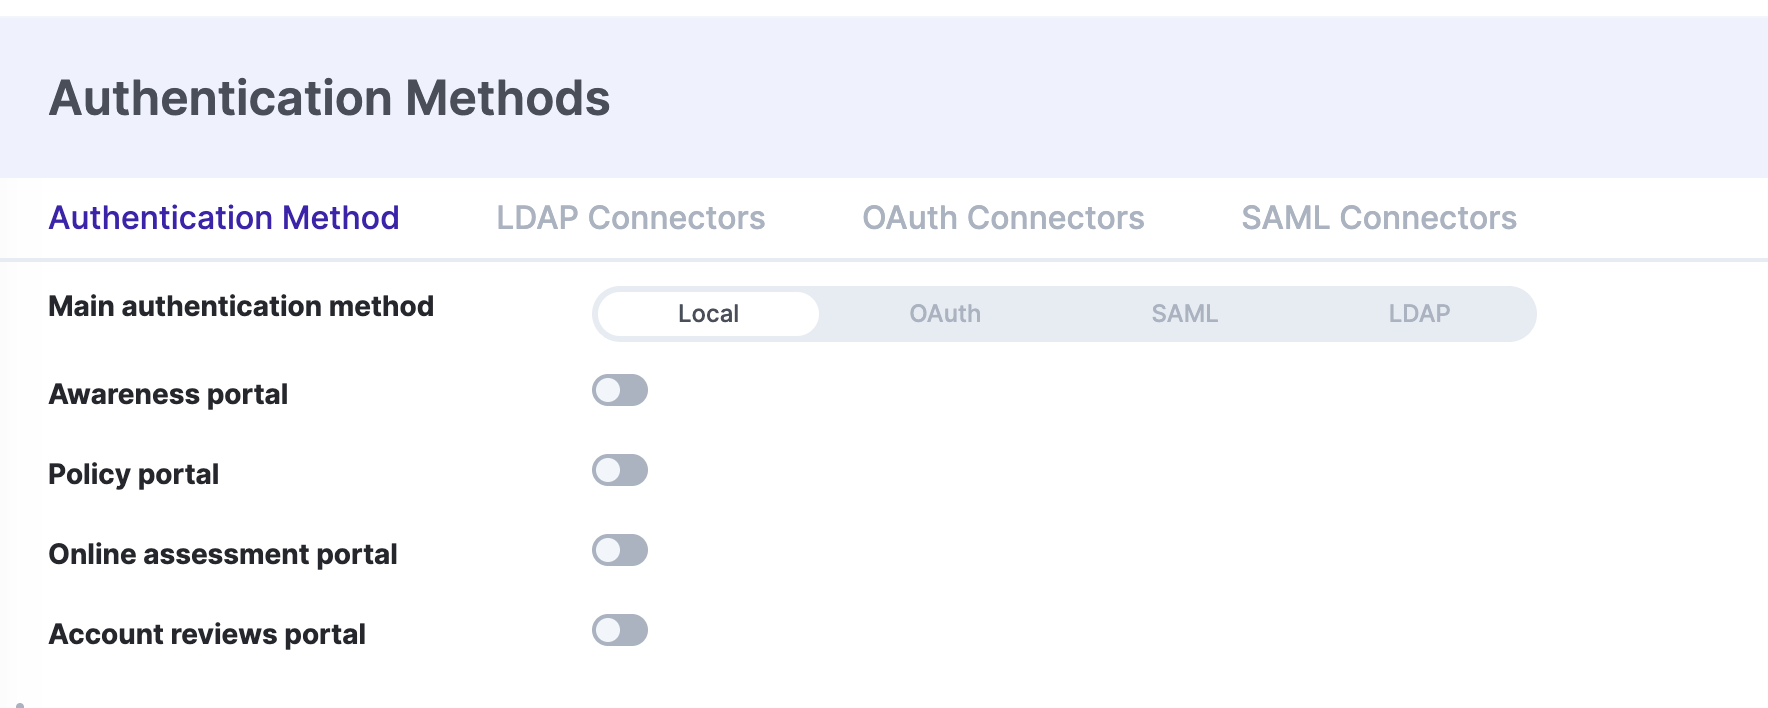
Some sections in Eramba use portals, which are modules with a separate login page where you can perform activities related to that section. By default, only the Main Portal is enabled.
You can enable portals under: Settings / Authentication Methods / Authentication Methods

Once the portal is enabled, the authentication applied to that portal is inherited from the authentication defined on the Main portal.
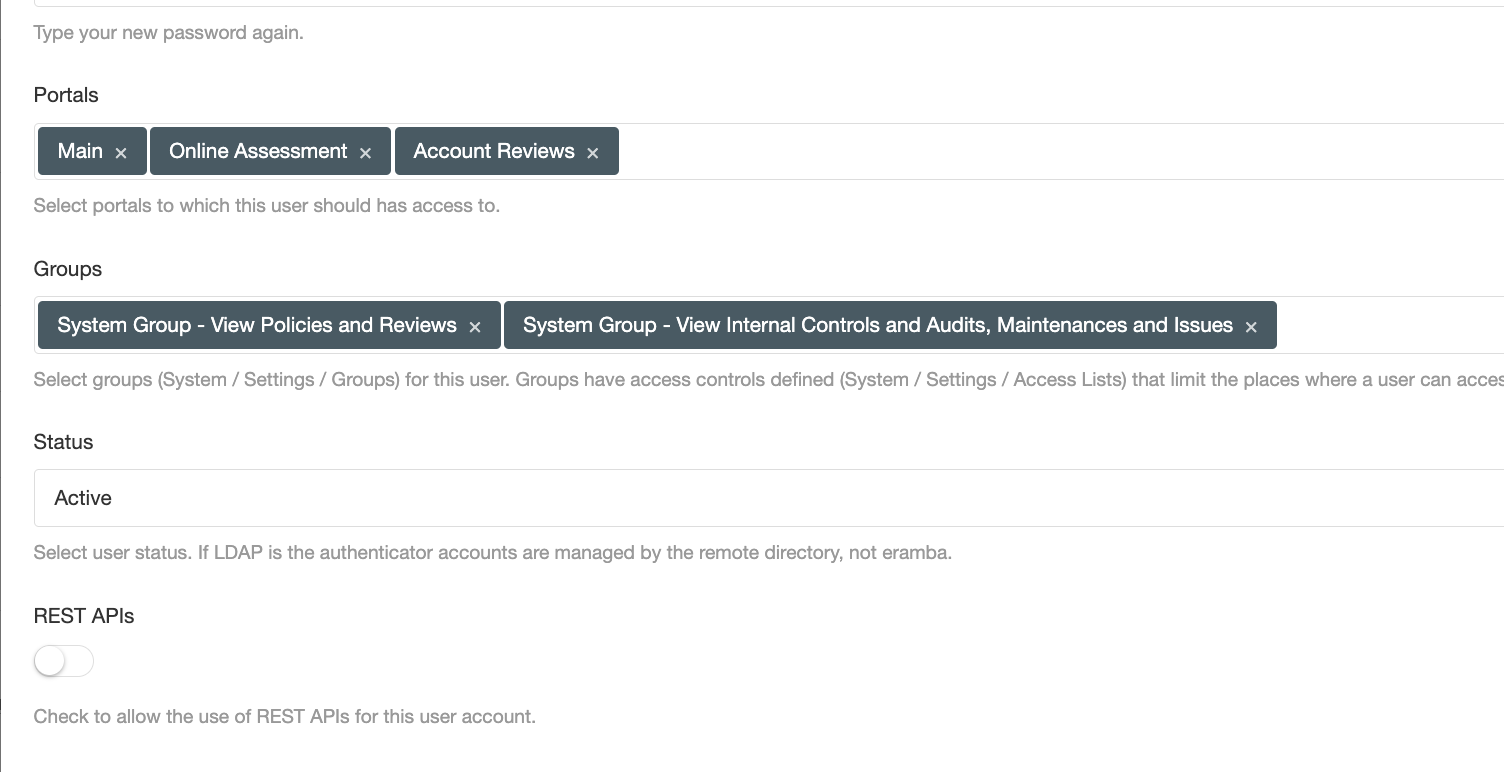
When you create a user, you must define which specific portals they can access. This provides a second layer of isolation between portals, ensuring users only see the environments relevant to their role.
Authentication
Accounts in eramba can be authenticated in two ways: locally, where user credentials are stored directly in eramba, and remotely, which authenticate users against an external Identity Provider.
When creating a user account, you must select whether it will authenticate locally or remotely. If the account is set to “Local,” you must define the password in Eramba; otherwise, the password is stored in your IdP. You can configure Eramba authentication as “Remote” (with an IdP) and still authenticate accounts locally, as long as they have the local option enabled and a local password set.

To authenticate users remotely, you must choose which authentication provider to use. Eramba supports the following options:
-
LDAP: Eramba passes user credentials to an LDAP directory service of your choice, such as Active Directory (Video)
-
SAML: Eramba passes authentication requests to a SAML service provider of your choice (Video)
-
Google OAuth: Eramba uses Google OAuth to authenticate users (Video)
These connectors must be configured in advance under Settings / Authentication Methods, and only one connector can be active at a time.
After the connector is created and tested, you can enable it on the “Main” portal. All user accounts that have the “Local Account” flag disabled will automatically start authenticating using the remote directory.
SAML Microsoft Entra (Azure)
Set the following values in the Entra Enterprise Application (Single Sign-On → SAML):
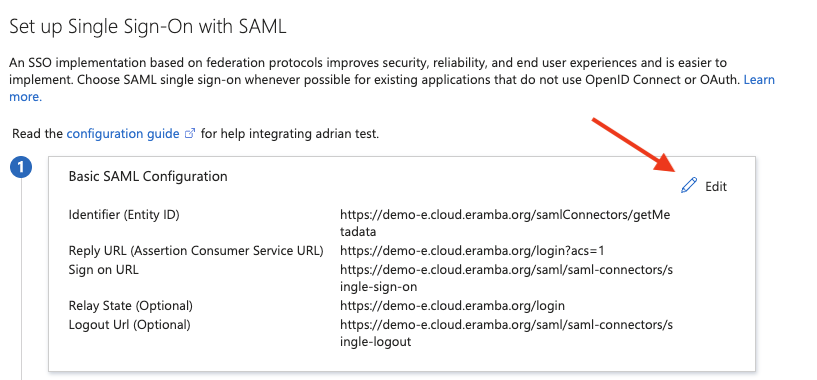
Identifier (Entity ID)
https://your-eramba-domain/samlConnectors/getMetadata
Reply URL (Assertion Consumer Service URL)
https://your-eramba-domain/login?acs=1
https://your-eramba-domain/portal/awareness-programs/login
https://your-eramba-domain/portal/vendor-assessments/login
https://your-eramba-domain/portal/account-reviews/login
https://your-eramba-domain/portal/policy/login
Sign on URL (optional)
https://your-eramba-domain/saml/saml-connectors/single-sign-on
Relay State (optional)
https://your-eramba-domain/login
Logout URL (optional)
https://your-eramba-domain/saml/saml-connectors/single-logout
Navigate to Settings > Authentication Methods > SAML Connectors and create a new SAML Connector.
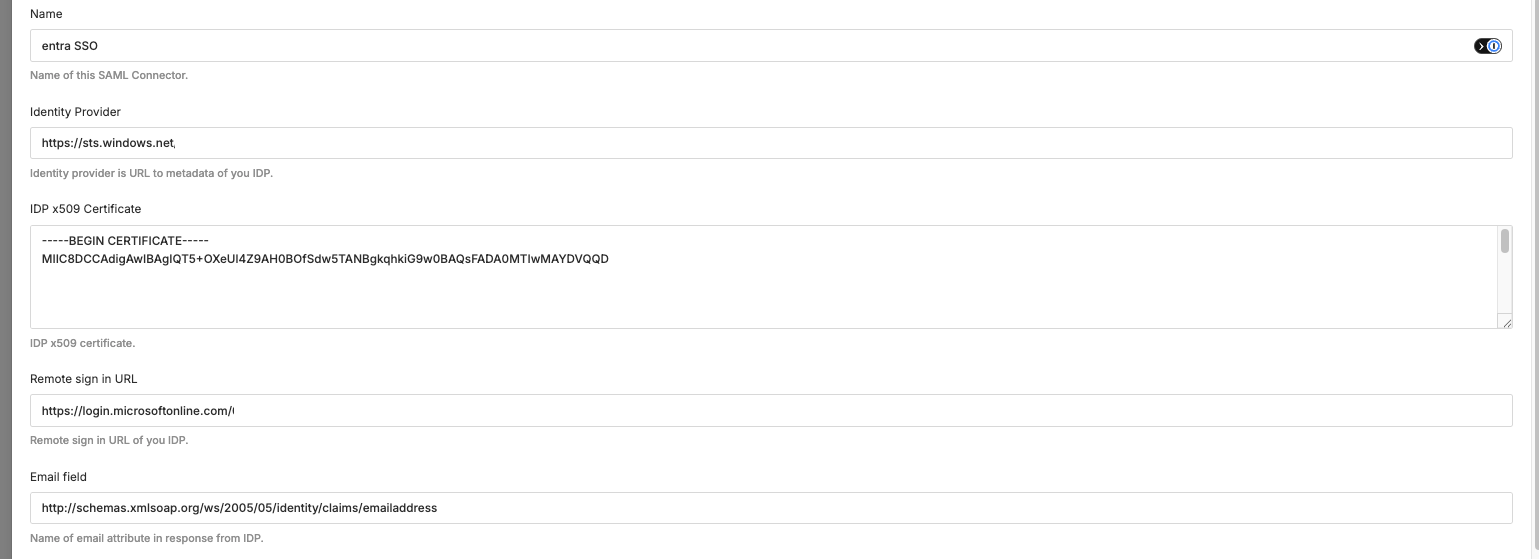
| eramba SAML Connector field | Entra / Azure value |
|---|---|
| Eramba Identity Provider | Microsoft Entra Identifier |
| IdP x509 Certificate | Certificate (Base64) — download the certificate and paste it directly into eramba |
| Remote sign in URL | Login URL |
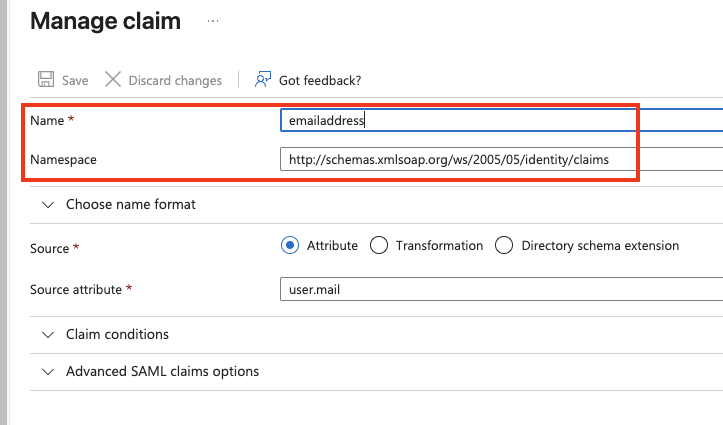
| Email field | http://schemas.xmlsoap.org/ws/2005/05/identity/claims/emailaddress |
The Email field value may differ depending on your attributes/claims configuration. Verify the exact claim name under Attributes & Claims in the Entra Enterprise Application before entering it in eramba.

If you are using MFA, set Authentication Context to disabled.

Users Accounts
User accounts are managed from Settings / Organization & Access / Users. No matter if the users will authenticate remotely, you need accounts created in eramba (their login name must match the one on the IDP).
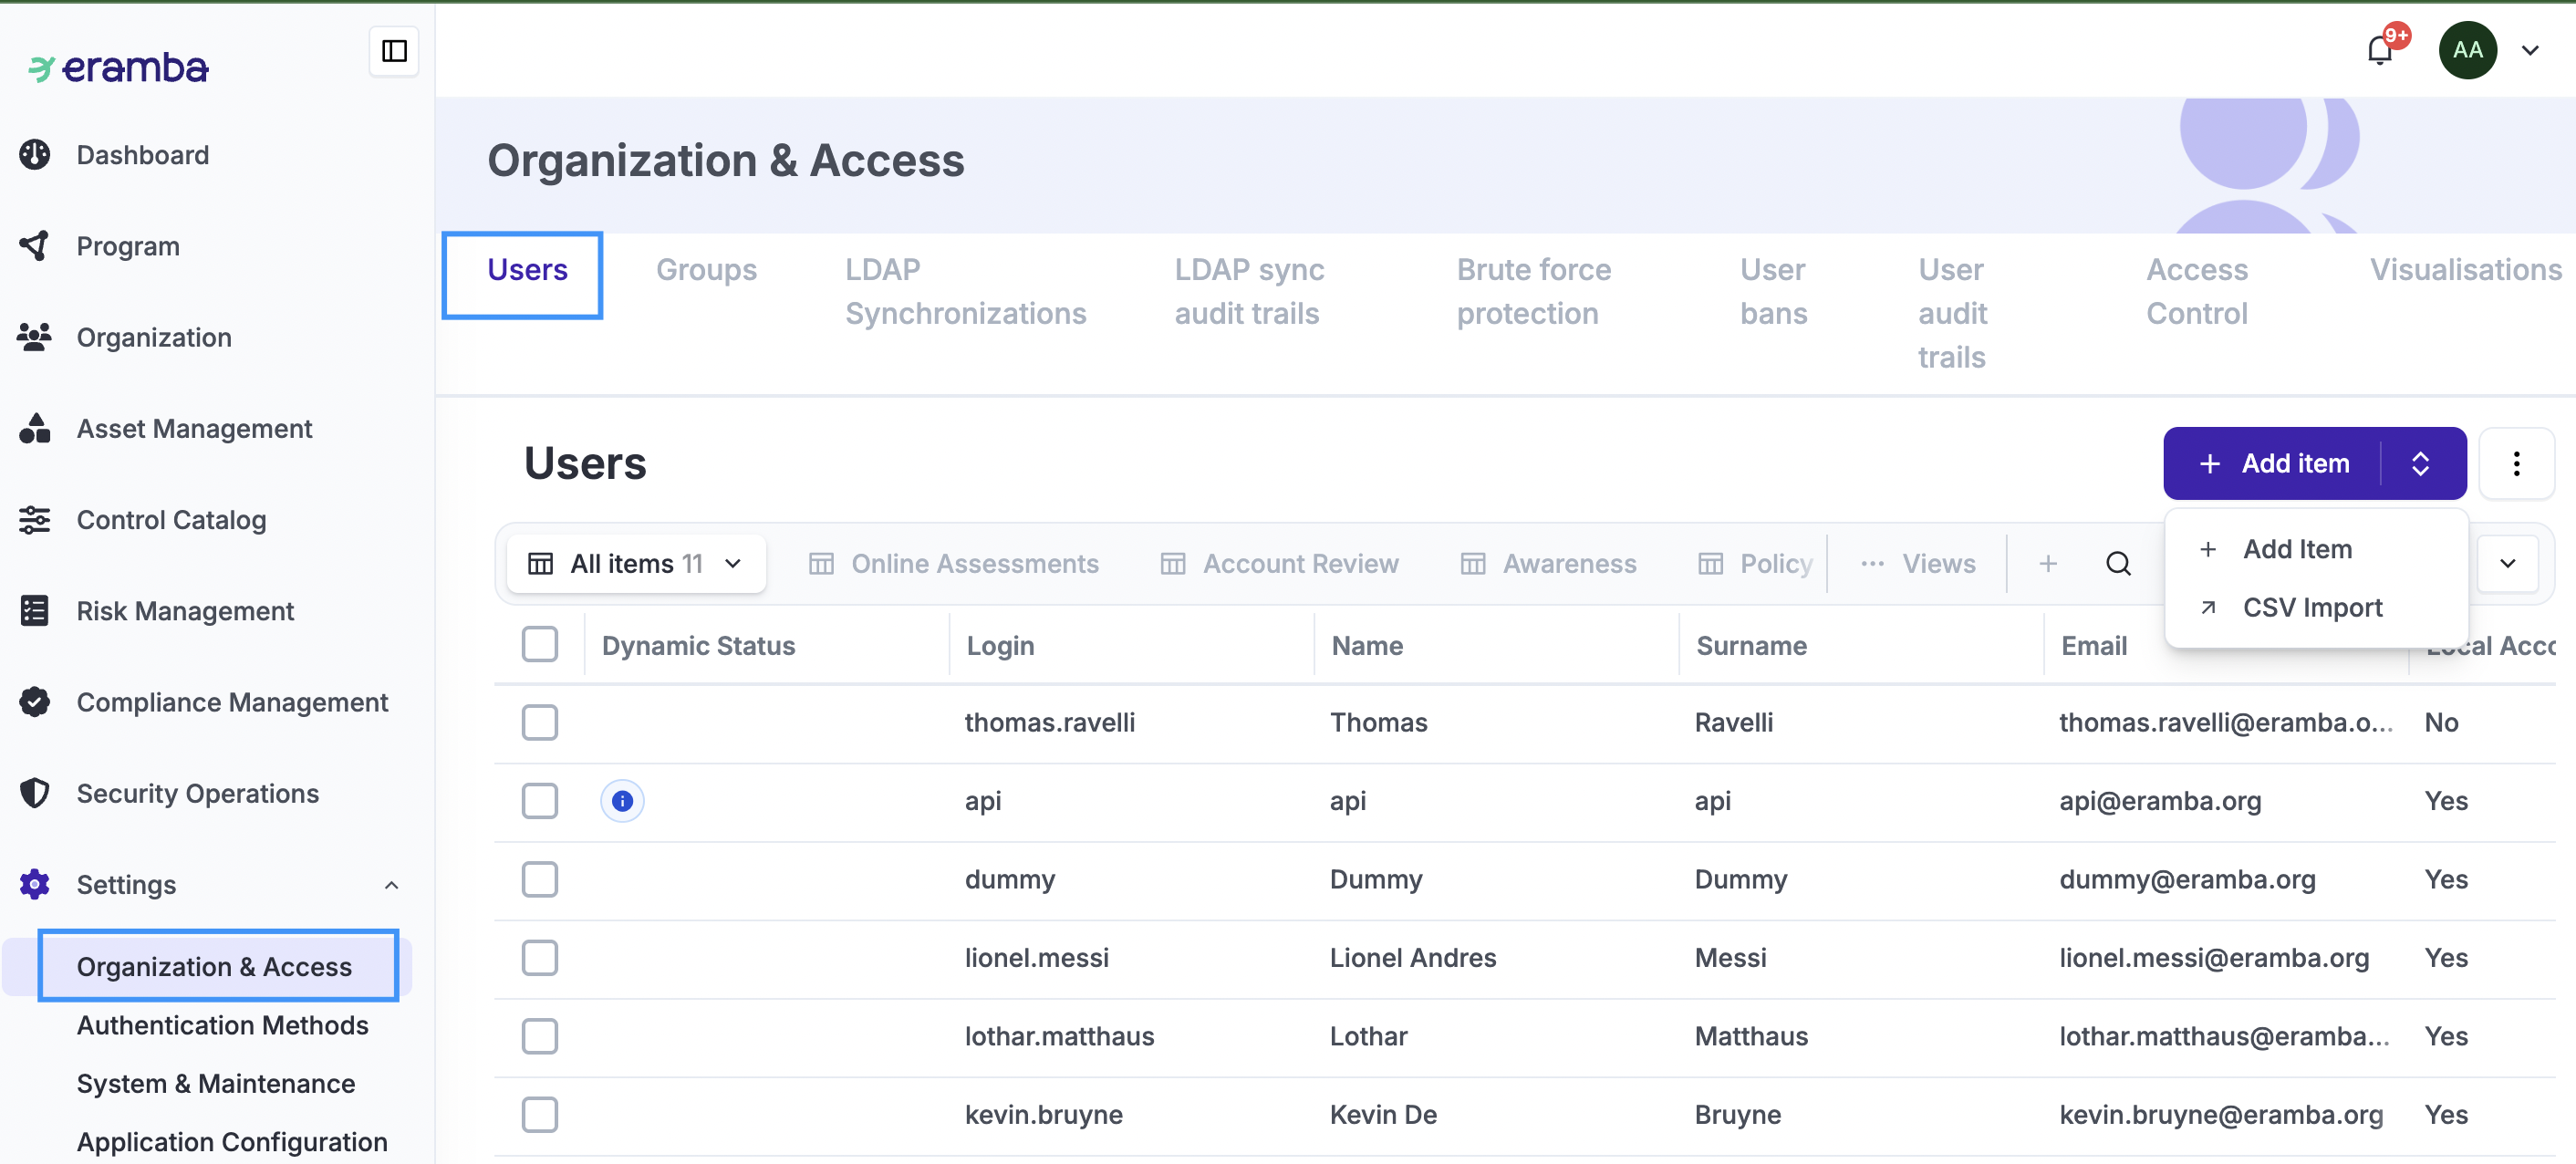
When managing accounts, the key fields are:
- Name, Surname
- Email (must be unique)
- Local/Remote Authentication
- Portals (it is important that you only enable the portal the account needs)
- Groups (as explained, at least two groups must be associated with the account)
- API (if the account will be used for APIs)
- Disabled/Enabled
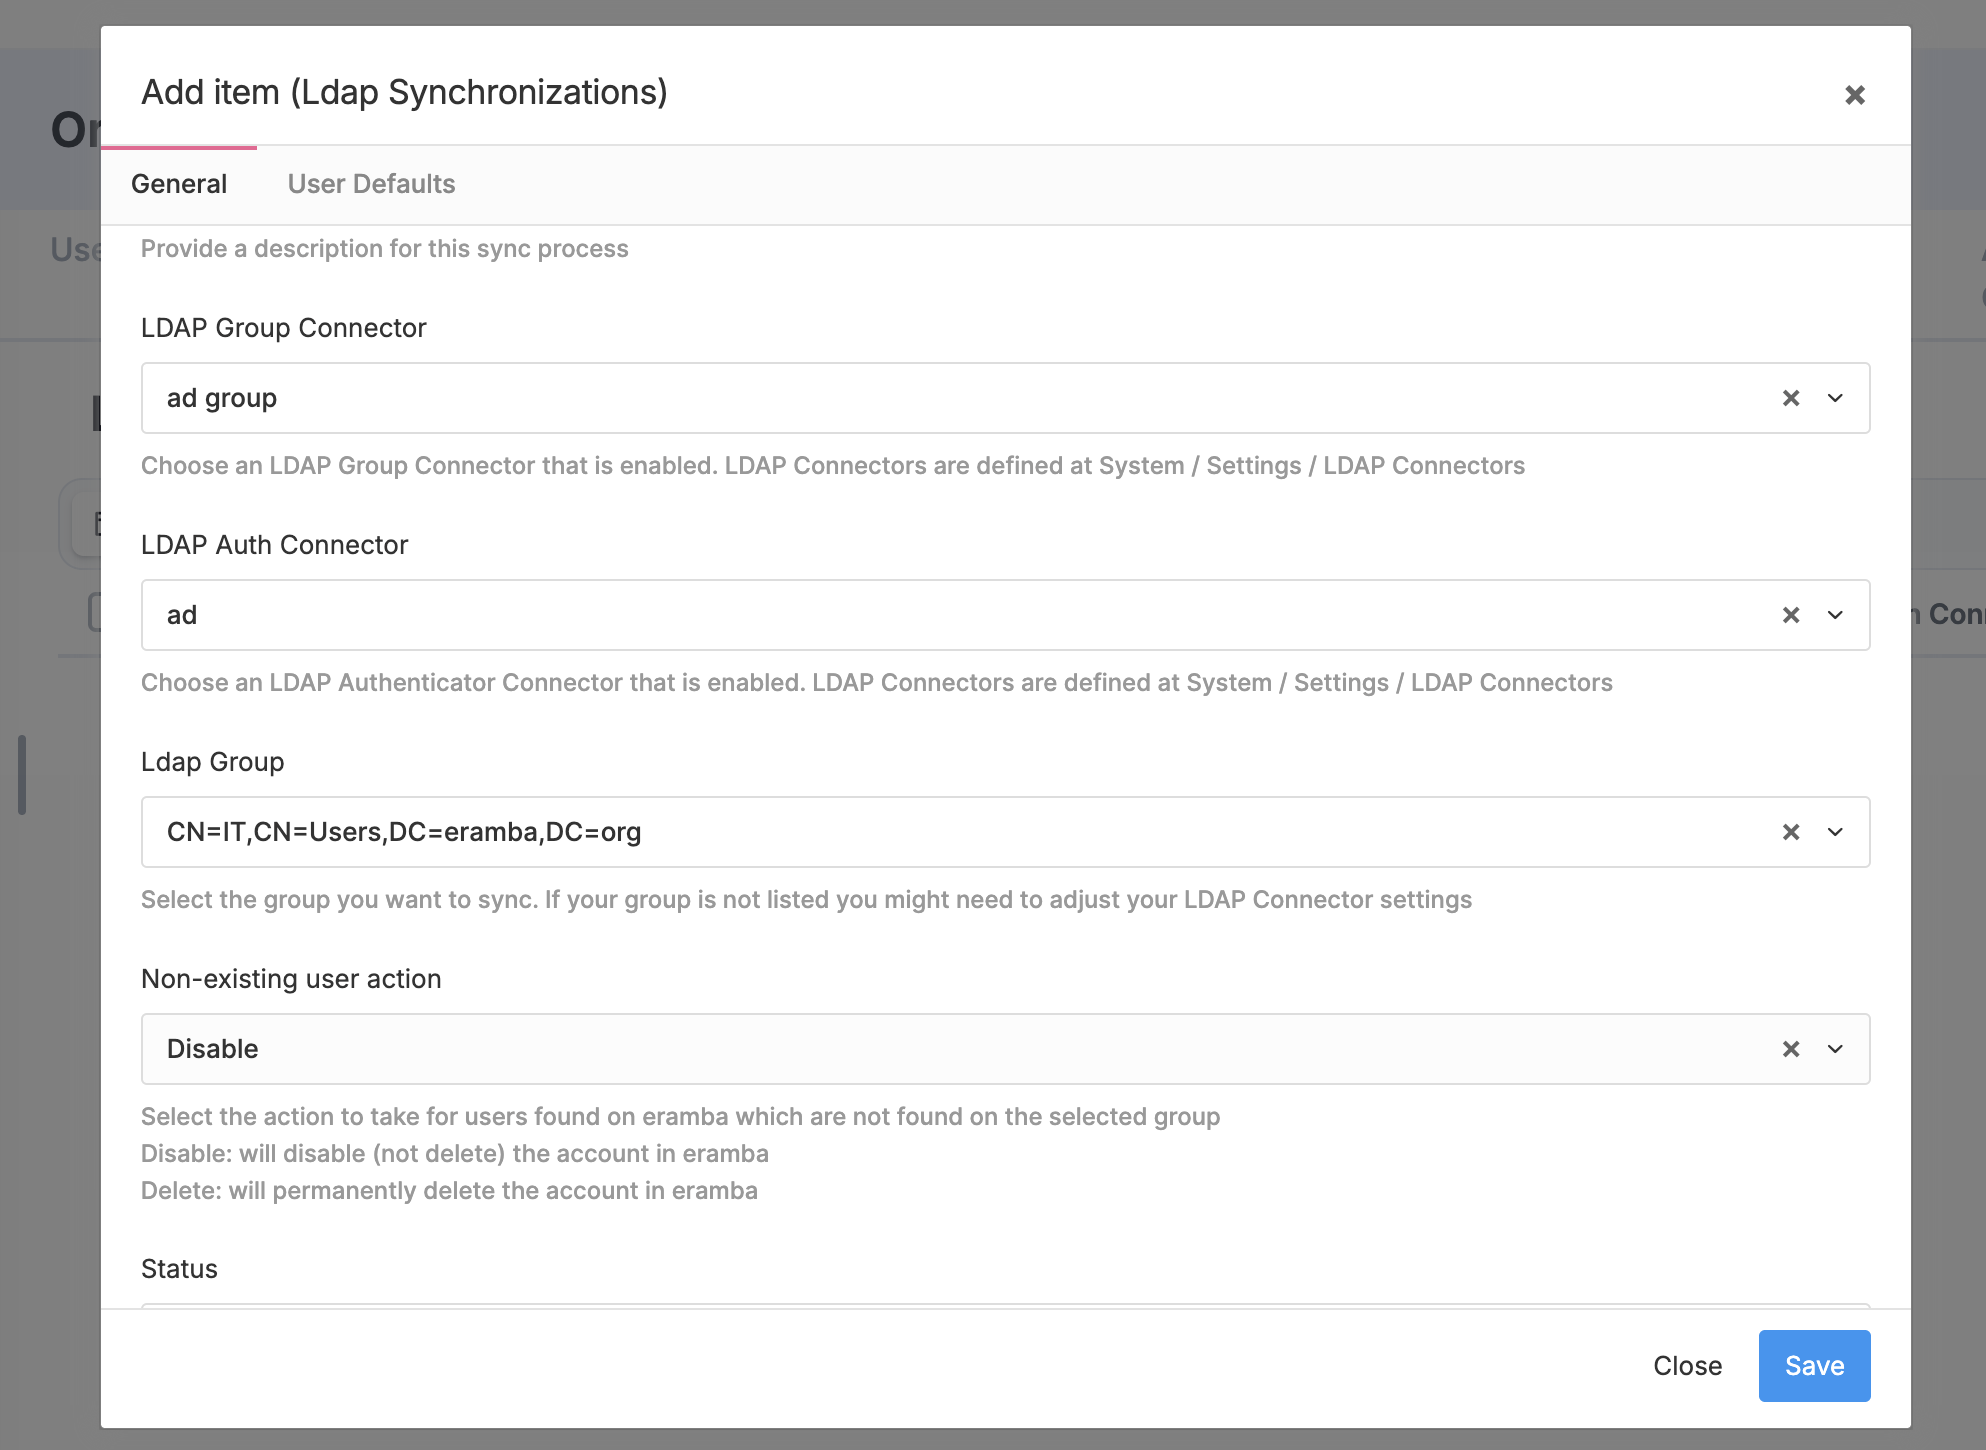
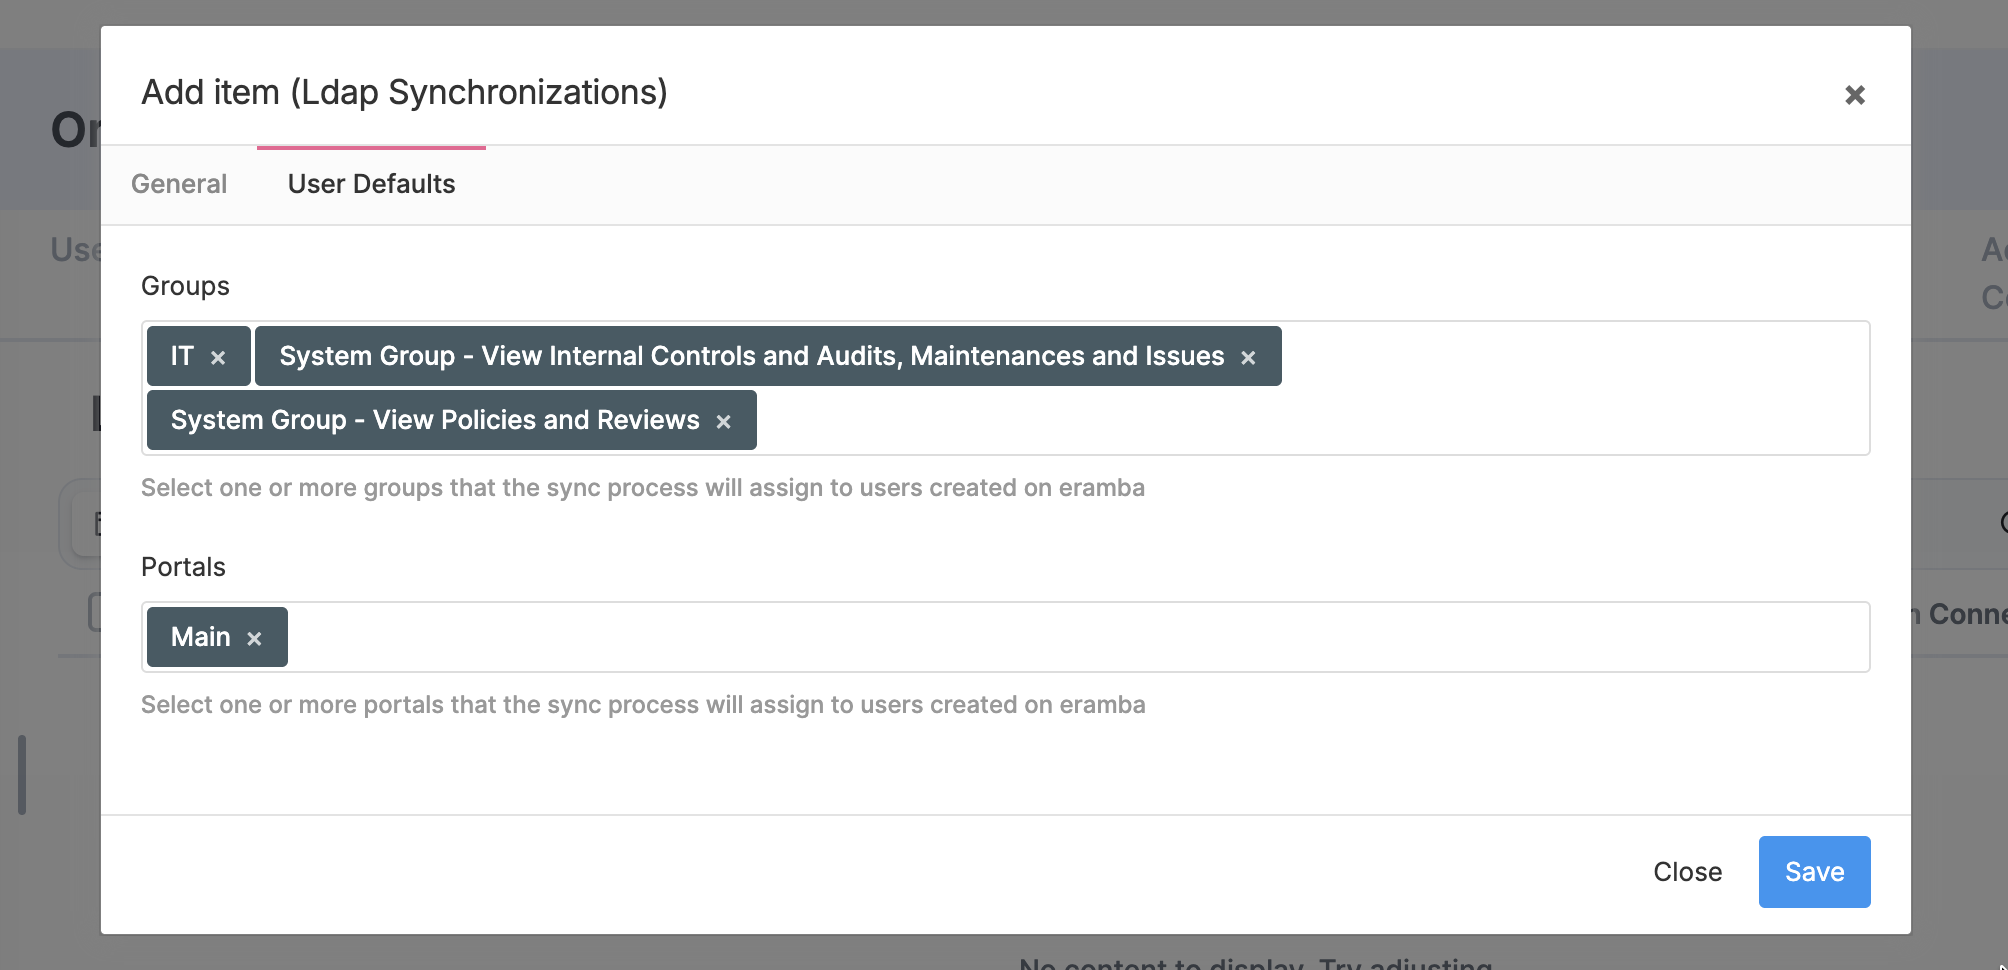
You can bulk create accounts in Eramba using CSV Import, or LDAP Sync:
-
CSV Import: Fill out the template downloaded from Eramba and upload it back into the system. CSV imports are only for adding new users; they cannot be used to update or edit existing accounts. Review the CSV documentation to learn how to use this method.
-
LDAP Sync: Create accounts by syncing your LDAP environment. To do this, you must have the LDAP connectors configured and create a sync under: Settings / Organization & Access / LDAP Synchronizations
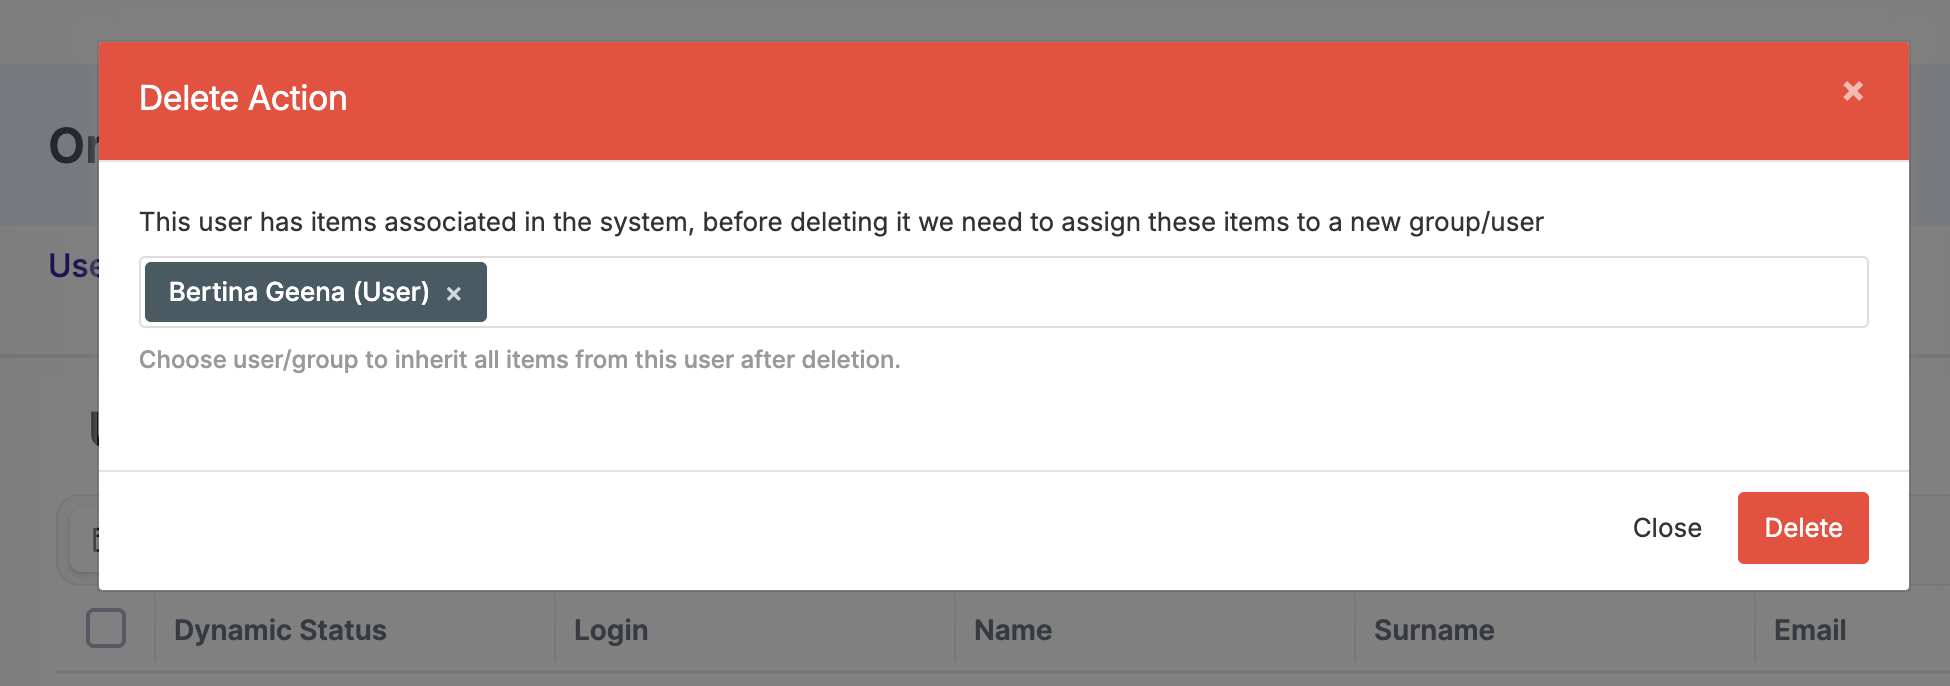
Accounts can be deleted as long as they do not have items assigned. If you try to delete an account that has items assigned, you will be prompted to reassign these items to a new user or group. It is not possible to delete a user until this reassignment process is completed. Once this is done, the user will be deleted. The default admin account cannot be deleted.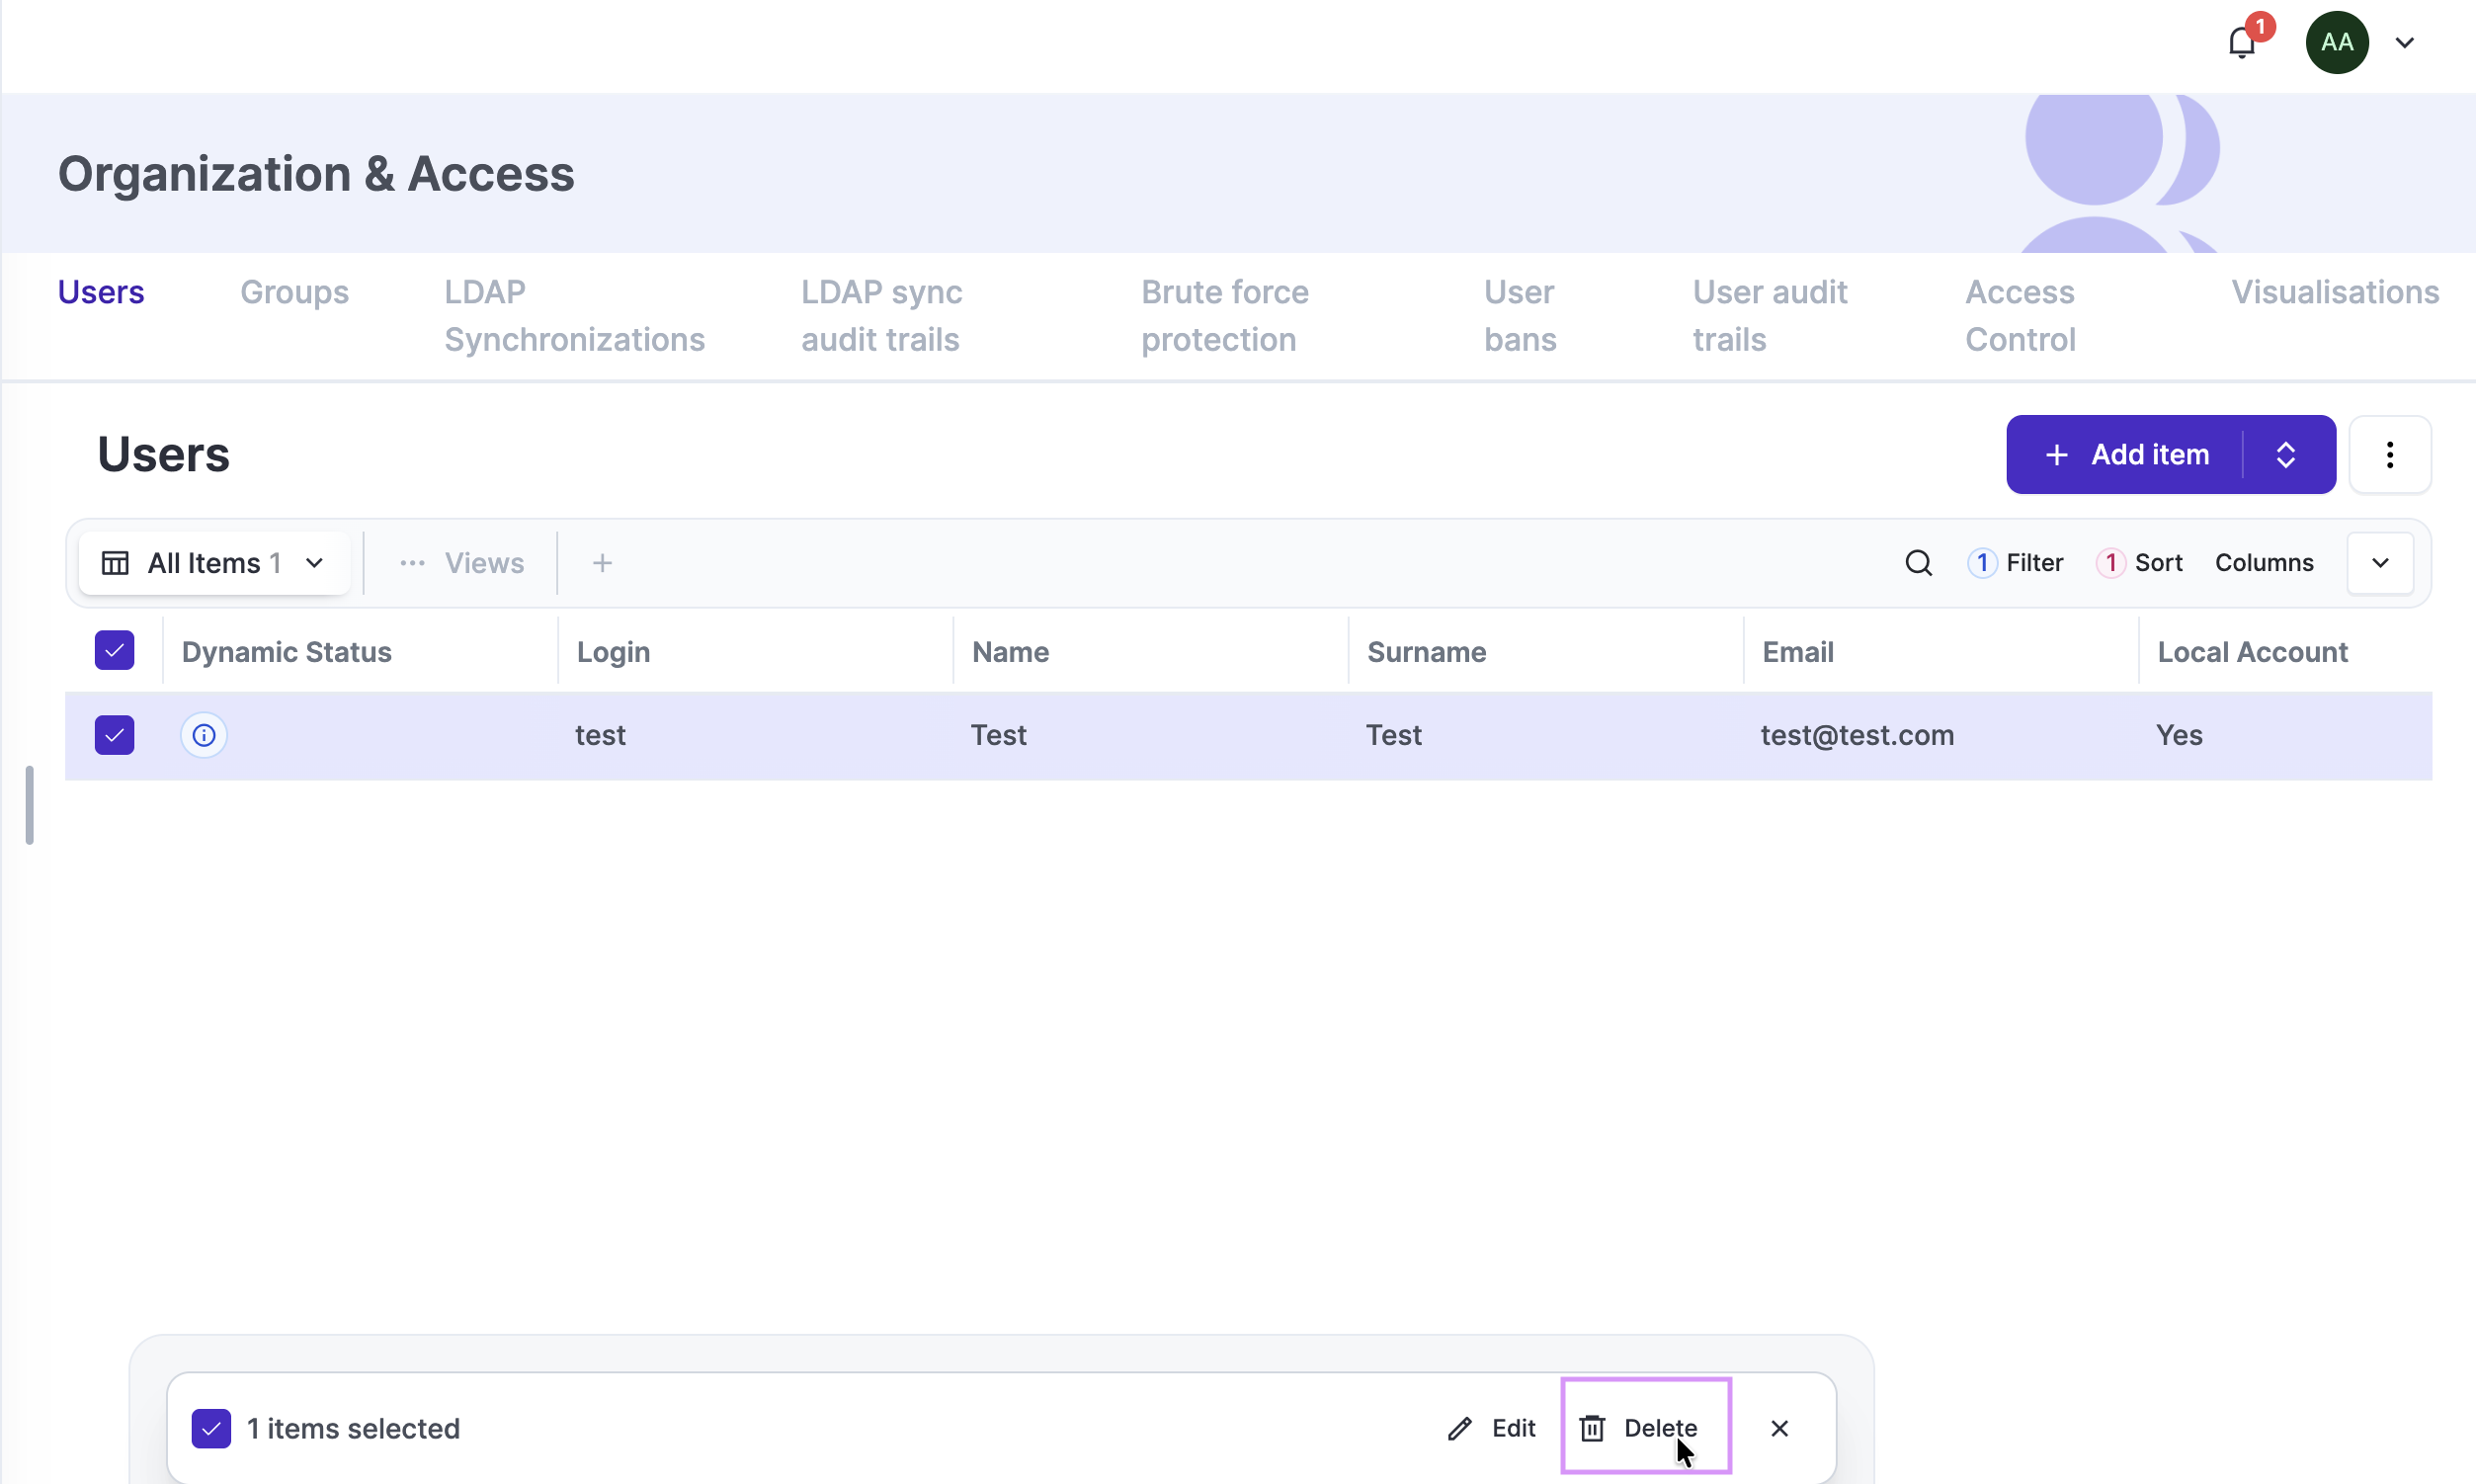
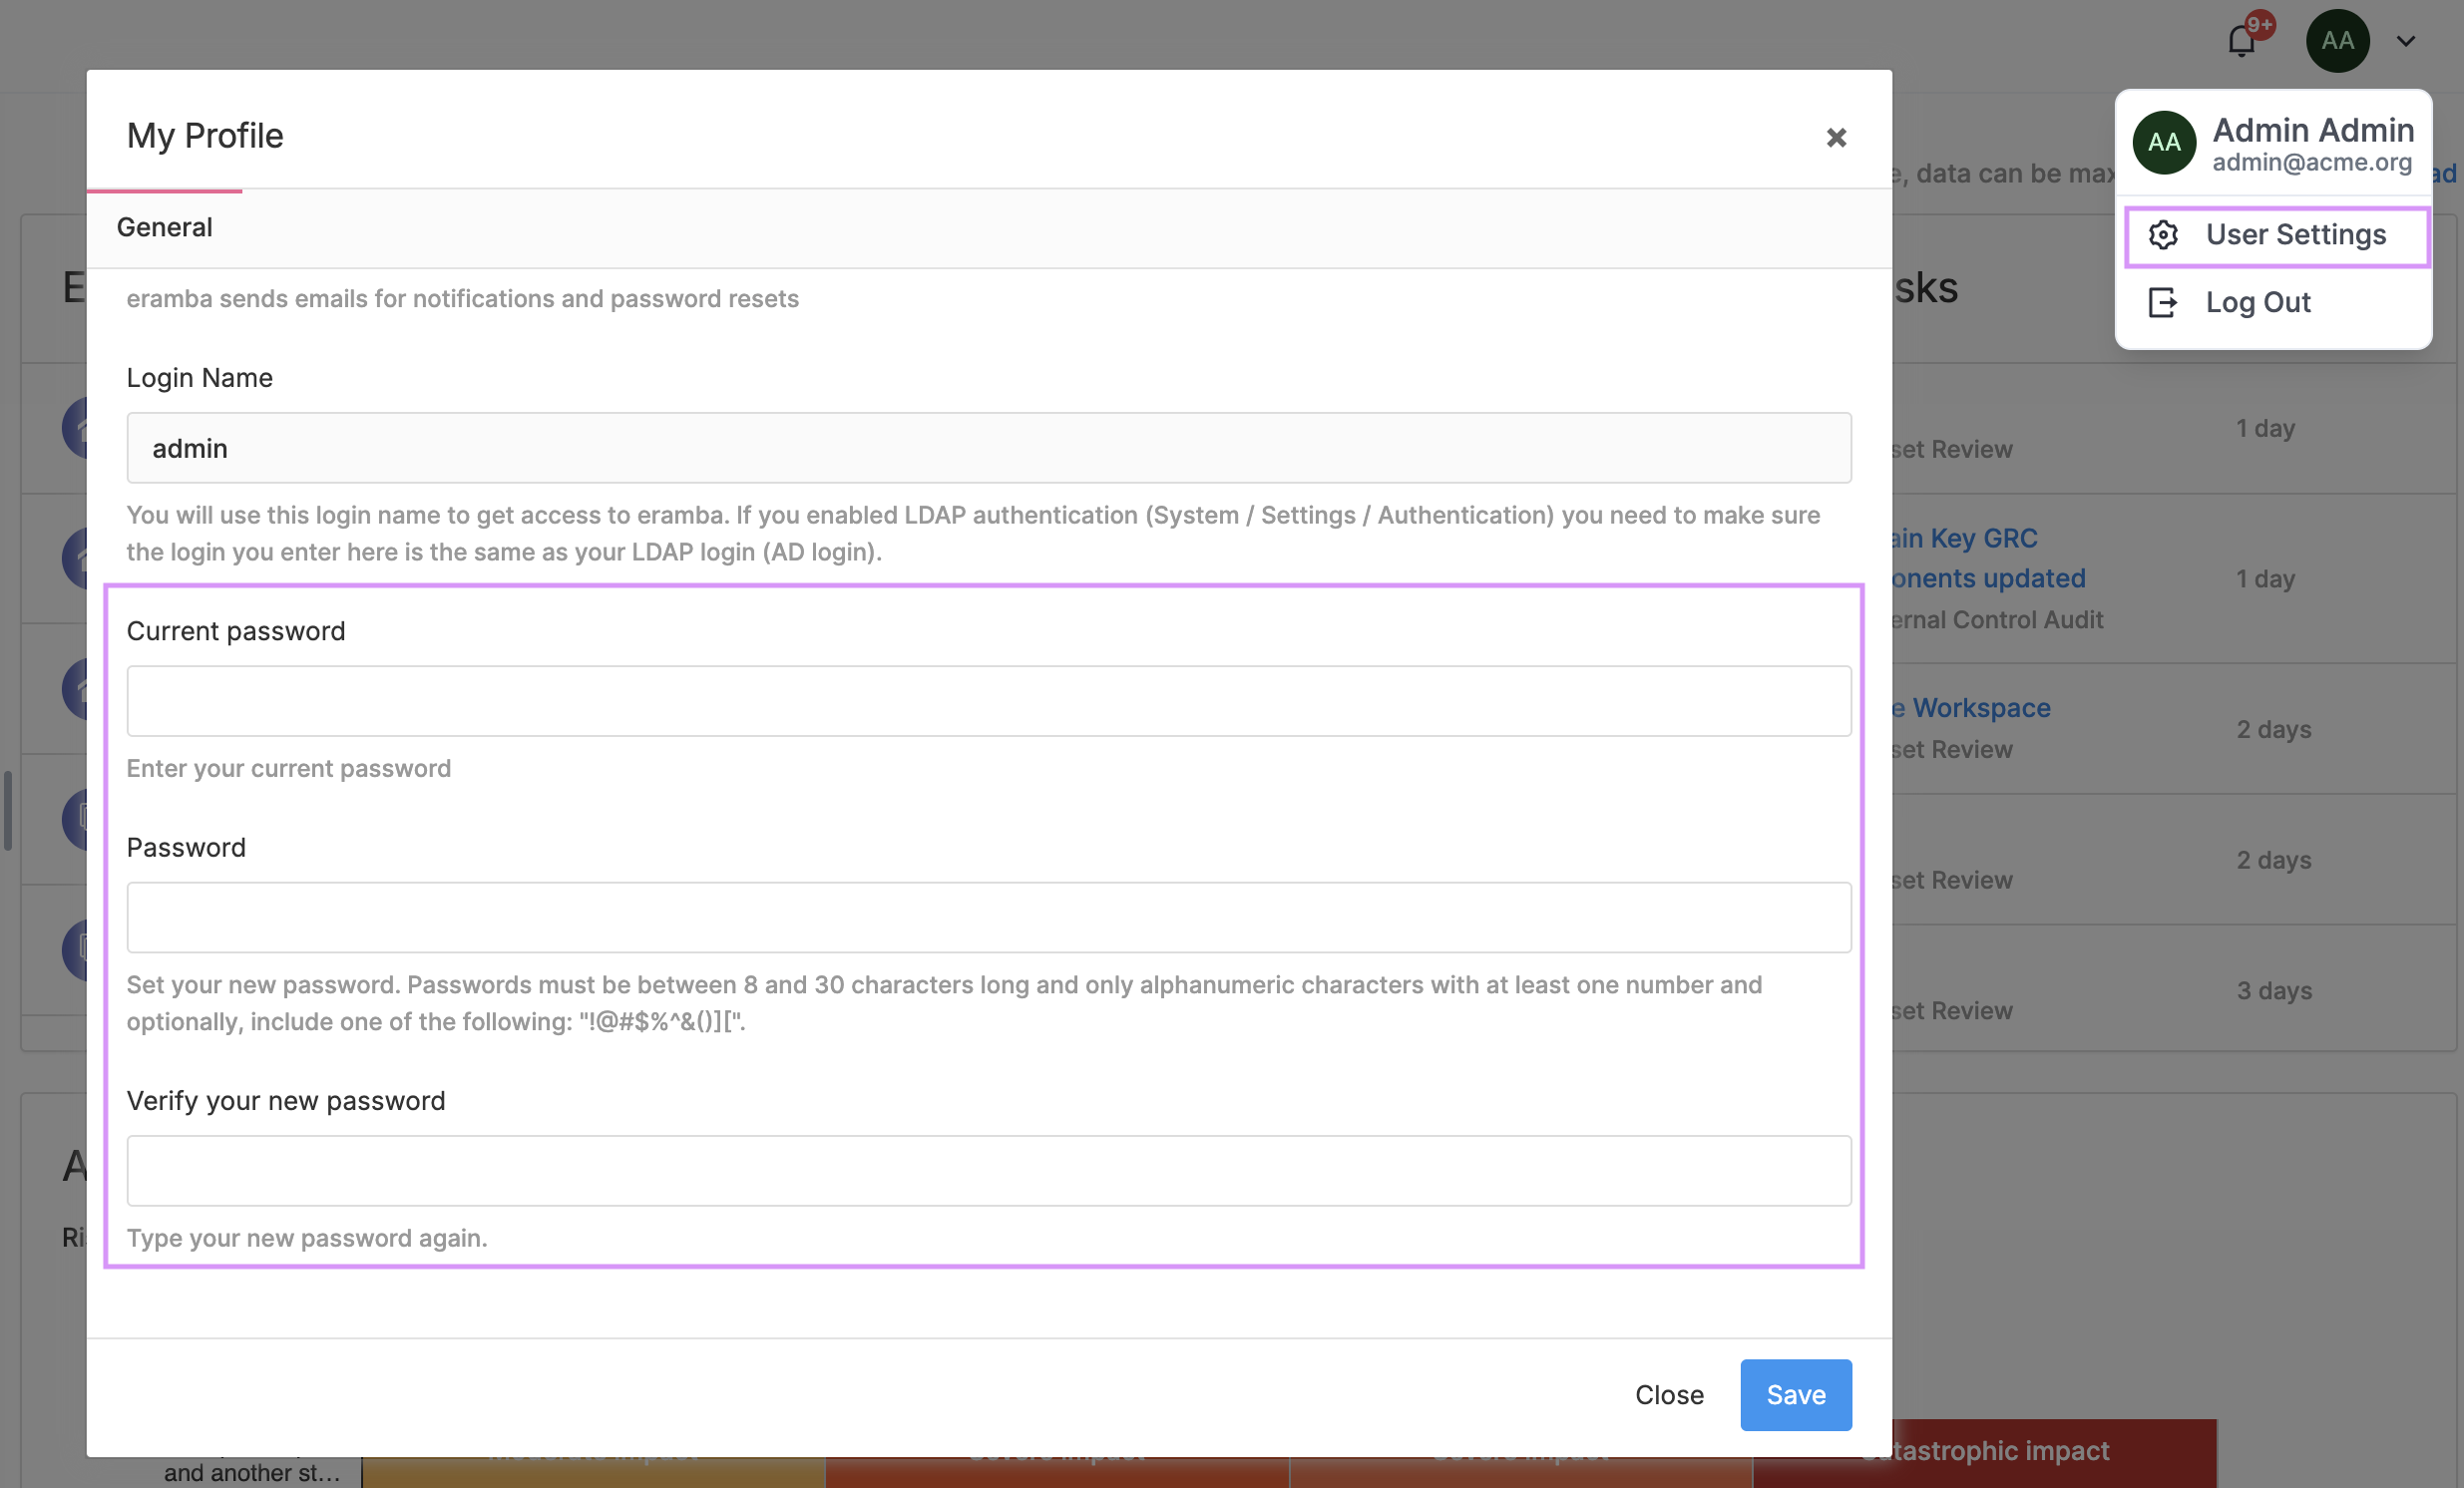
Local accounts can manage their password from User Settings (top-right corner, user profile). Admin group members can change other users passwords.
Brute Force
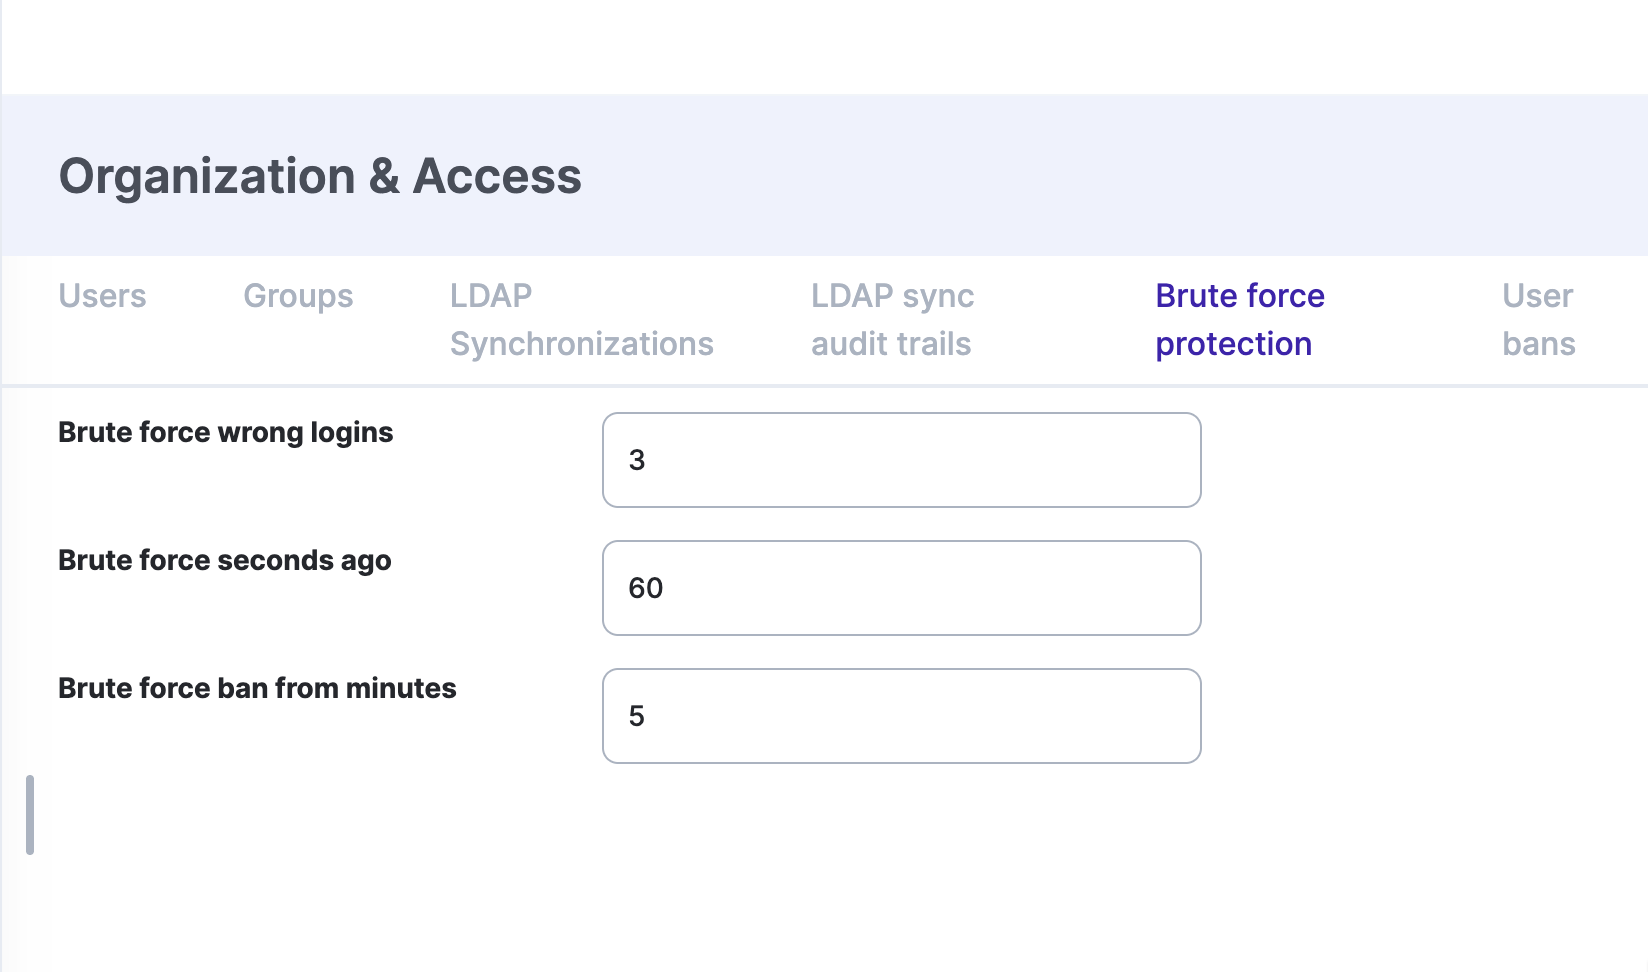
By default, all locally authenticated accounts are protected by Brute Force protection. This means that if a user enters incorrect credentials while attempting to log into Eramba, the system will block further login attempts. Brute Force protection can be configured under Settings / Organization & Access / Brute Force Protection.
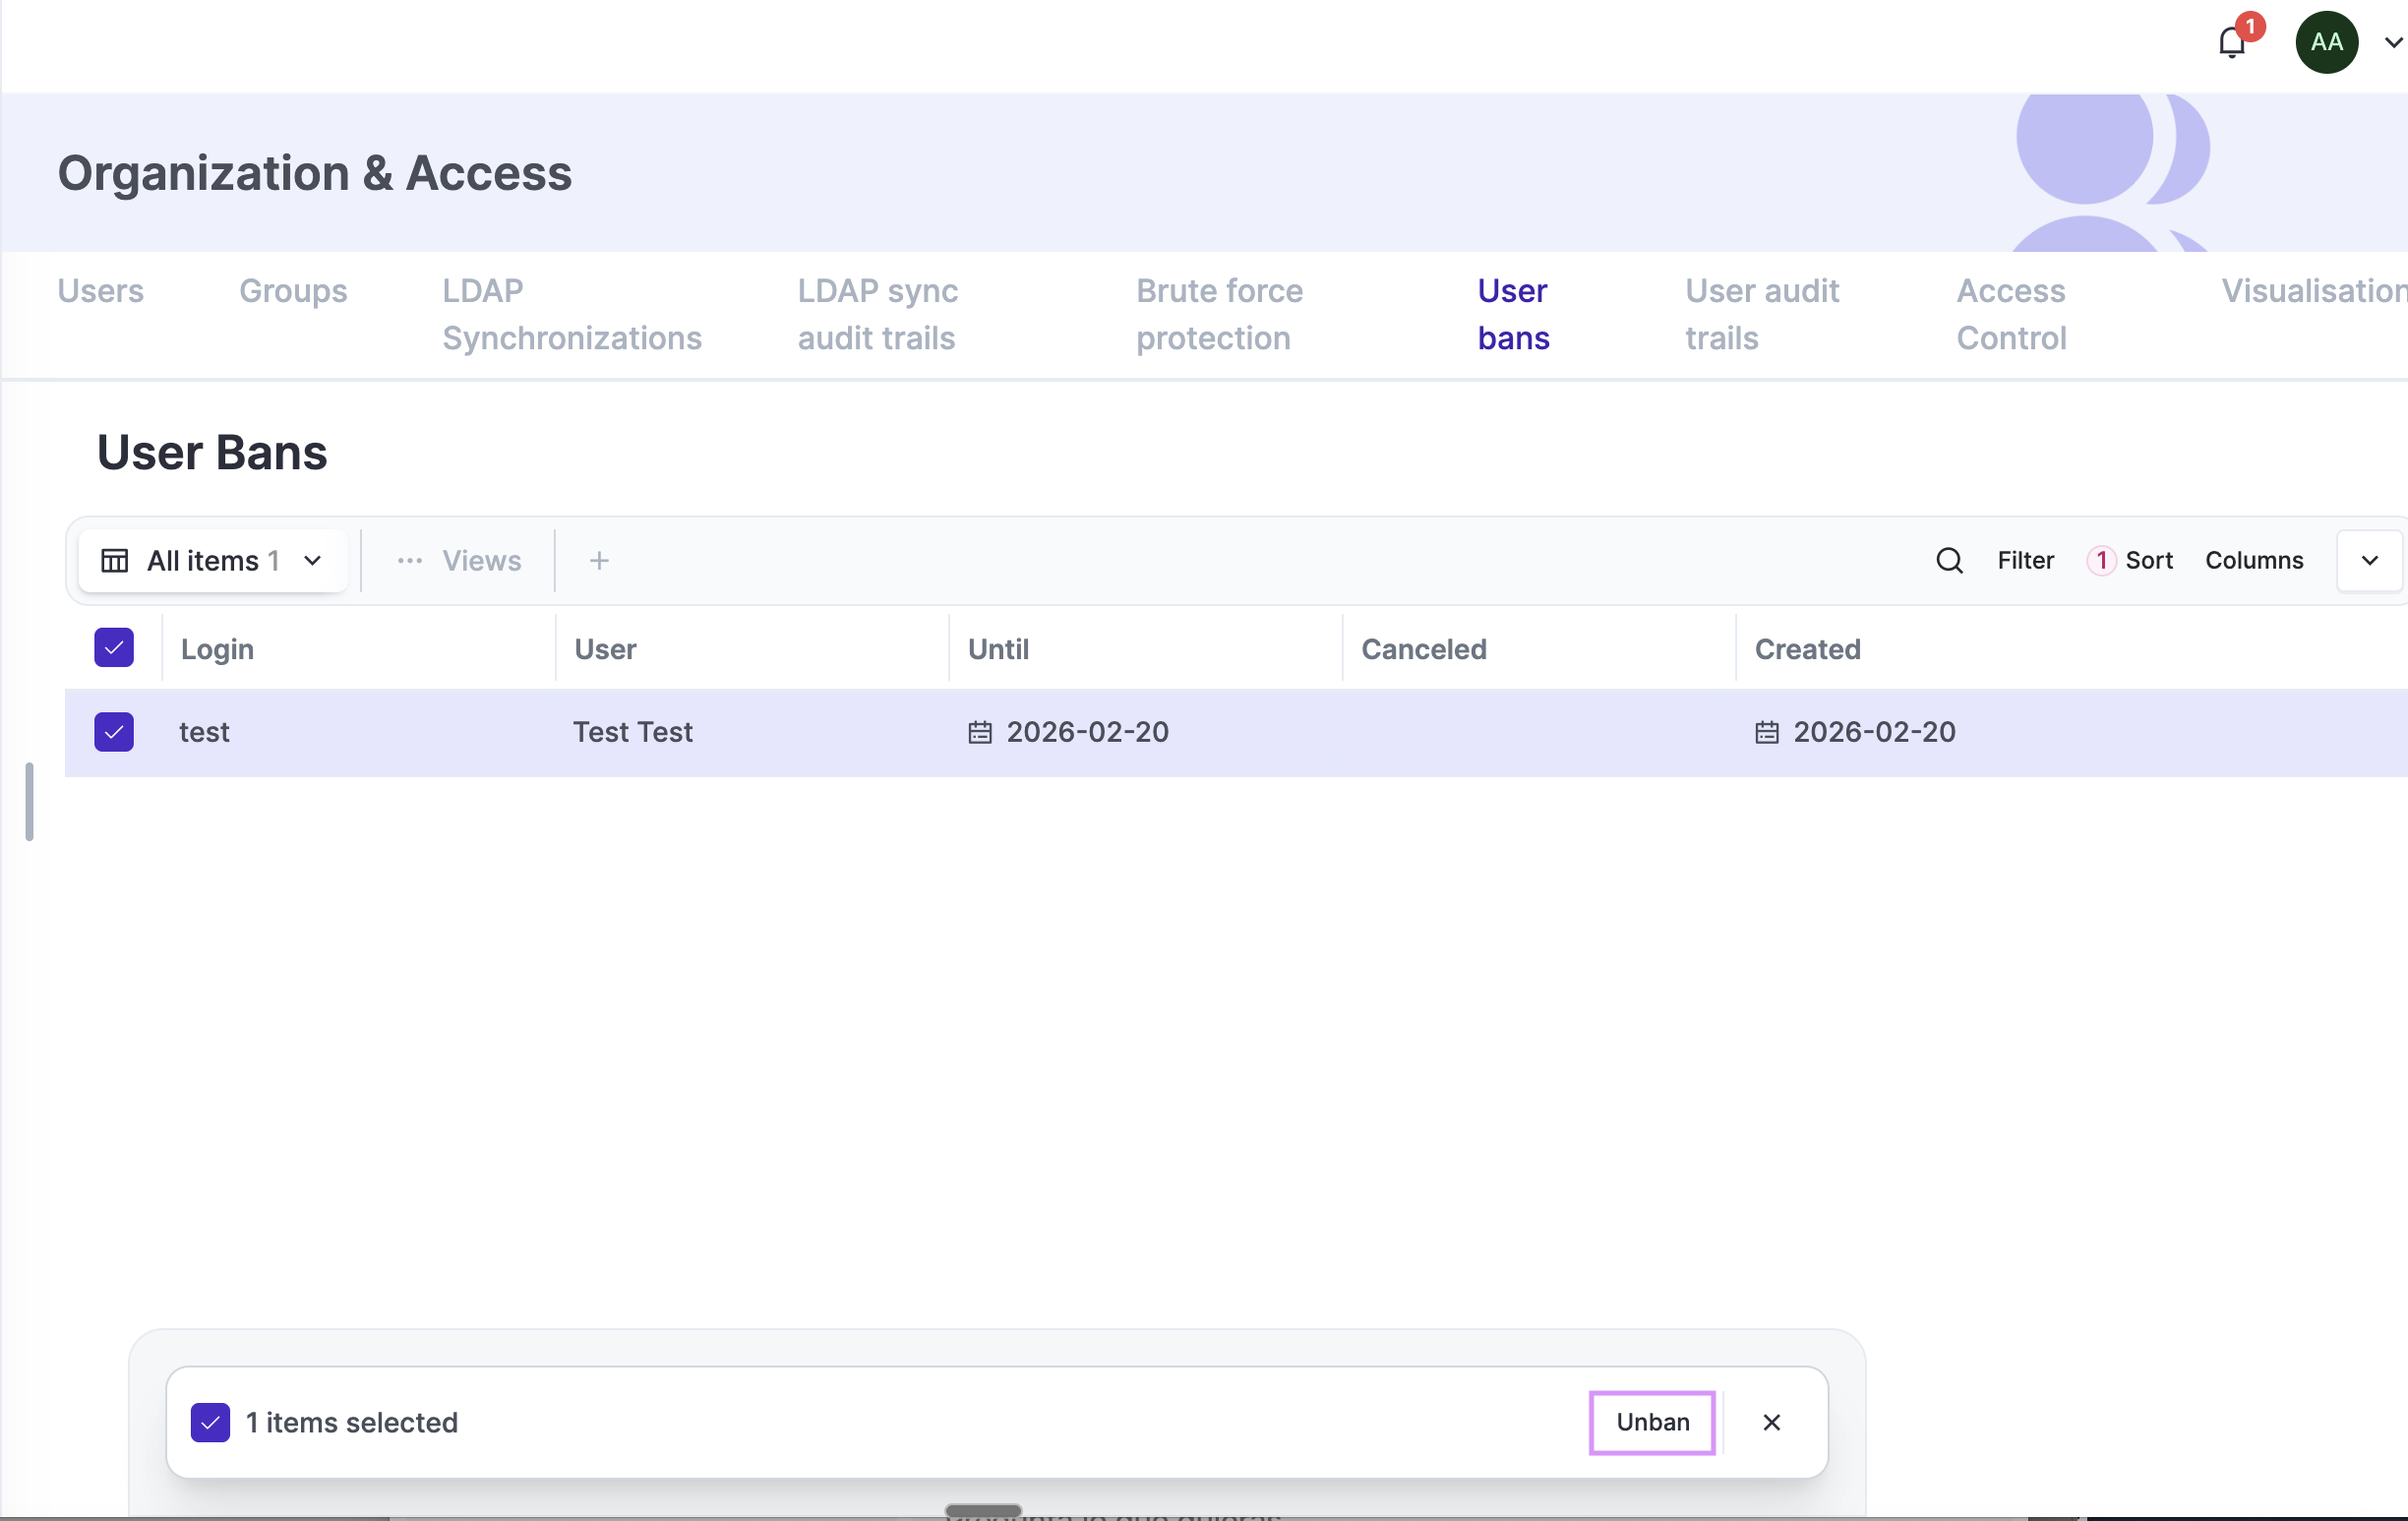
Blocked accounts can be unlocked by navigating to Settings / Organization & Access / User Bans.
How-to Guides
Create GRC Accounts
-
We use a group called “GRC”; your group could be called something else.
-
We set the “Portal” to the “Main” portal only. This might be different depending on your use case. You will see instructions in the course that brought you here.
Create "Other" Accounts
Create "Dummy" Account
-
We set the “Portal” to the “Main” portal only. This might be different depending on your use case. You will see instructions in the course that brought you here.
-
We set a number of "Template" groups, this instructions may differ depending onthe use case. You will see instructions in the course that brought you here.
Create Department Groups
Create Custom Permission Groups
Create User CSV Import
Missing
Create LDAP Sync
Missing