Managing Groups & Access Lists
How groups and their permissions are defined and tested
Introduction
In this episode, we teach you how to manage groups in eramba. As explained already all your user accounts will need multiple groups:
- One group will tell you where that person works in your company (department)
- One or more (very likely many) will tell you where that person can access eramba
For the reasons listed above you will need to create groups in eramba and understand where to assign them. In this episode, we will simply explain how groups are created, edited, assigned and deleted.
Creating Groups
Groups are managed in the "System" > "Settings" > "Groups" section.
You will see many default groups already created, these groups are there to make your life a little easier in terms of access permissions, which we'll discuss later. To create a group simply click "Add" and complete the form.
By default, all new groups come with no permissions allowed. This means that if you create a group and assign that group alone to a user, that user account won't have access to any module or feature other than the landing page.
Deleting Groups
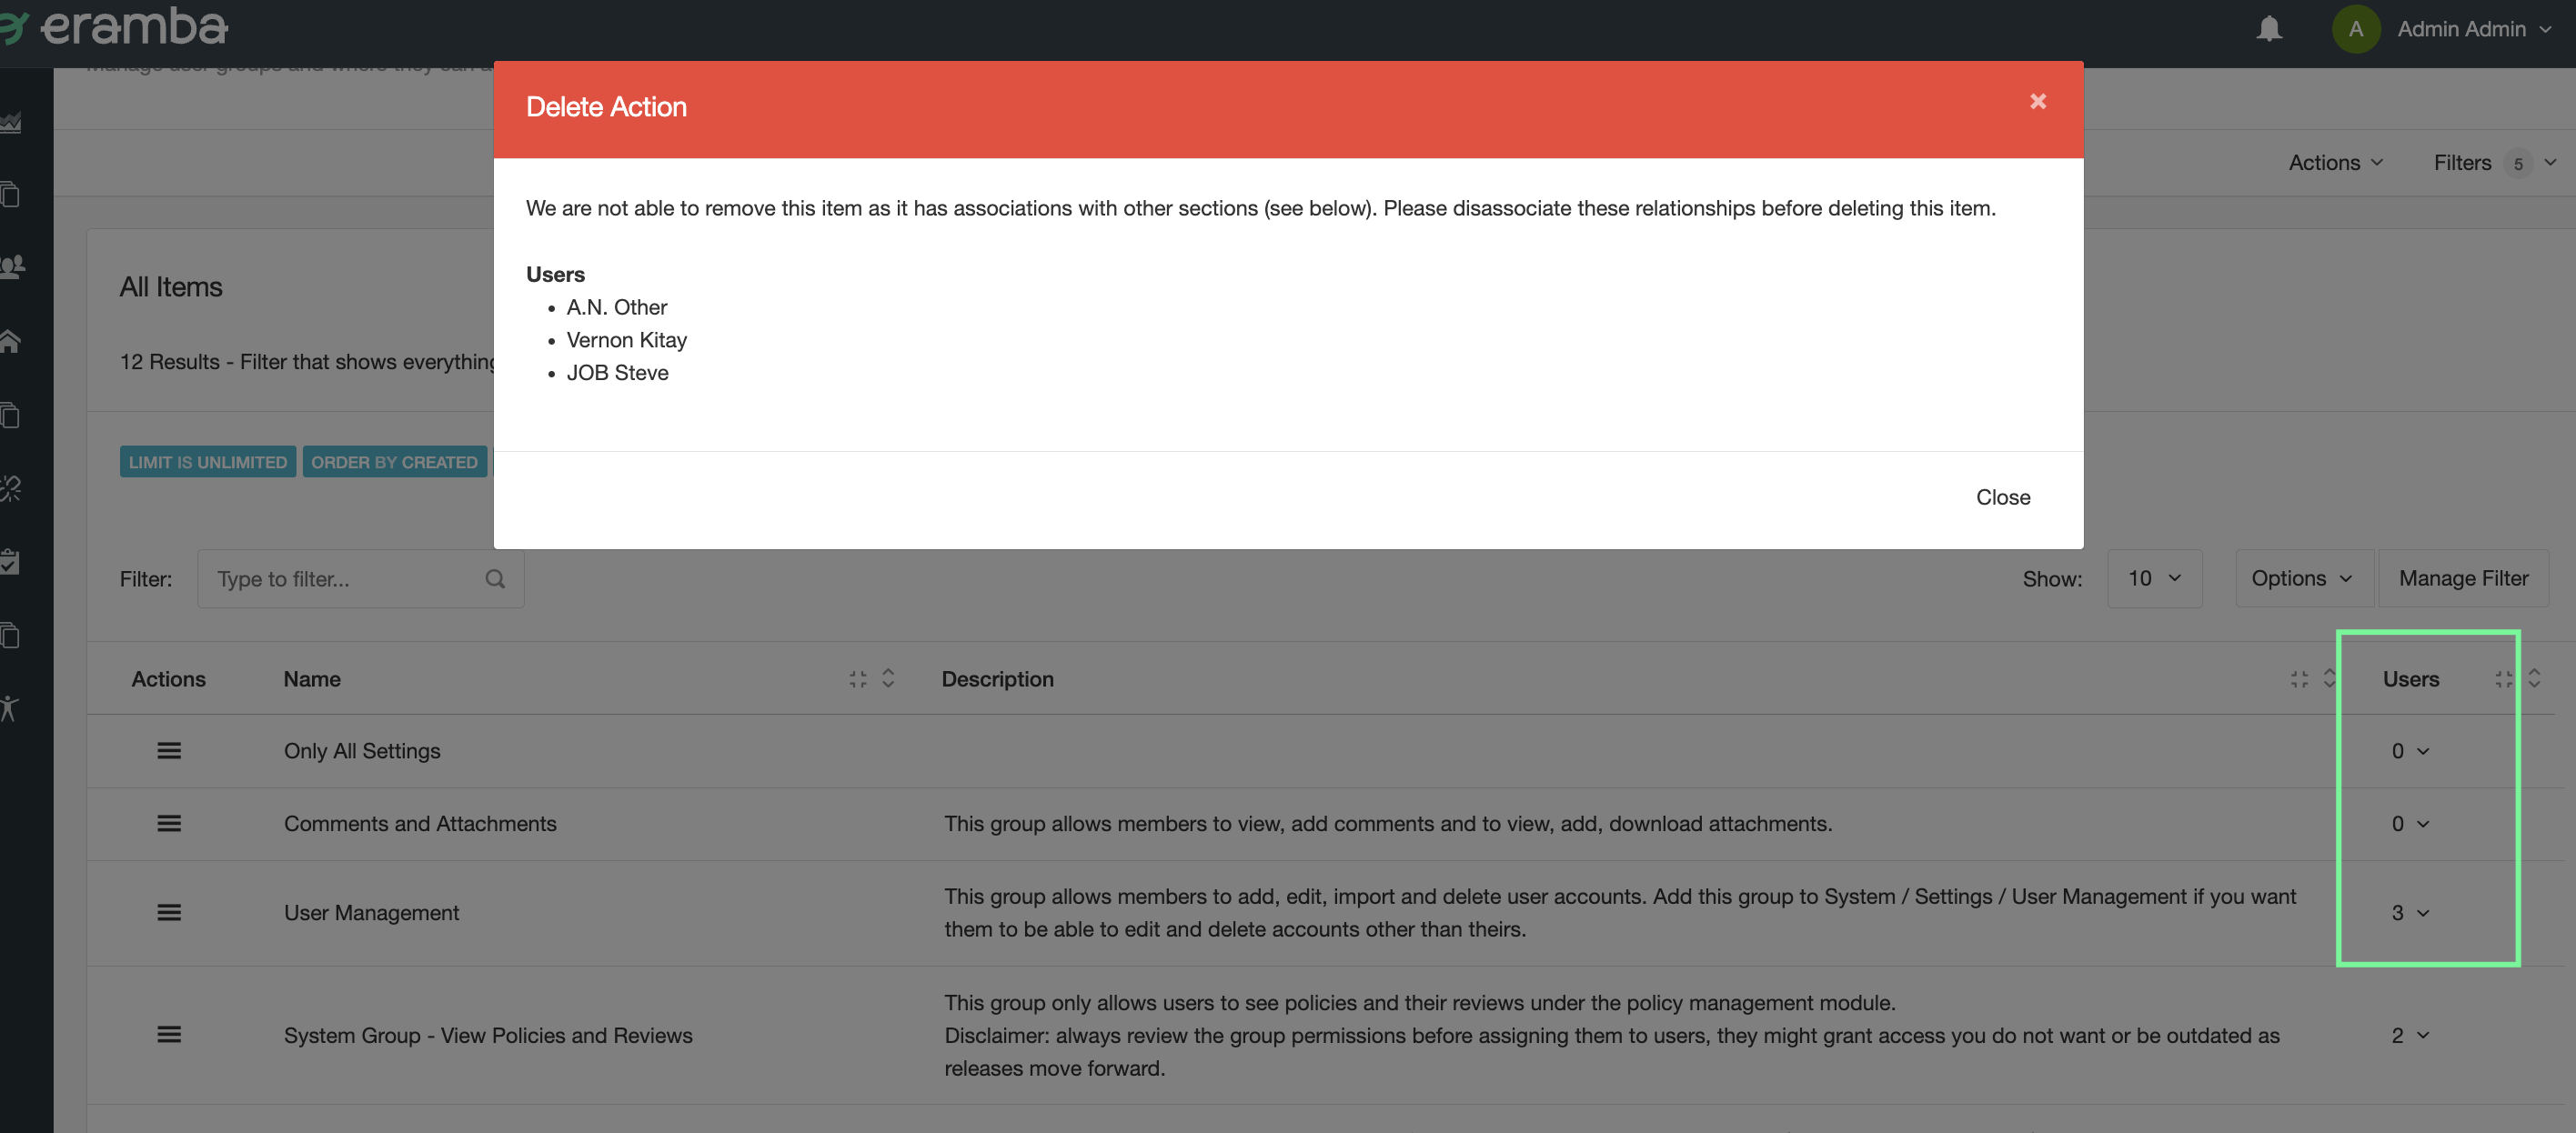
You won't be able to delete groups which are being used by user accounts, you first need to remove all group associations and then delete groups. If the group you are trying to delete has no user account association then you will be able to delete it.
Assigning Groups
Groups you create can be assigned to users from the User Management module located at "System" > "Settings" > "User Accounts" section. Edit the account and adjust the group field to your needs.
Note: In order for changes to reflect the user might need to log out of the system and log in again.
Adjusting Access Lists
As explained groups determine where people can access eramba, we call this functionality Access Lists. Every click in eramba (Add, Edit, Delete, List, etc.) is an access list entry and therefore there are hundreds of them.
On each group defined you can select which one of these Access Lists the group is "Allowed" or "Denied". To make your life simpler we have multiple pre-defined groups with common access list requirements:
- View only Risks
- View only Policies
- View only Controls
- Create Comments & Attachments
- Etc
If you want to let a user view Risks, Policies and Controls you then need to grant that user those three groups. An alternative way would be to create a group and customise those permissions into one group, most times this is a bad idea as in the long term it complicates permission management.
If you want to adjust permissions to any group, go to "System" > "Settings" > "Authorisation". Select the group you just created and then select the module you want to allow access to.

All actions for that module will be displayed. Choose which ones you want to enable (remember, by default, they will all be disabled if the group is new).
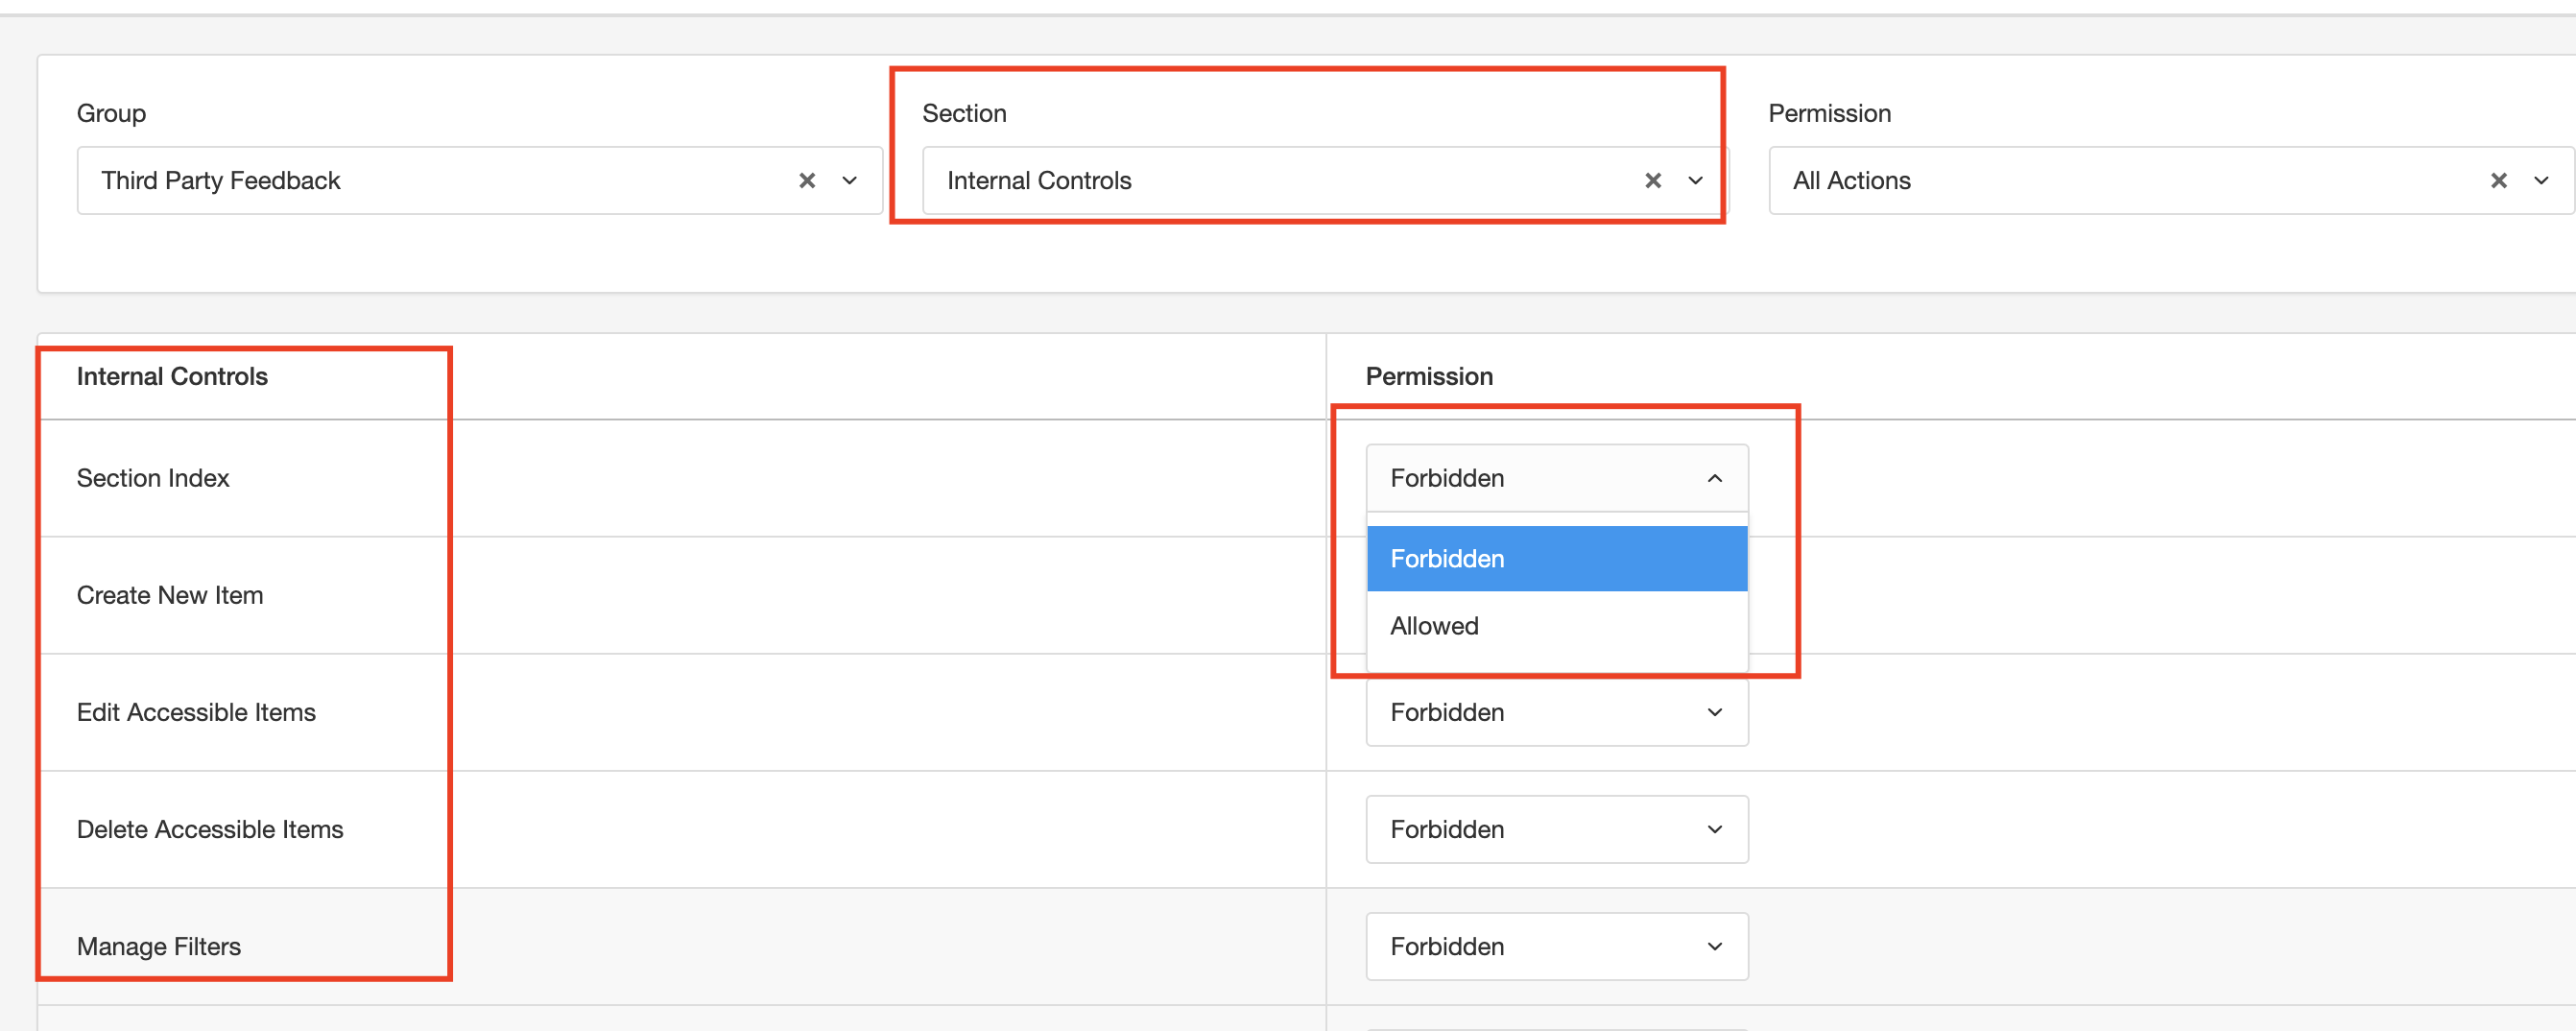
Repeat this process for every module until you have configured the group as you wish. Since, at this stage, you might not know what eramba does, it might be difficult to tell what permissions to grant. Always assign the least amount of permissions. When you start to use the system you can add additional permissions as the need arises.
In the scenario where a permission race condition occurs (where a user has two groups assigned and these groups conflict in Allow/Deny permissions) then the Allow ACL will take priority over the Deny.
Access Matrix
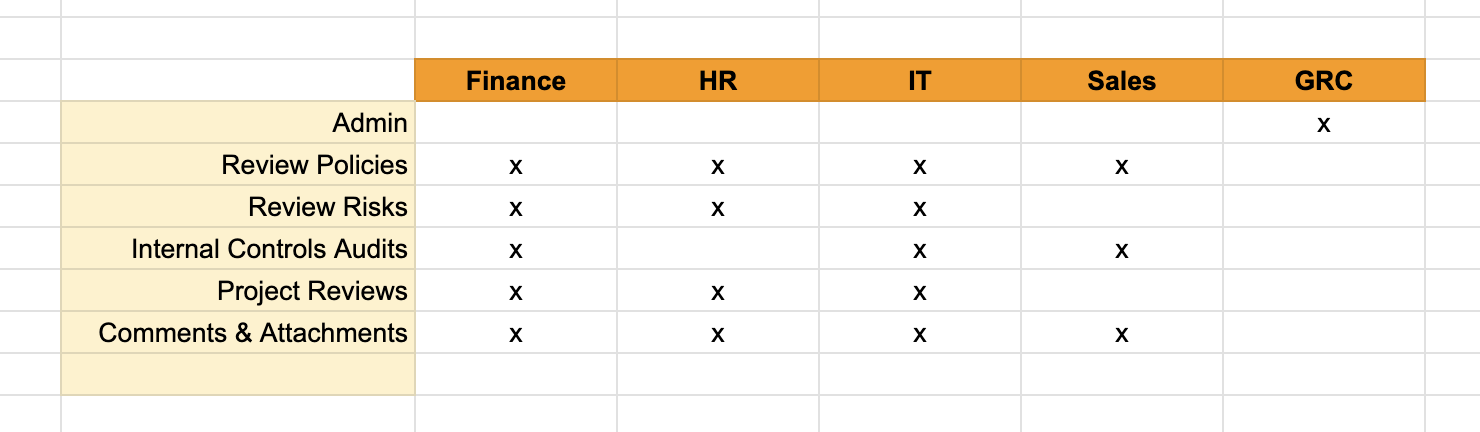
When you install eramba and implement you do not have to worry much about creating accounts for people outside the GRC department, but eventually, you will and you want to make sure you give them the access rights they need. The easiest way to decide who (team) has access to what (module, click, etc.) is to build a simple Access Matrix as shown in the table below. For example, we know from that table that any user in the Sales department needs:
- Review Policies
- Access Controls Audits
- Provide Comments & Attachments
You simply need to create (or in most scenarios, use an existing group in eramba) a group in eramba, assign the right permissions to each group and then test with a dummy account if those permissions are working correctly or not.
The method we use to create this matrix is:
- Ask yourself which department needs to access eramba
- Then ask what for what purpose
The questions above will give you in a top row the teams (groups in eramba) and in the first column in the left the permissions (groups as well) you will need to create. As you can see many permissions will be reused across different teams.
Testing Permissions
After you create (or use the default groups that come with eramba) the groups you need for every column, you need to test these groups do what you want. We typically recommend having a dummy or test account you can use to test such permissions.
Playlist
- Episode 1Introduction to Access Management5 mins left
- Episode 2Managing Groups & Access Lists7 mins left
- Episode 3Managing User Accounts4 mins left
- Episode 4Configuring Authentication1 min left
- Episode 5Configuring LDAP Connectors11 mins left
- Episode 6Configuring Google OAuth Connectors1 min left
- Episode 7Configuring SAML Connectors2 mins left