Introduction
Course Introduction
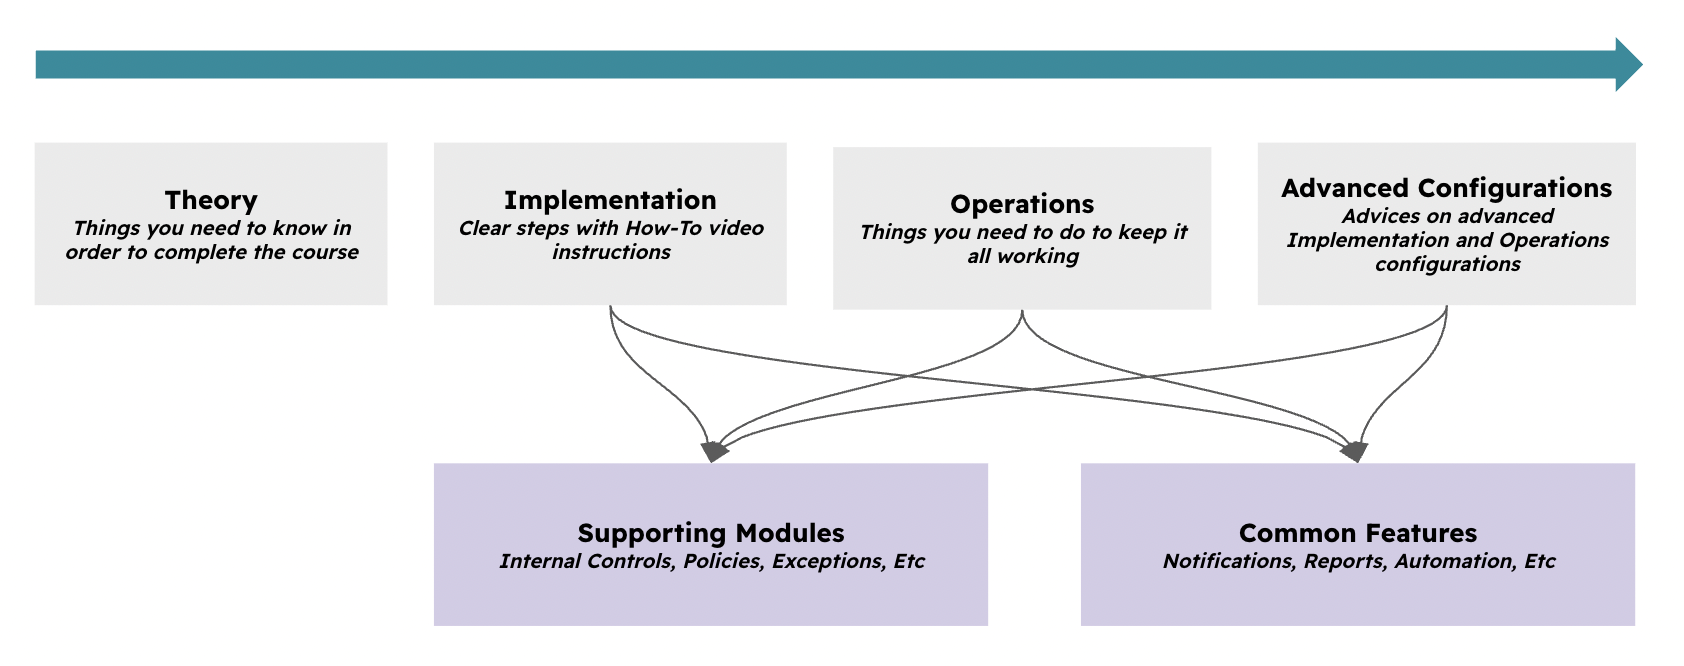
The course is structured around Theory, Implementation, Operations, and optional Advanced Configurations. You cannot skip these steps; otherwise, you will not succeed with a successful implementation and later operation of the use case.
At times, this guide will require you to understand how other modules (Supporting Modules) and features (Common Features) work. Follow the instructions carefully.
Typical Scenarios
This chapter shows practical ways to use online assessments for:
-
Third-party (supplier) assessments
-
Risk assessments in your organization
-
Gap assessments if you are a consulting company
Supported Versions
This feature runs on Enteprise version alone.
Workshops
If you are an enterprise customer, you can purchase 8-hour implementation workshops delivered by a GRC professionals. Contact support@eramba.org for more information.
Theory
Module Relationships
The Online Assessment (OA) module can operate independently without any other module unless you are using it for purposes in which case you will rely on multiple "Supporting Modules":
-
Supplier Assessments: Requires association with the Organization / Third Party module.
-
Application/Asset Assessments: Requires association with the Asset Management / Asset module.
-
Risk Assessments: Requires association with the Risk Management module.
-
Data Privacy Assessments: Requires association with the Asset Management / Data Flow module.
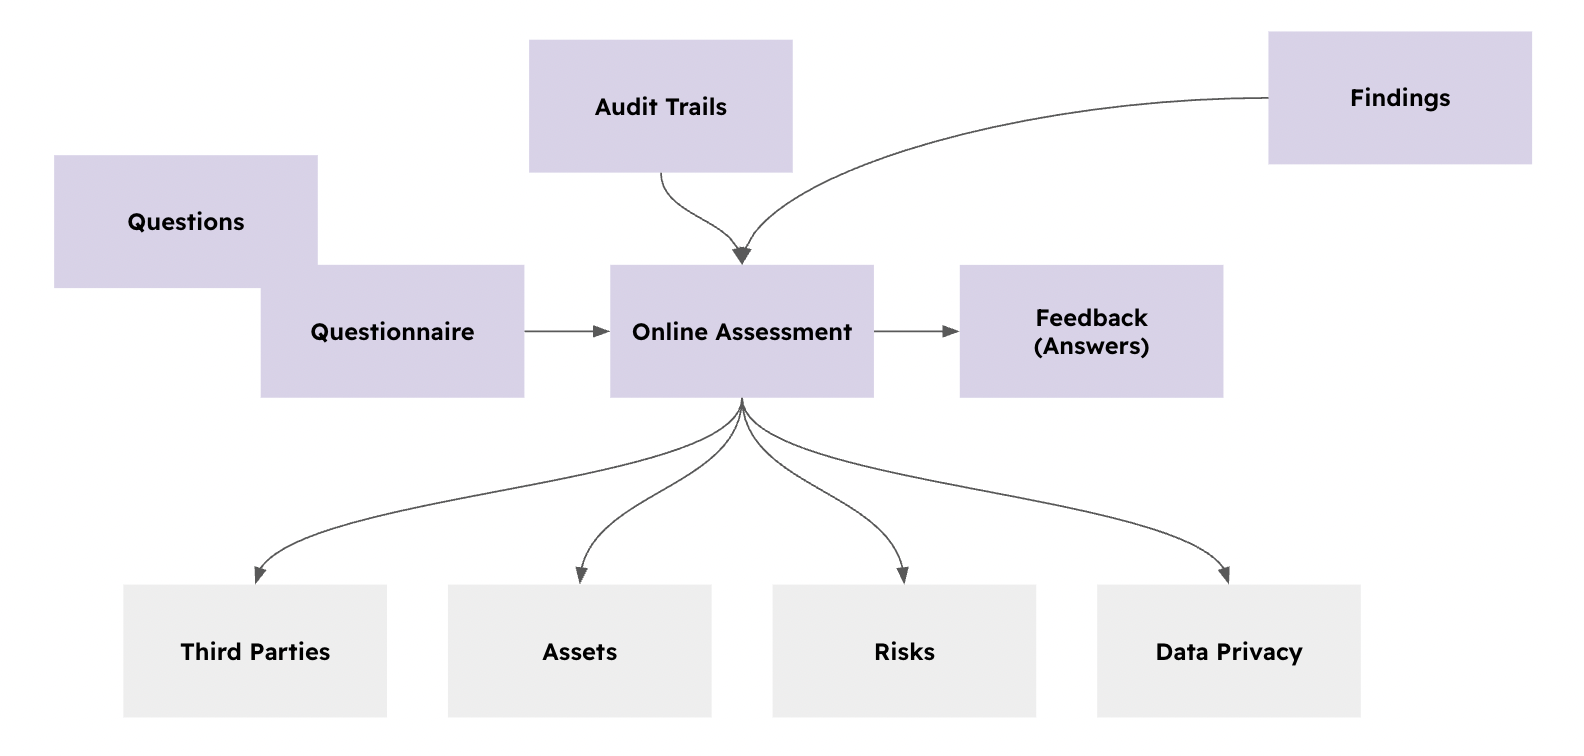
Within the OA module, you have multiple sub-modules that are required for the OA module to operate.
-
Questionnaires: Where you maintain the library of questionnaires used in your OAs. Each questionnaire is composed of one or more questions.
-
Feedback: Contains the answers provided in your OAs.
-
Findings: Used to record specific answers that do not meet requirements or require further follow-up.
-
Audit Trails: Records all activity within the OA module for tracking and compliance.
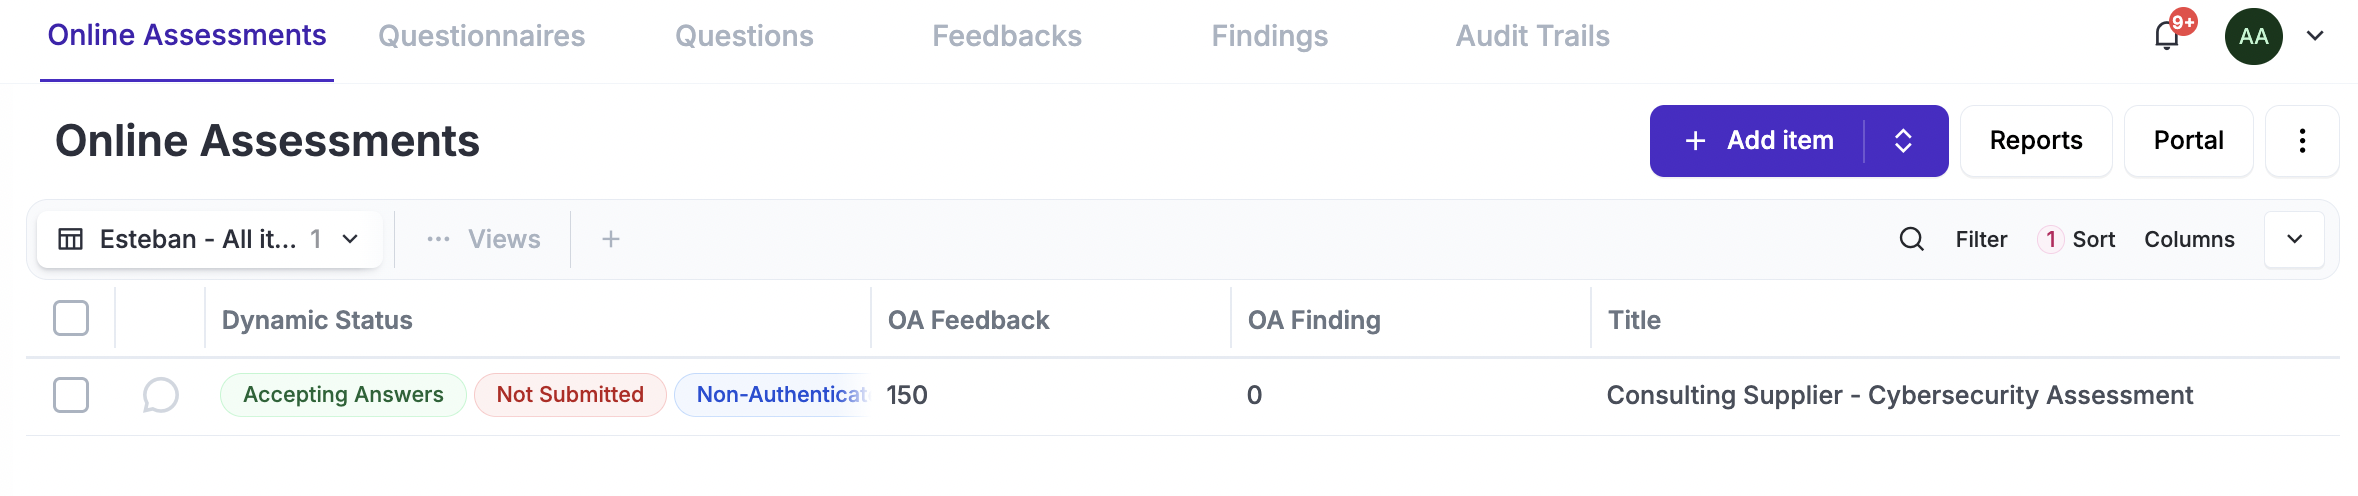
Online Assessments
Every time you want to send a questionnaire to someone (inside or outside your organization), you will need to create an Online Assessment (OA) under the Security Operations / Online Assessments module.
 OAs can be created one by one (using a form) or multiple in one shoot using CSV import files (see CSV Imports common functionality documentation). The main attributes when creating an OA are:
-
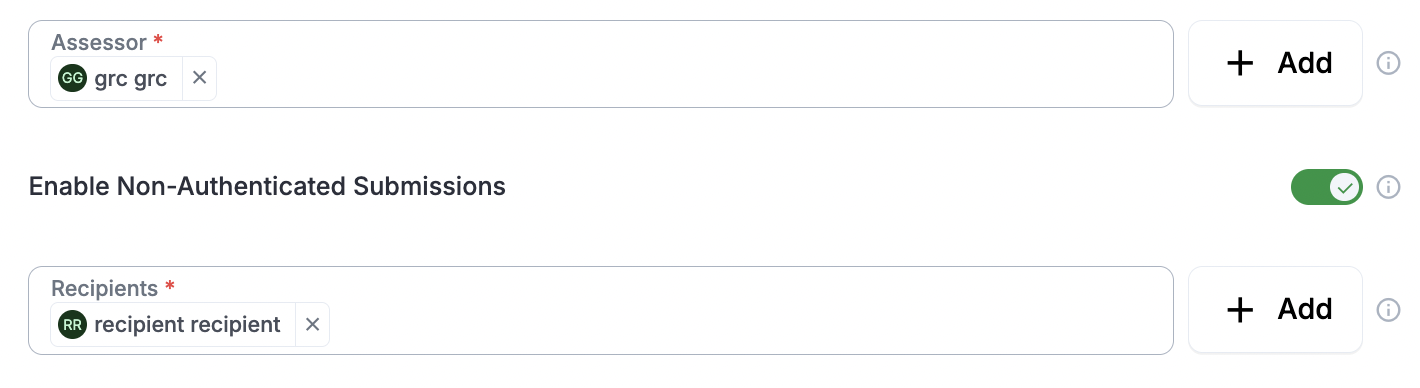
The GRC Assessor and Recipient define who will send the questionnaire (and review the answers) and who will be on the receiving side. These can be single or multiple accounts or groups created in Eramba; anyone assigned will receive a notification and be granted access to work on the OA.
-
The recipient must access the OA Portal (explained later in this document) using either a magic link (a unique link without authentication that allows access to their assigned OAs only) or standard authentication (built into Eramba). Most users choose the unique link, as it is much more practical.
- The questionnaire is essential; it is the primary reason for creating an OA. You can select the one you want to use from the library of questionnaires (explained later in this document). Once the OA is saved, this cannot be changed, even if you edit the OA.

-
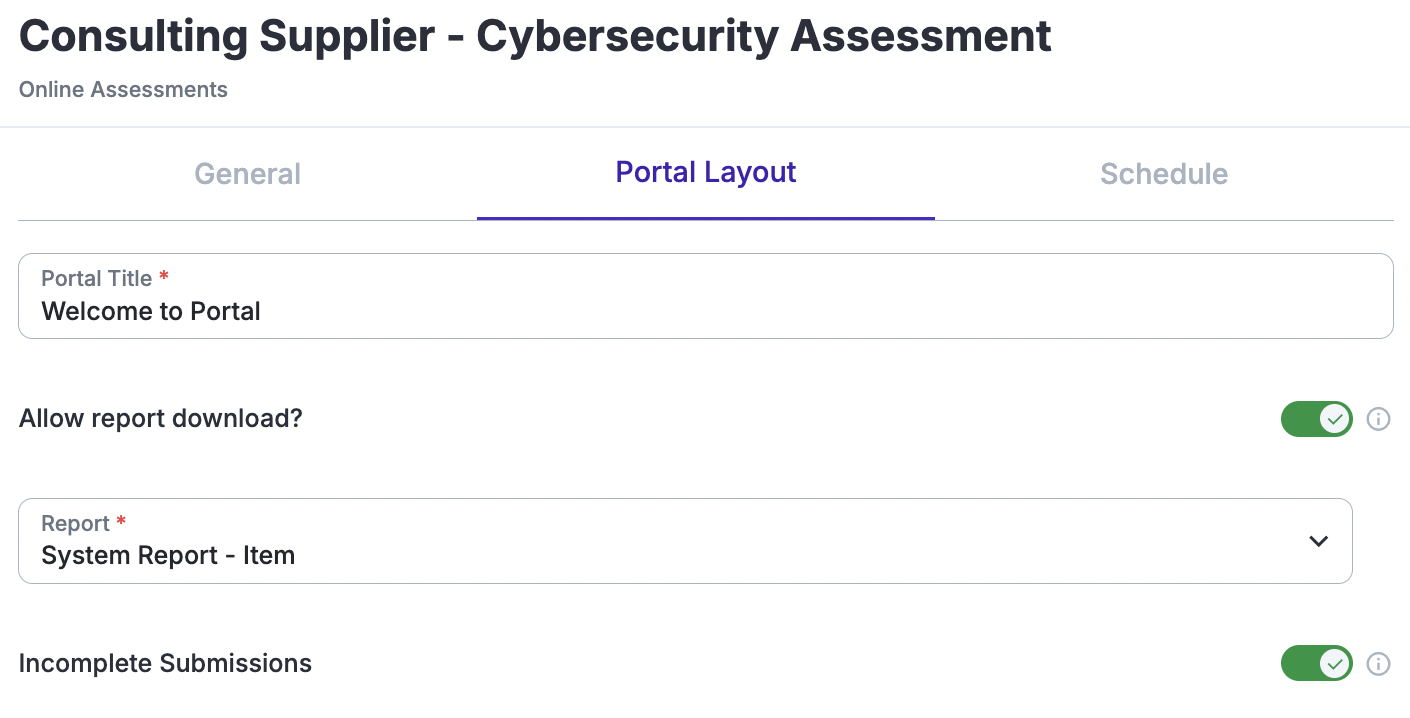
You can include an option on the portal for the recipient to download a PDF report, which you can generate using the common Reporting functionality. These reports are customizable and can contain any information you define. You can also decide whether the recipient is permitted to submit the assessment without answering all the questions.
-
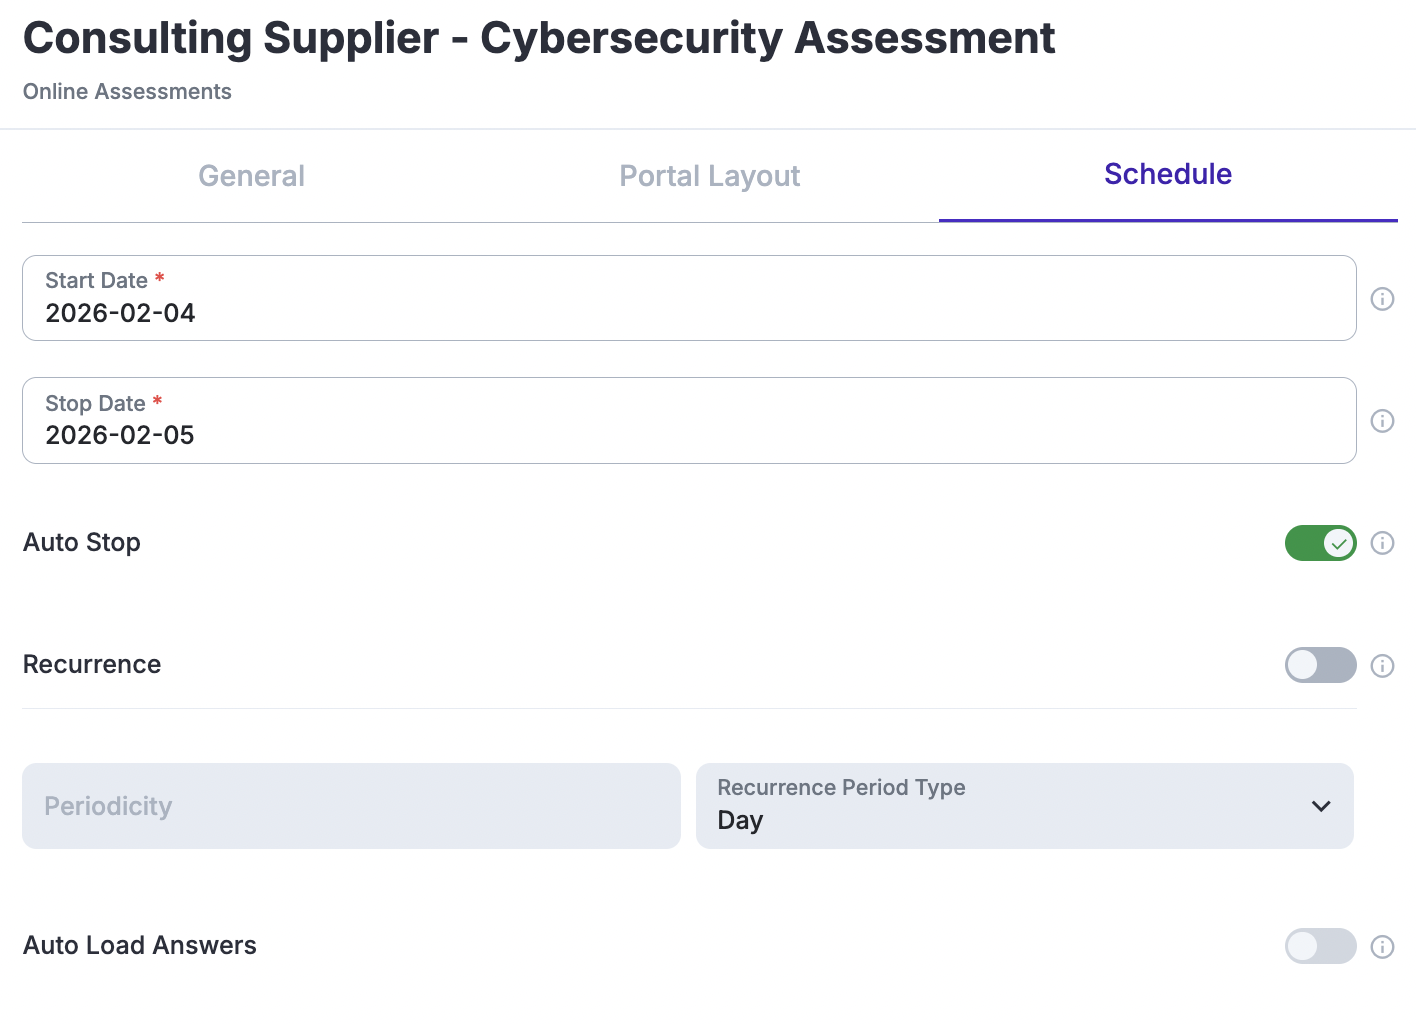
You must define the start and end dates for your OA; on these dates, the OA will automatically start and stop. You can override this at any time by selecting the OA from the list and clicking Start or Stop. Eramba can also send various notifications based on these dates.
-
You can also configure recurrence settings, which will "clone" the OA at the specific times you define and launch it again to repeat the process. You can choose whether to pre-load previous answers to make the process easier for the recipient.
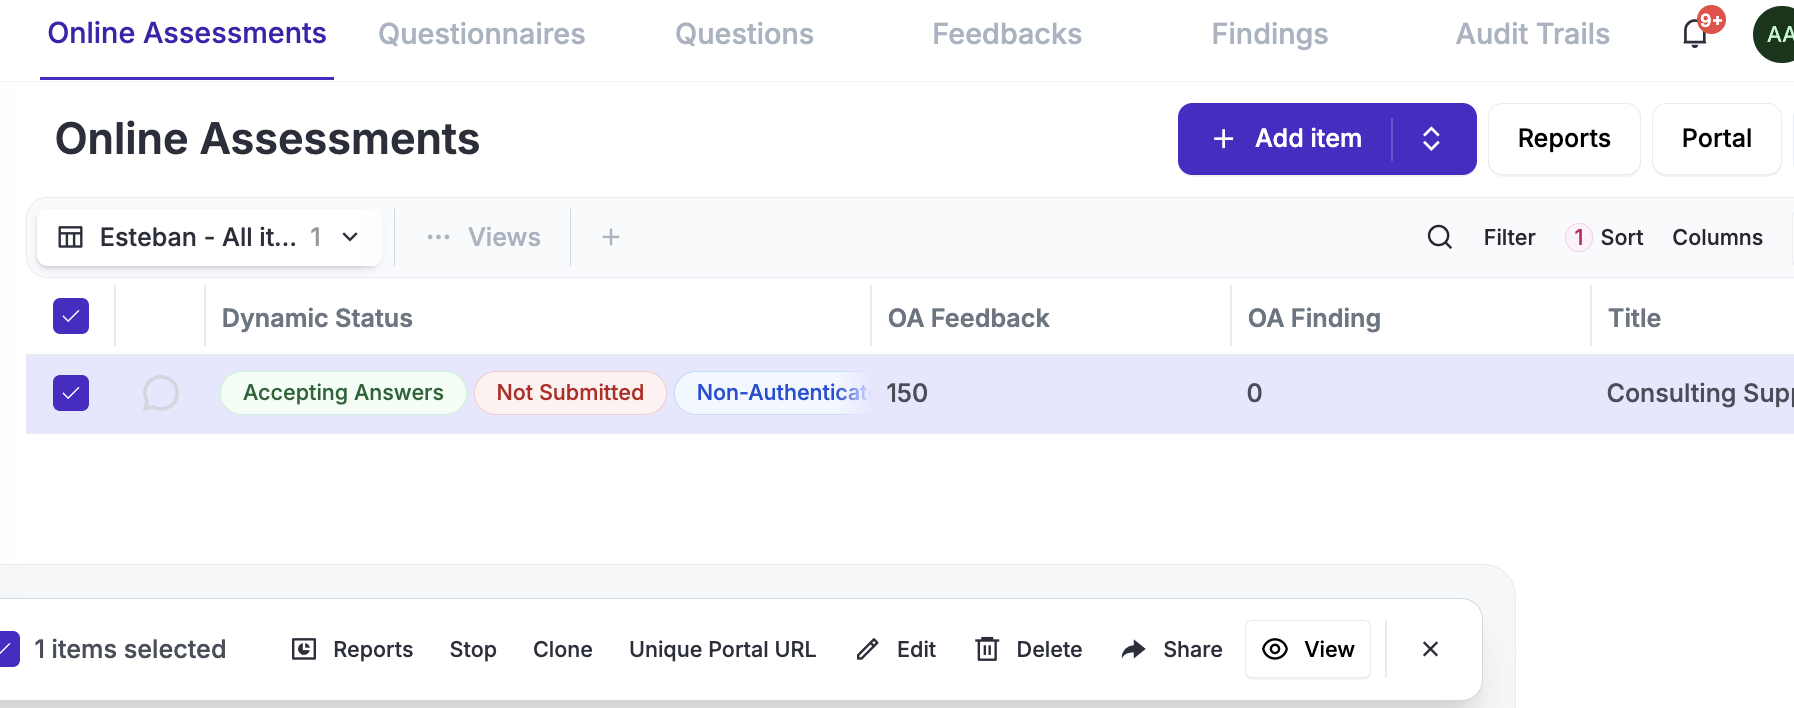
Once you create an OA, selecting it will reveal a menu bar with multiple options. From there, you can start or stop the assessment, generate a unique URL for accessing the portal, and more.
Questionaires
Before continuing, review the following common feature documentation: CSV Imports
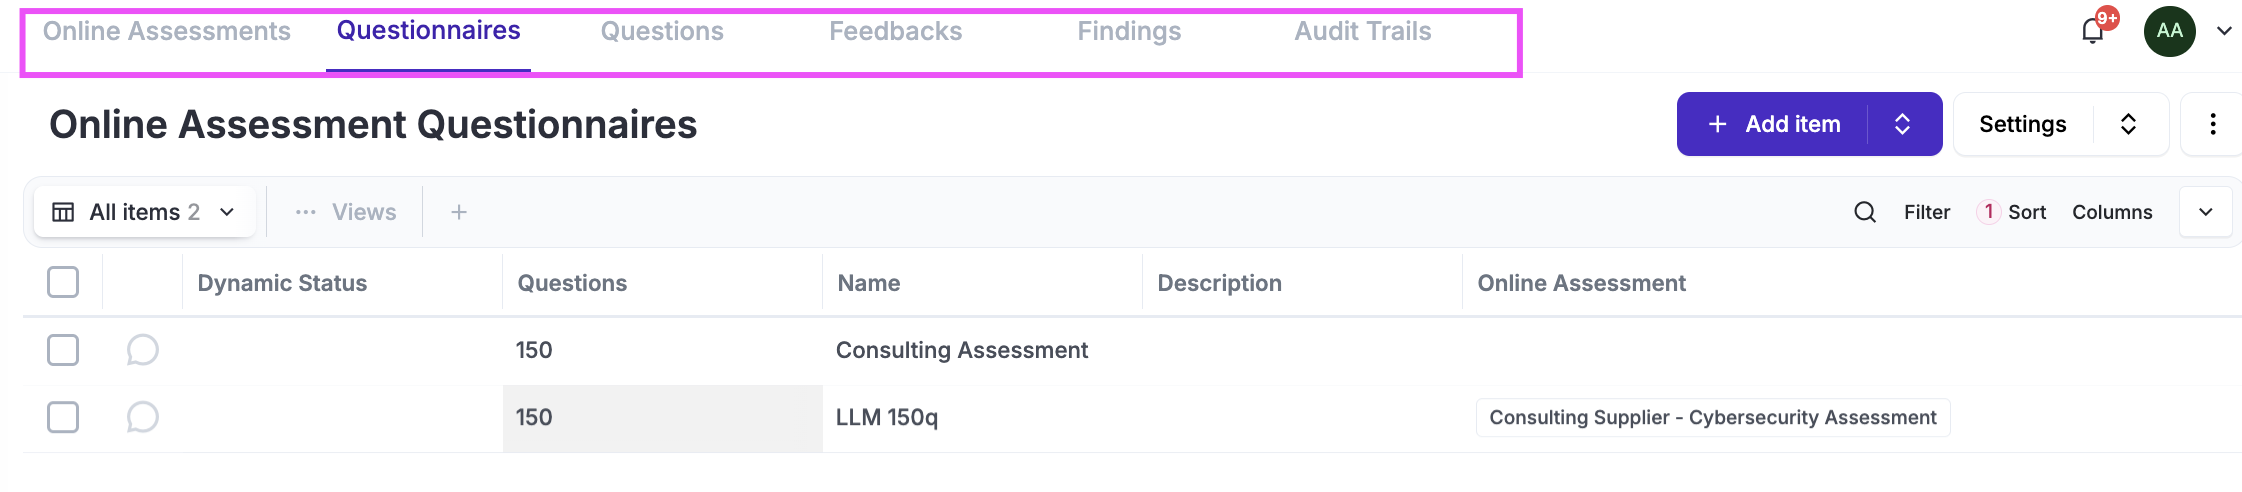
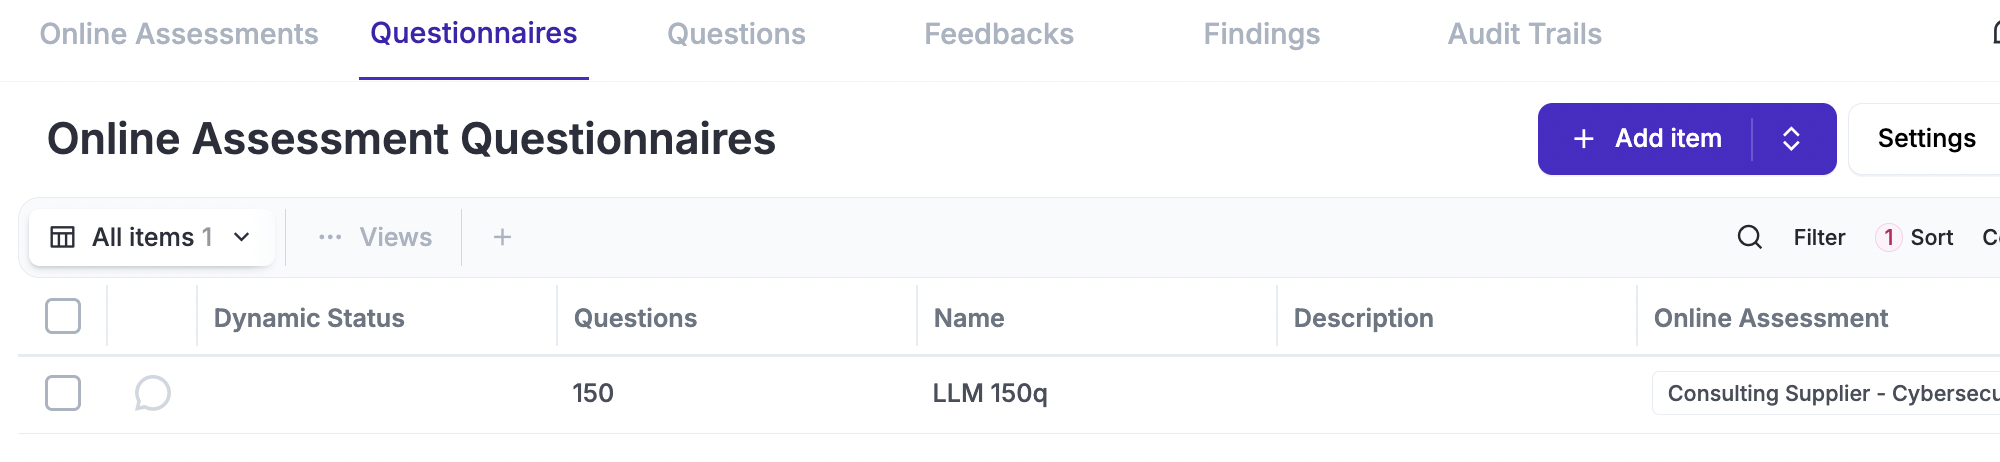
Under the Questionnaire tab, you must import questionnaires into Eramba. These can be configured in a multitude of ways, allowing for highly flexible questionnaires.
Questionnaires are most often created using spreadsheets, where every row represents a question. While this can also be done using the web interface, it is a much longer process. The CSV you use follows the same principles as any other CSV import in Eramba (see the CSV Common Feature documentation), so it is best to follow those specific instructions.
The questionaire can include:
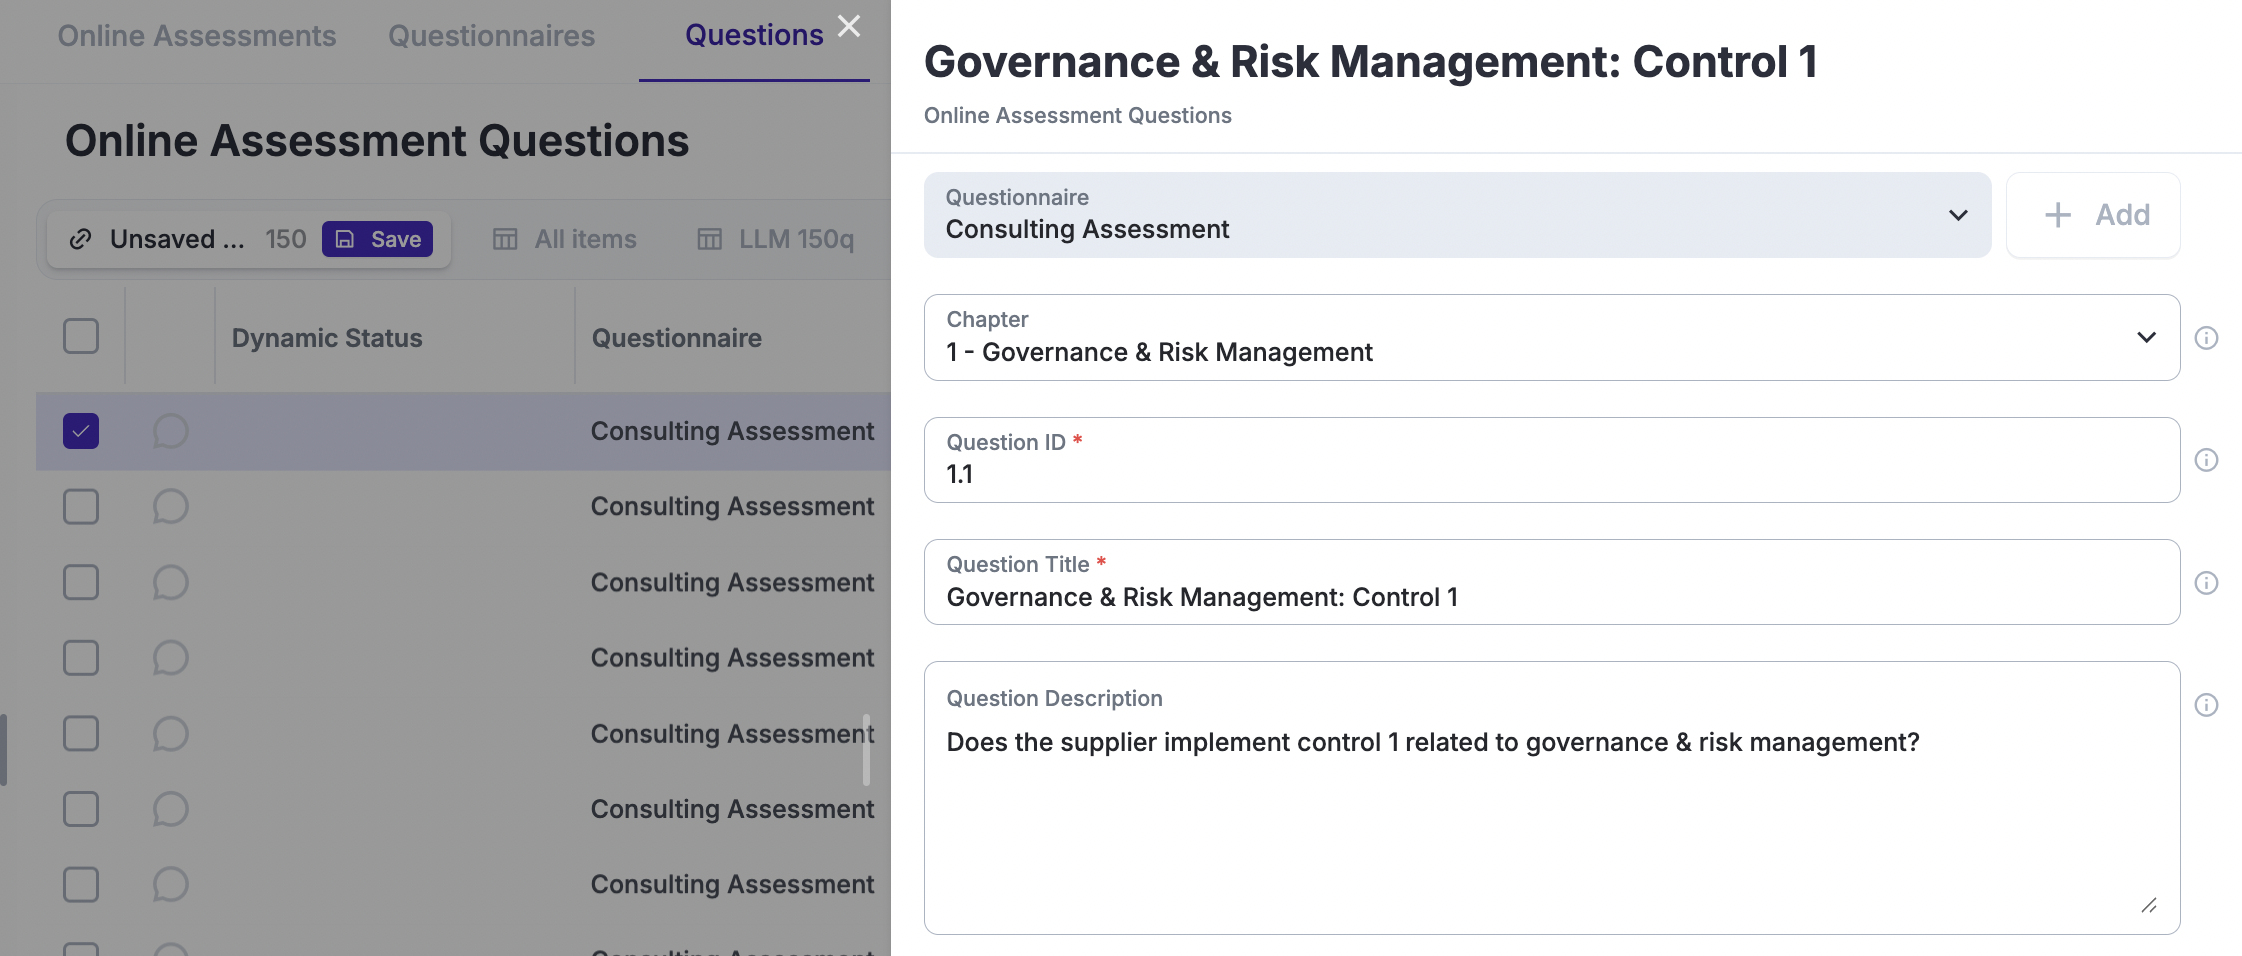
- Questions are grouped into chapters; both questions and chapters must have an ID, title, and description.
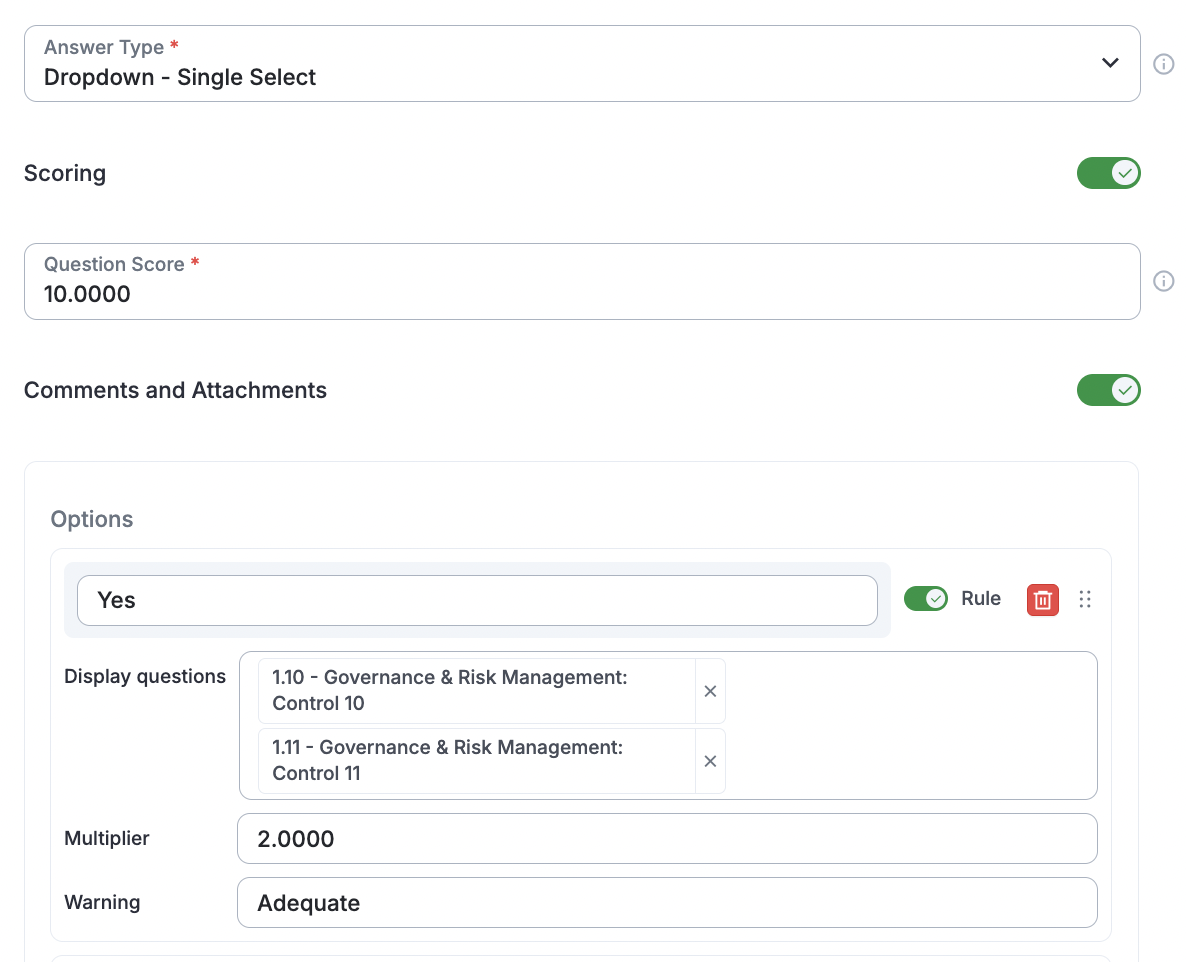
- Questions can be answered in several ways: Dates (where the recipient must select a specific date), Dropdowns, Multiple Dropdowns, Open Text, or a combination of both Dropdown and Open Text.

-
If you choose Dropdowns (single or multiple), you have several additional options: Scoring (where you can set a value for the question and a multiplier for each possible answer), Conditional Questions (where specific answers trigger additional questions that are otherwise hidden), and Warning Messages that appear depending on the selected option.
Assuming you will be using OAs for Supplier Assessments, it is typically a good idea to group your targets by their characteristics and only then define the questions you need them to answer. The fewer questions you ask, the fewer questions you need to review—a win-win situation. Typically, this grouping is structured as follows:
-
SaaS Vendors (product-related questions)
-
Consulting Vendors (no product-related questions)
-
Compliance-Specific Questionnaires (SOC, SOX, etc.)
Is also very important that you make full use of Questionaires potential, in particular dropdowns and scoring. A typical setup includes a "Yes/No" question for a category that only shows questions if applicable. For example: Do you handle PII Data? - where you only show the rest of the questions if the answer is Yes.
Any LLM (OpenAI, Gemini, Etc) can create for you a questionaire by simply importing an empty CSV template and promping something like: "Create a 10-question questionnaire that I can import into the eramba Online Assessment module. Please use the attached CSV template and follow the included instructions. The assessment will be used to evaluate SaaS vendors; ensure you include key security and compliance questions and utilize dropdown menus where possible"
Dropdowns allow you to set scoring; typically, this is used to "Add" or "Deduct" points depending on the expected answer. Scoring all your questions as +1 for a good answer and -1 for a bad answer will typically provide a clear indication of which overall scores are very bad or very good.
Efficient questionaires make a huge operational cost difference.
OA Portal
The OA Portal is the website that your OA recipients will access to respond to your questions. Every OA you send out has an associated questionnaire; this is what is shown on the portal.
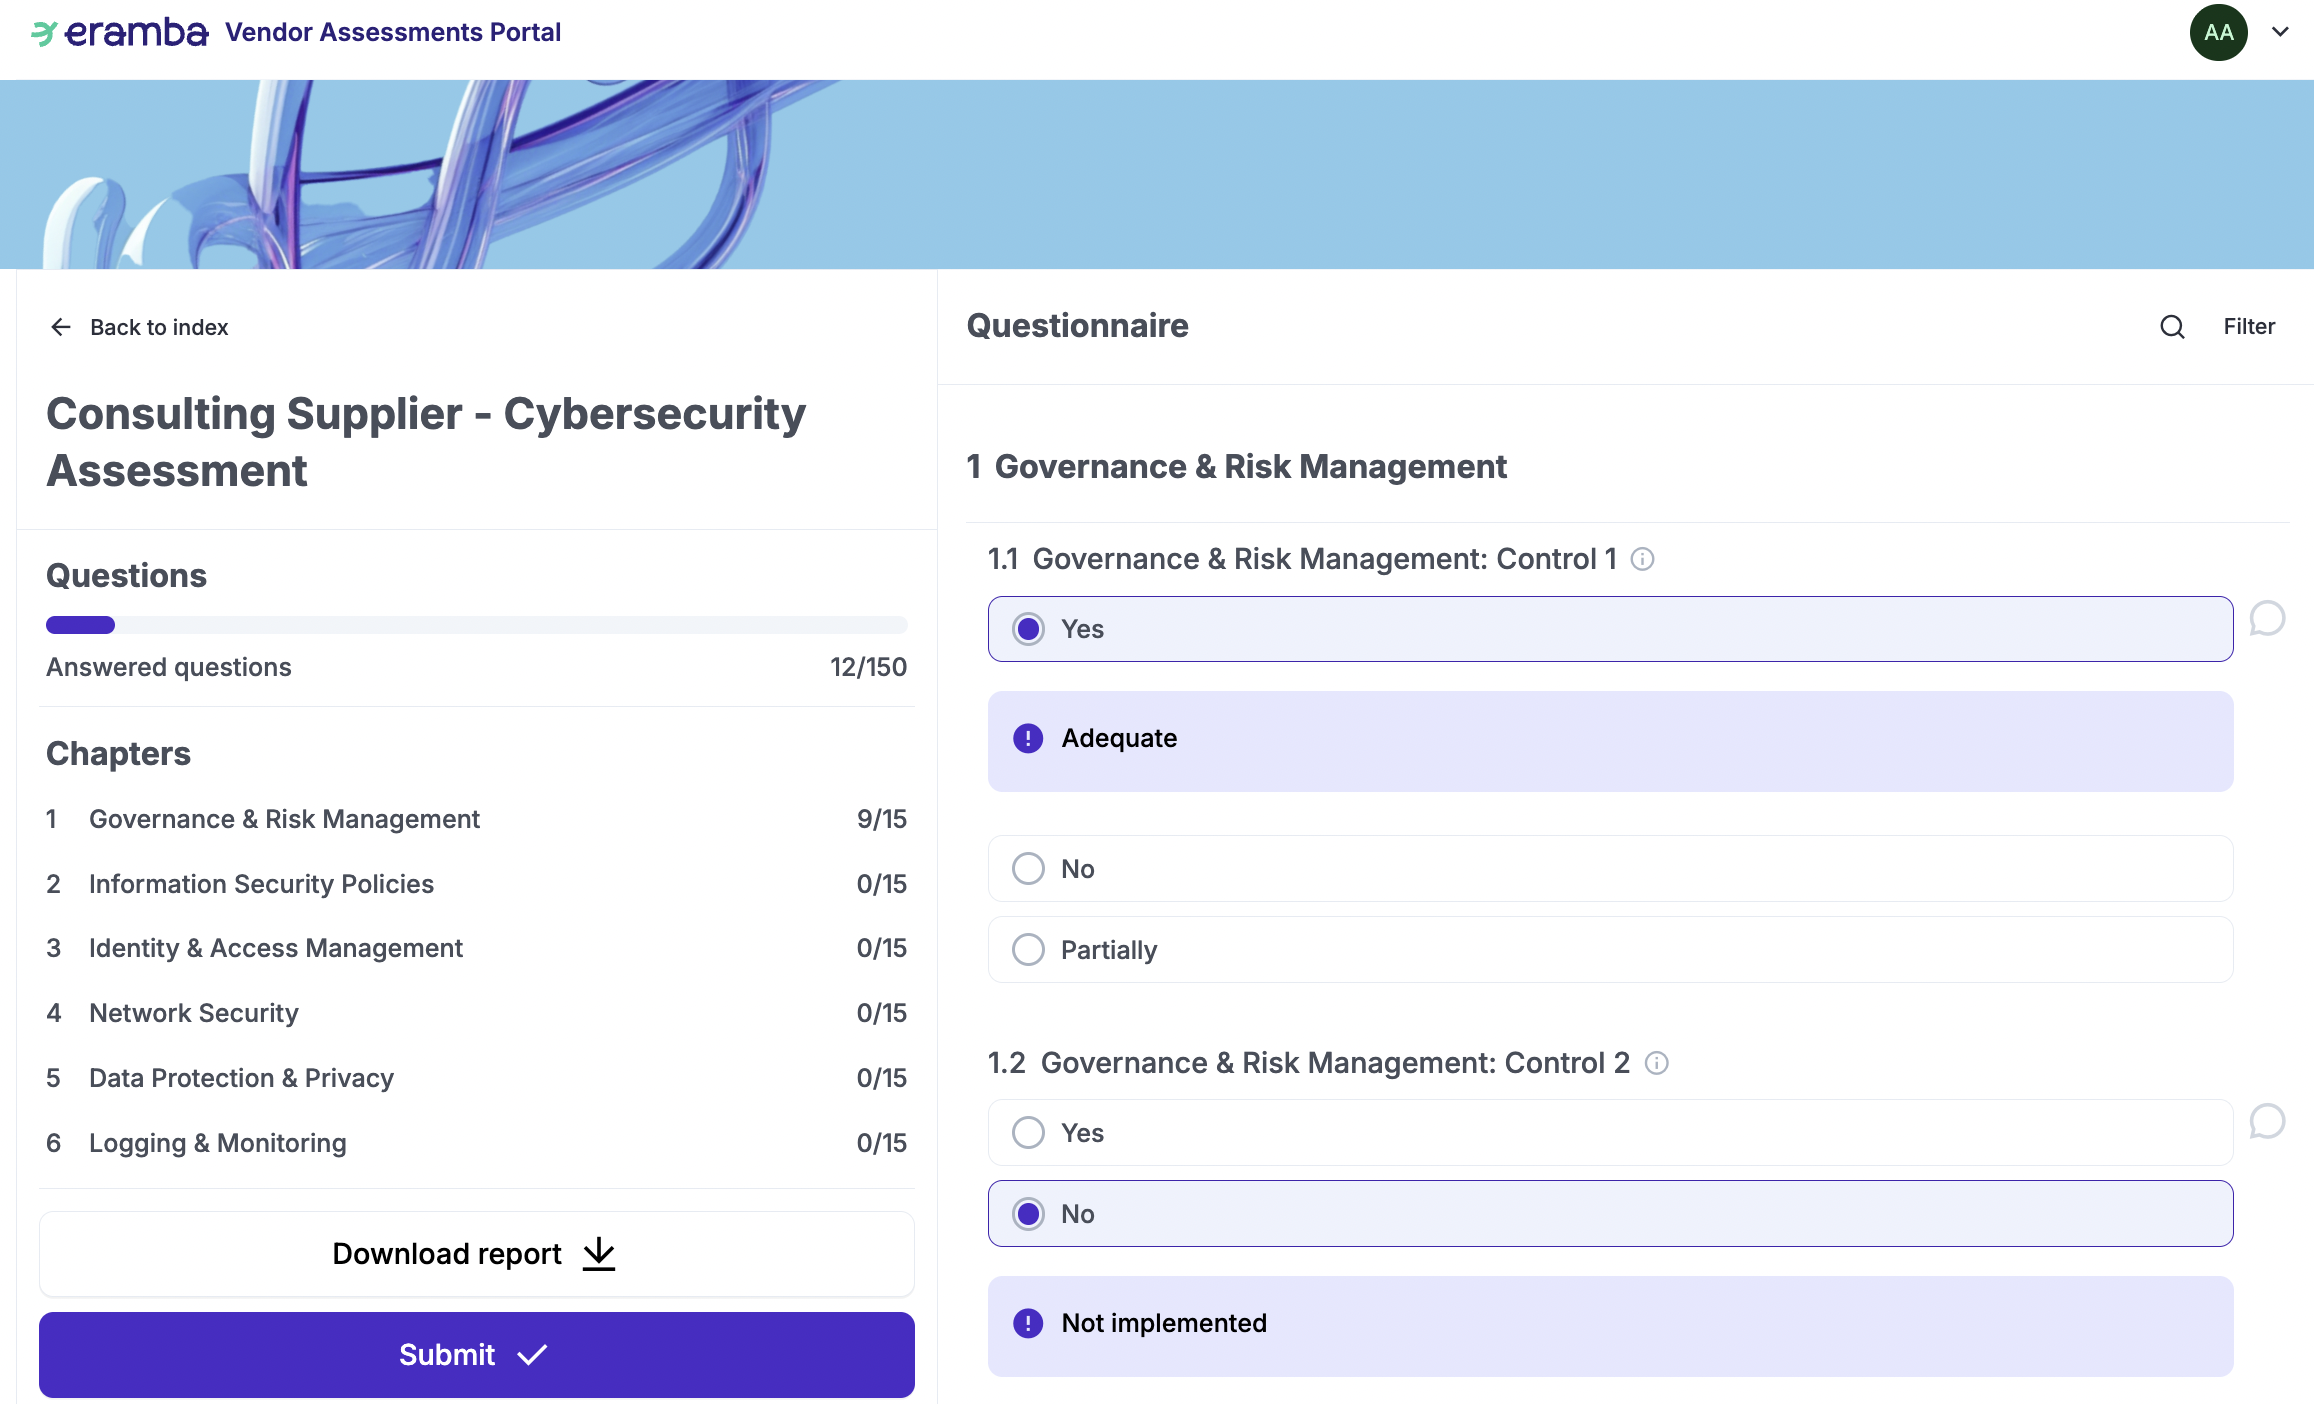
The portal allows recipients to answer questions (which are saved automatically as they are answered), download a report (optional, depending on the OA settings), and submit once ready (the administrator can configure whether this is only possible after all or some questions are answered). The questions shown are derived from your questionnaire settings and can include a multitude of different question types. The recipient can also add attachments if allowed.
Feedback
Under the Feedback tab, you will see the responses your OA received from the recipient. As the GRC Contact, you can also review the recipient's feedback using the portal; use whichever method you find more practical.
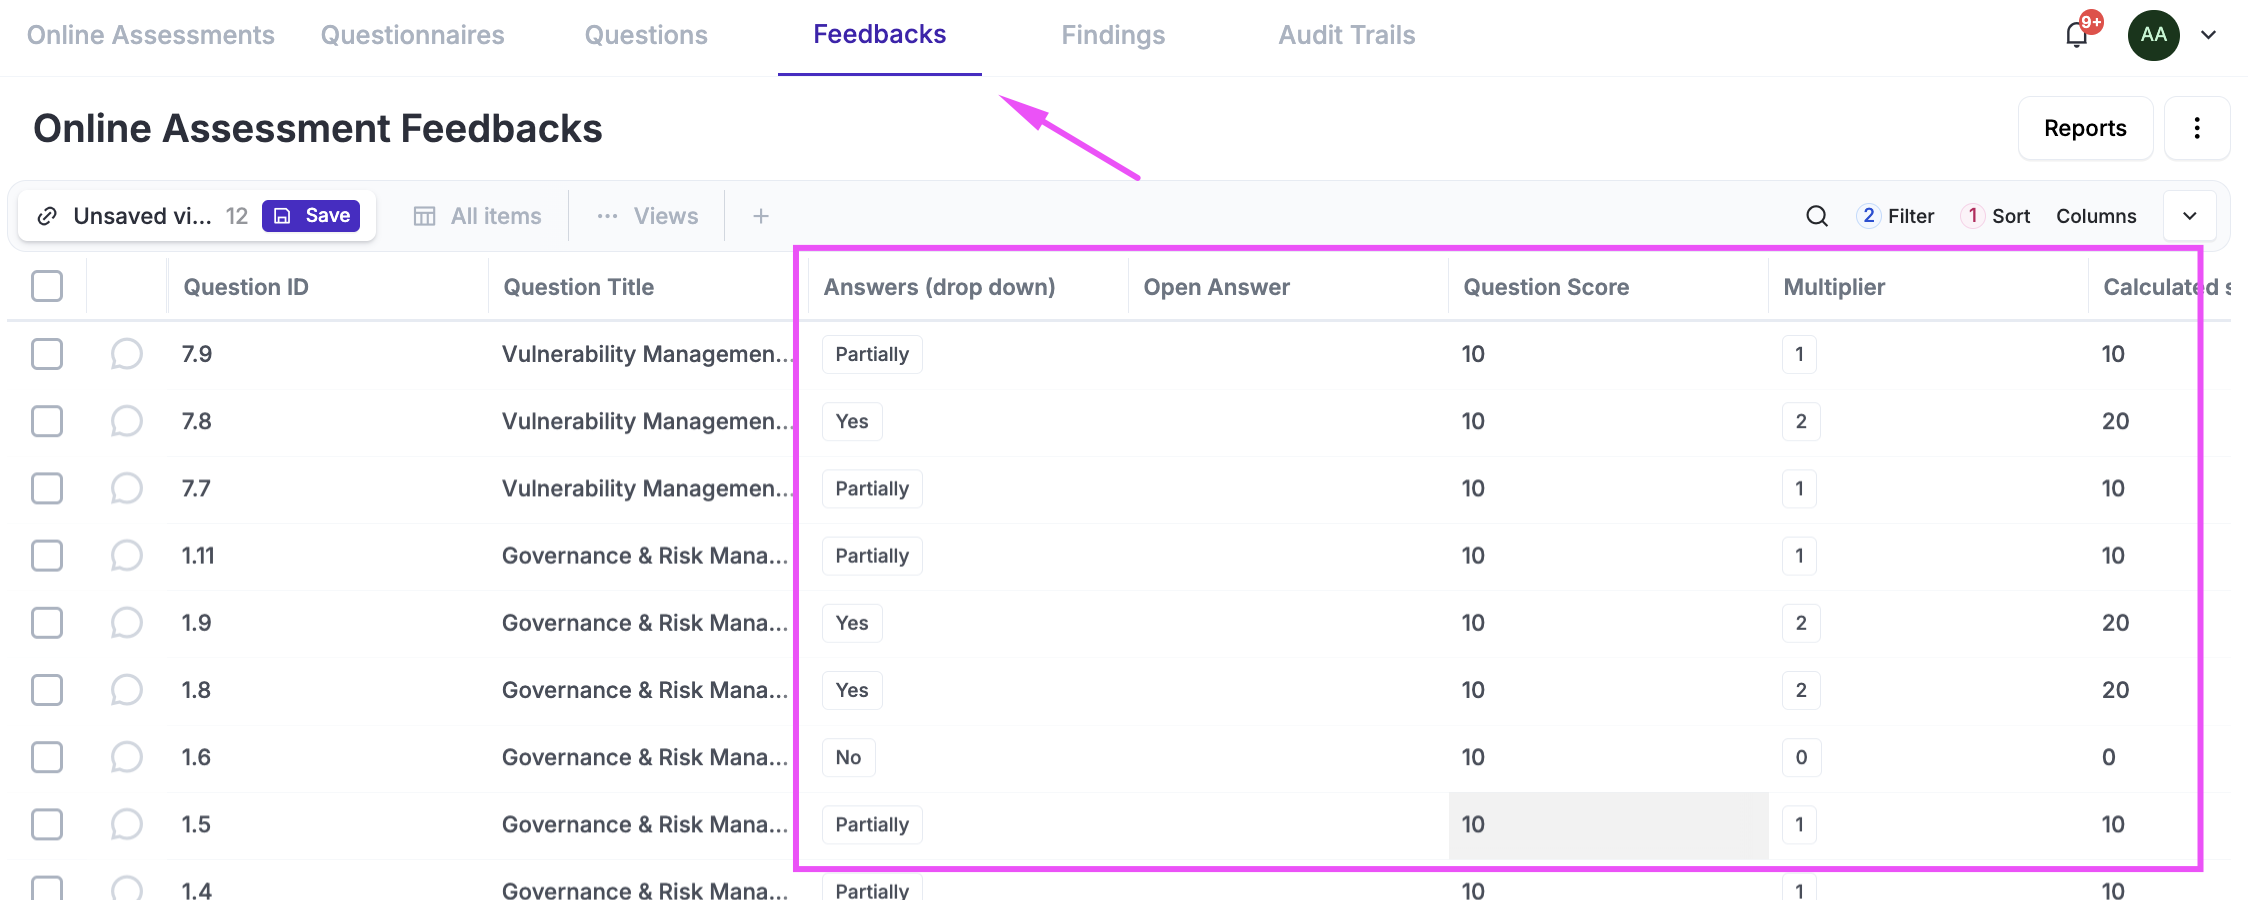
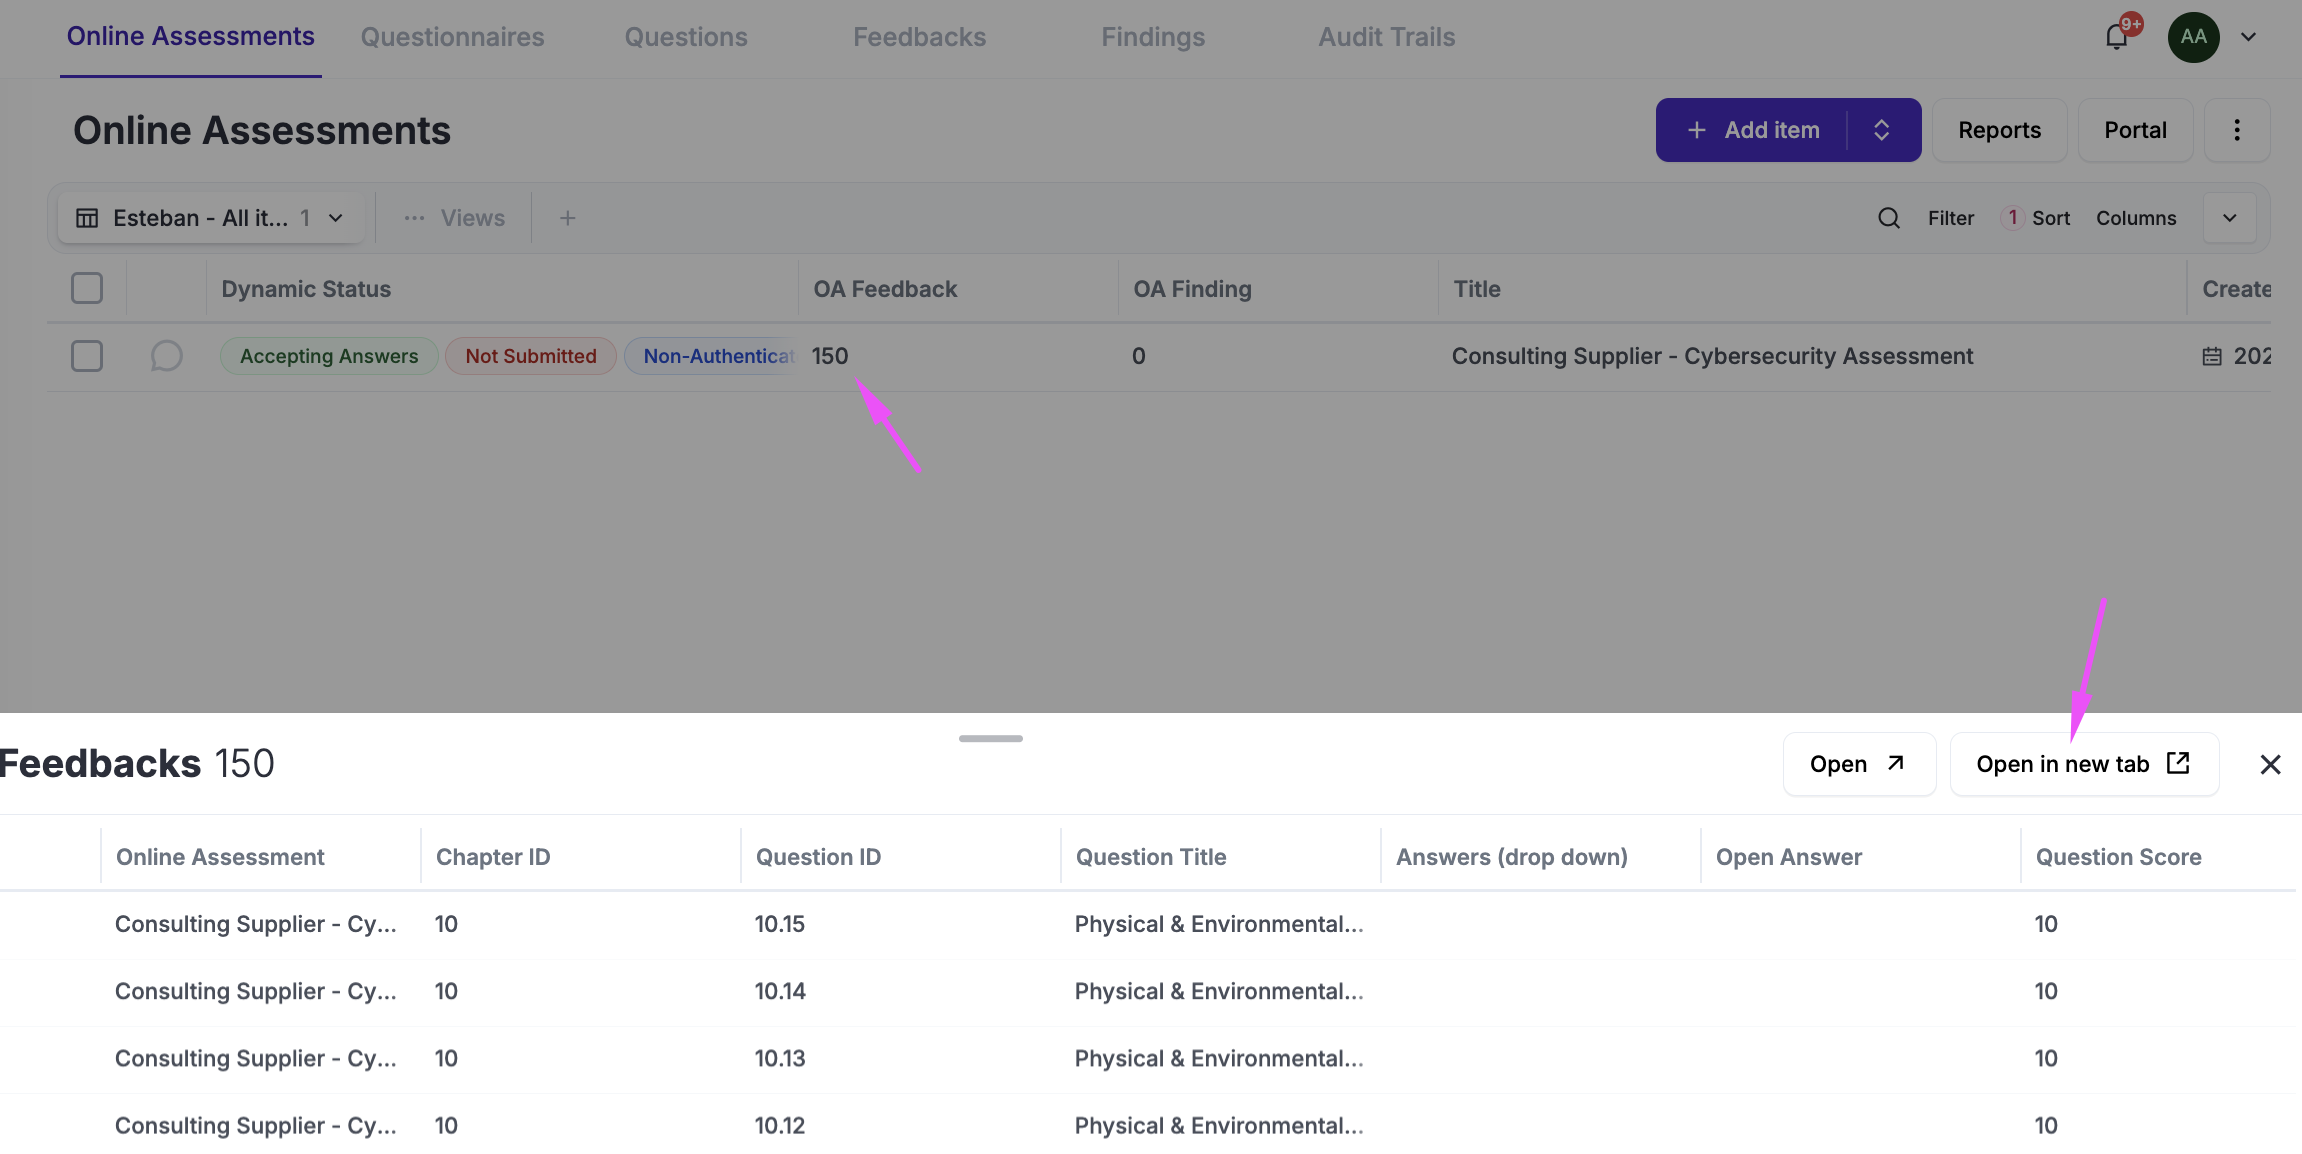
The Feedback tab will include many rows, so it is best to access them from the Online Assessment module by clicking on the Feedback shortcut column. You can then open the feedback in a new tab to work more comfortably.
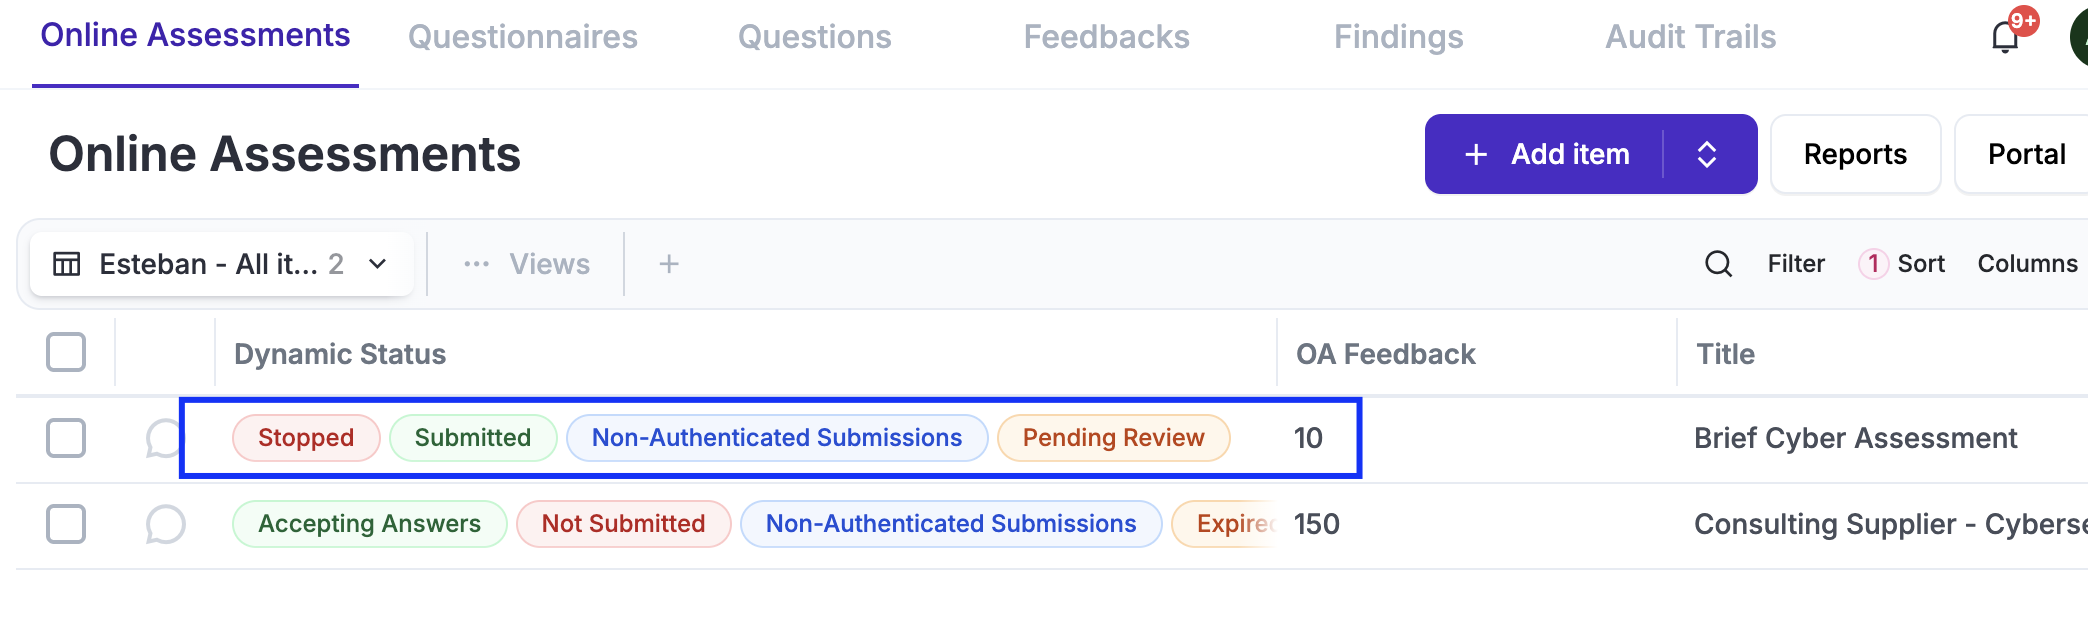
OA Review
After an OA has been submitted, you will notice the statuses update to show that the "Pending Review" status has appeared. This is because once an OA is completed, your task is to review the answers and provide a final comment on the "Result" of the assessment.
To complete the review, you need to load the "Feedback" tab for the OA. You will notice that the "Reviewed" column indicates whether each question has been flagged as reviewed (by default, all will be marked as "Not Reviewed").
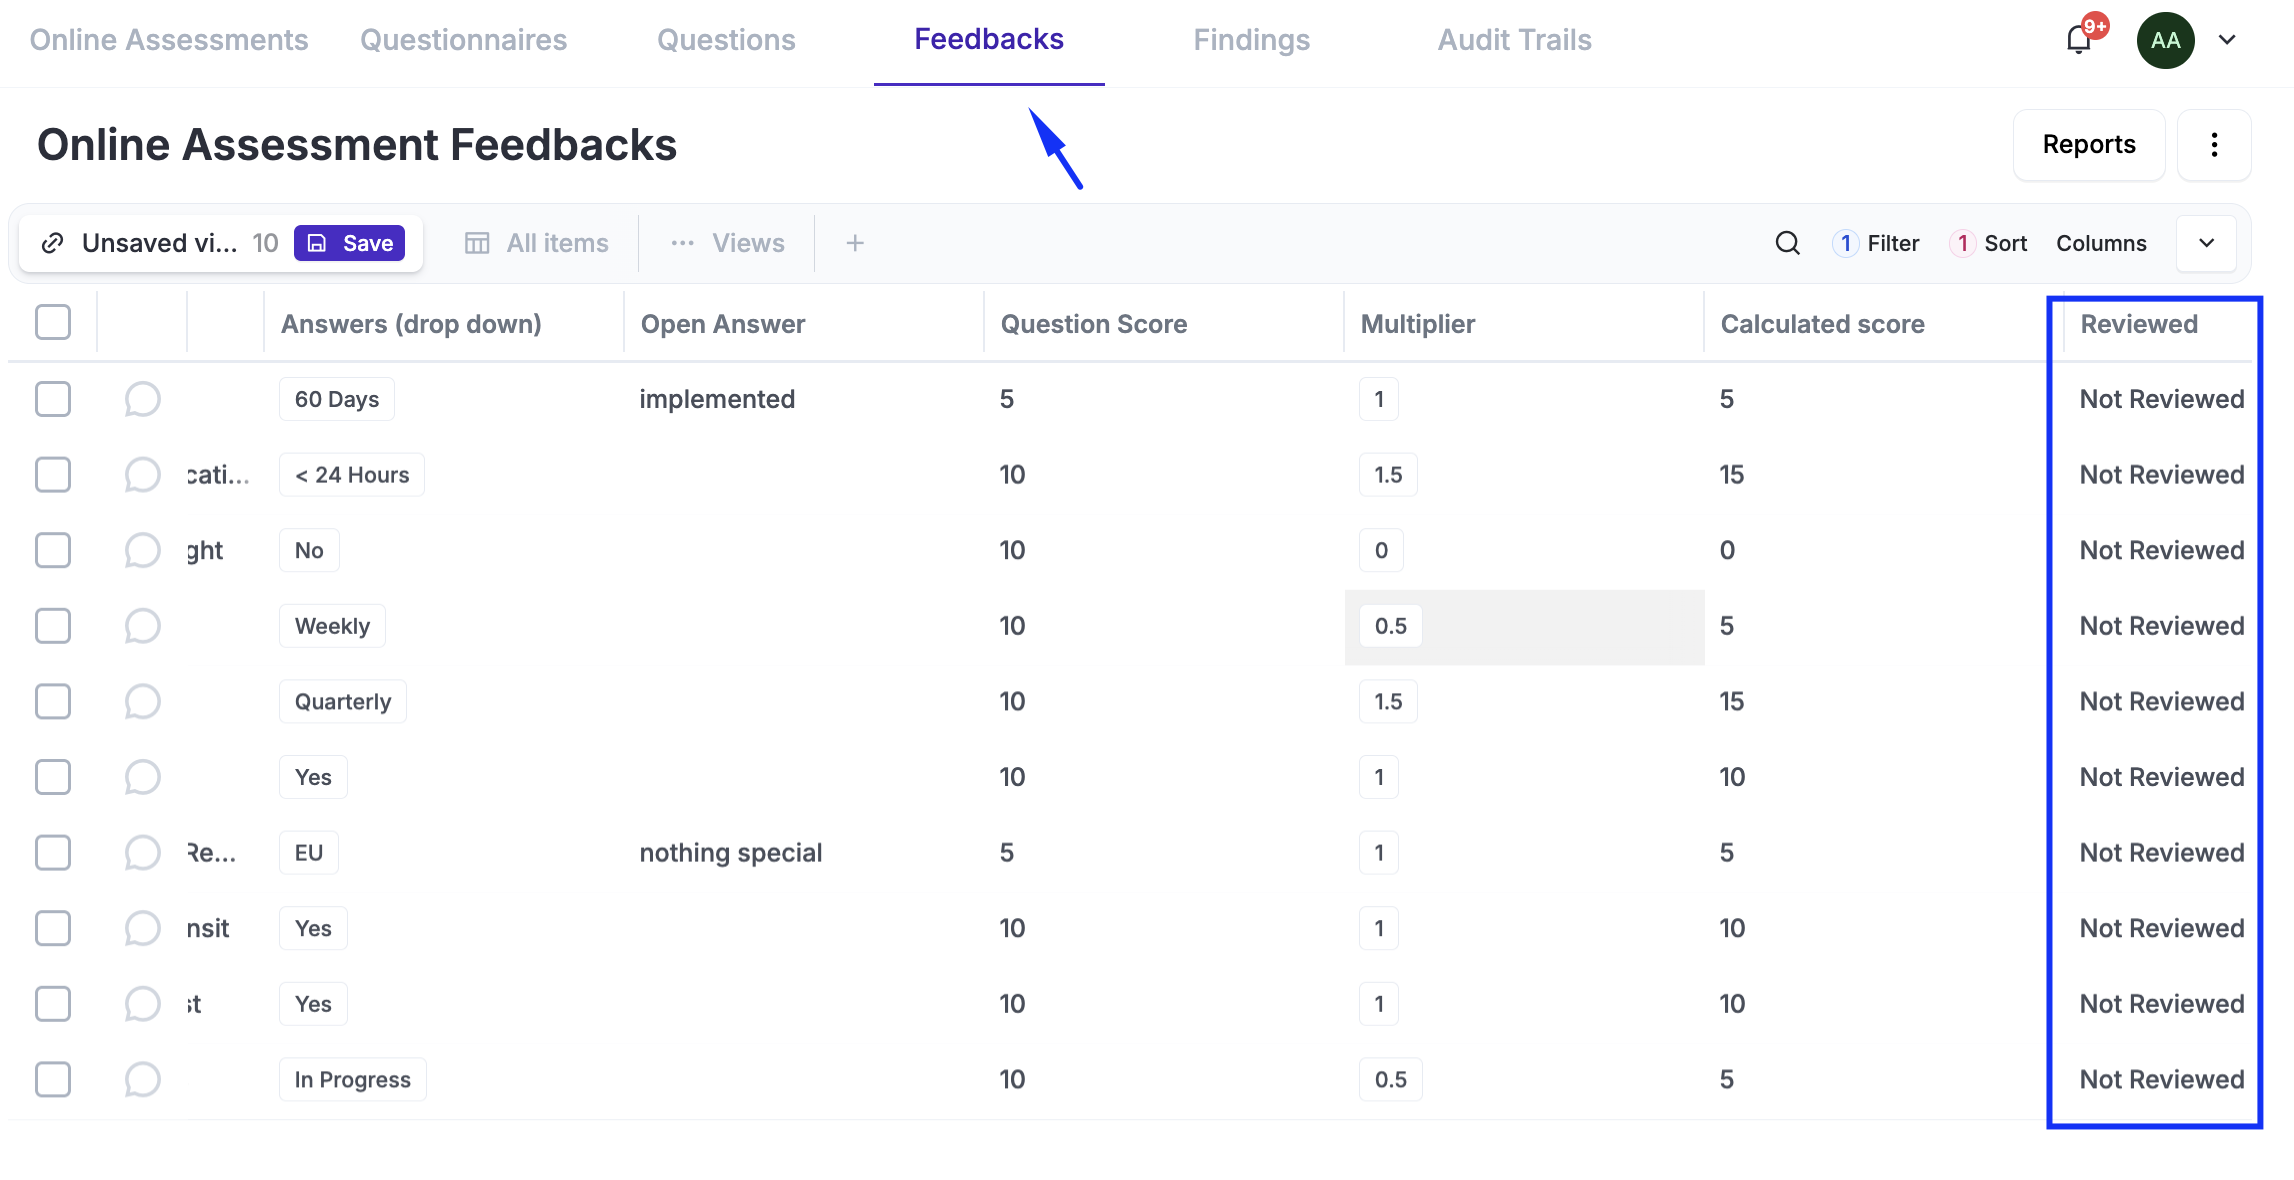
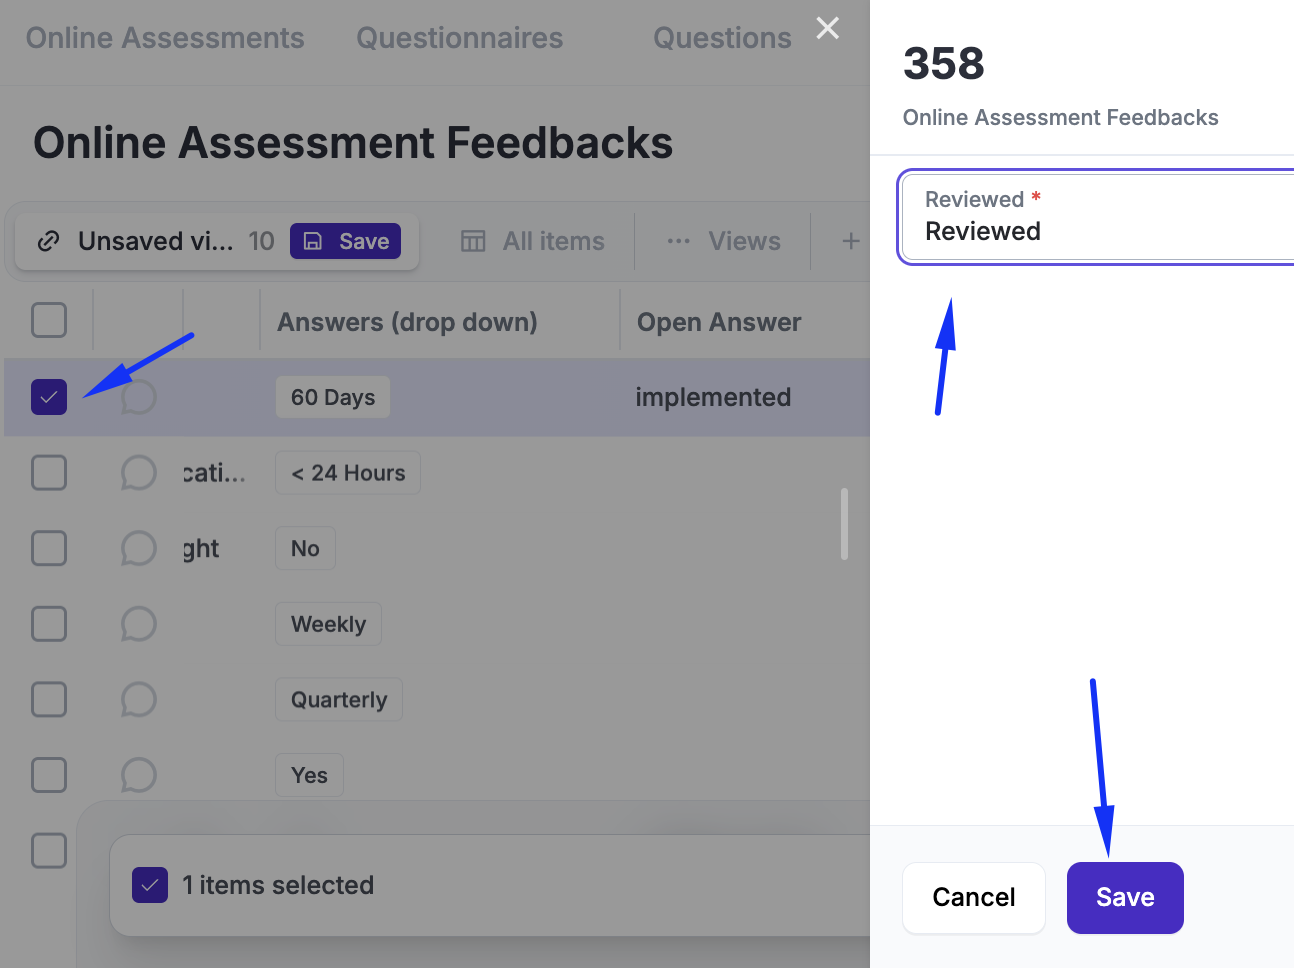
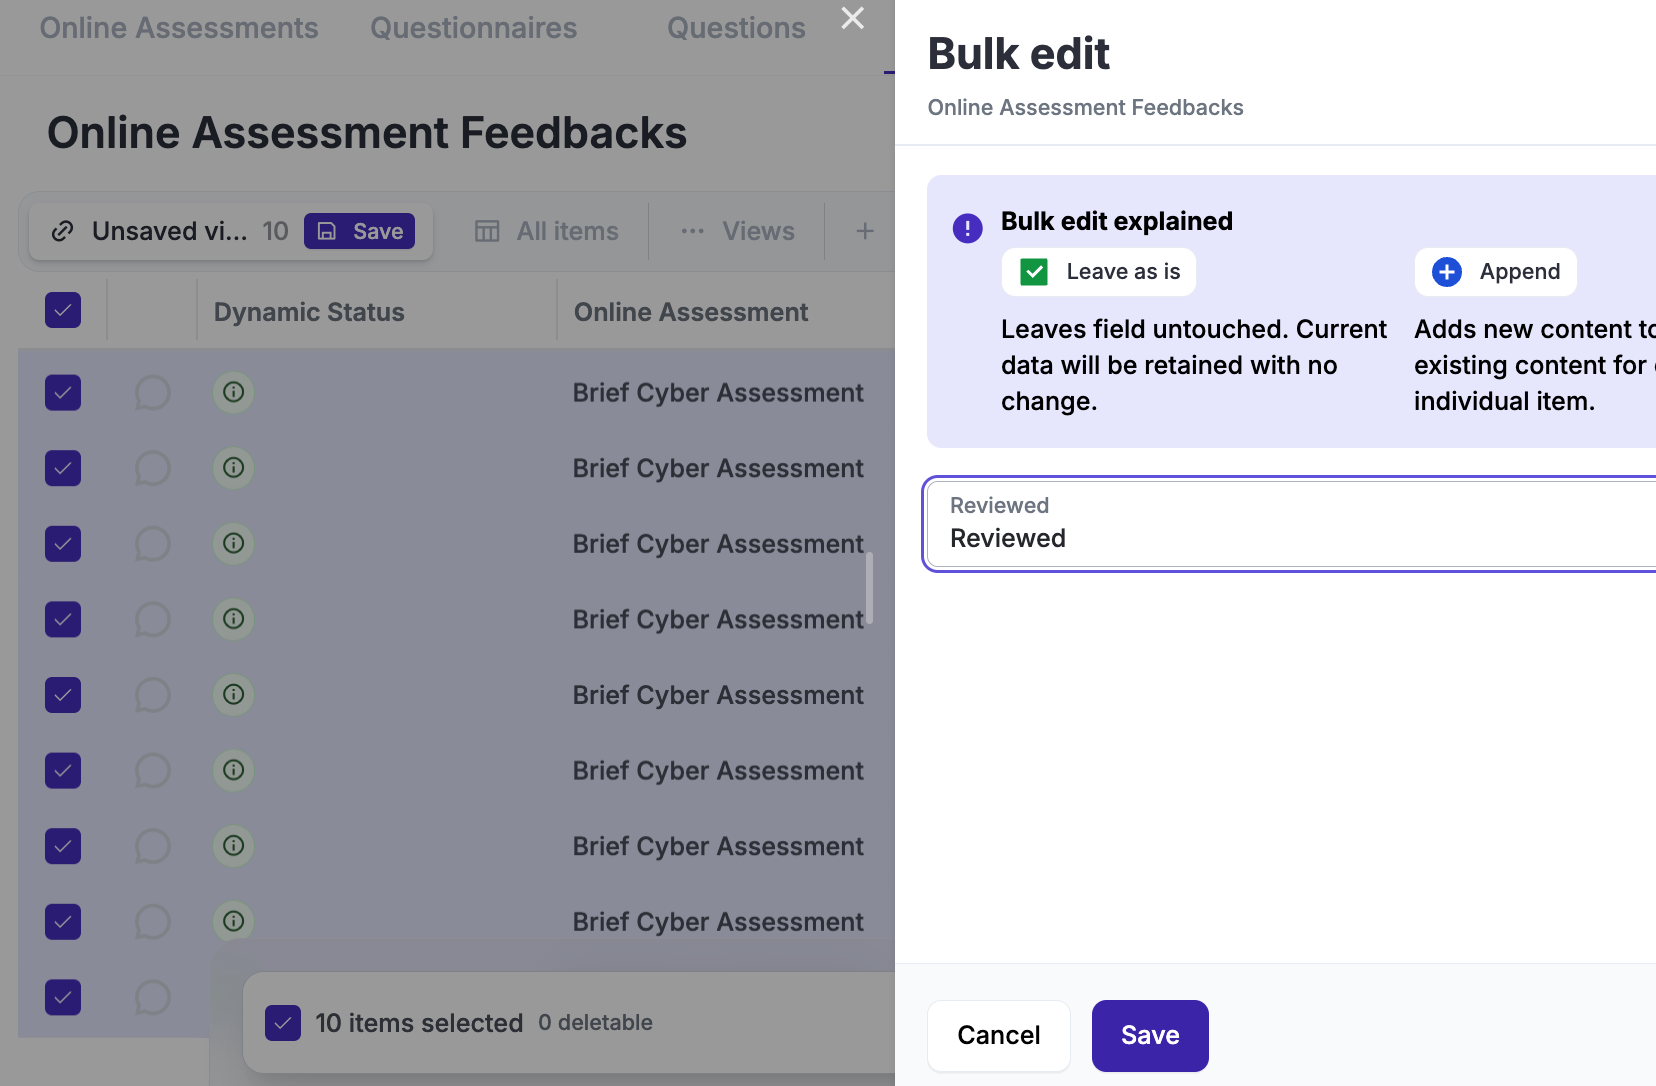
After you review an answer, you can flag the question as reviewed by simply editing it (typically, this is also done via bulk edits in one shot).
After all your questions have been reviewed, if you select the OA you have been working on under Online Assessments, you will notice that the "Review" button has become available. Clicking there allows you to log your review notes and save your final assessment.
Each Reviewed OA will have its "Notes" and "Review Date" saved, once an OA has been reviewed ithe review notes can no longer be pupdated.
Findings
After you complete the review, you might want to document issues or gaps that were identified; we do that in the form of Findings. These findings are linked to the specific OA and, optionally, to one or more individual questions within that OA.
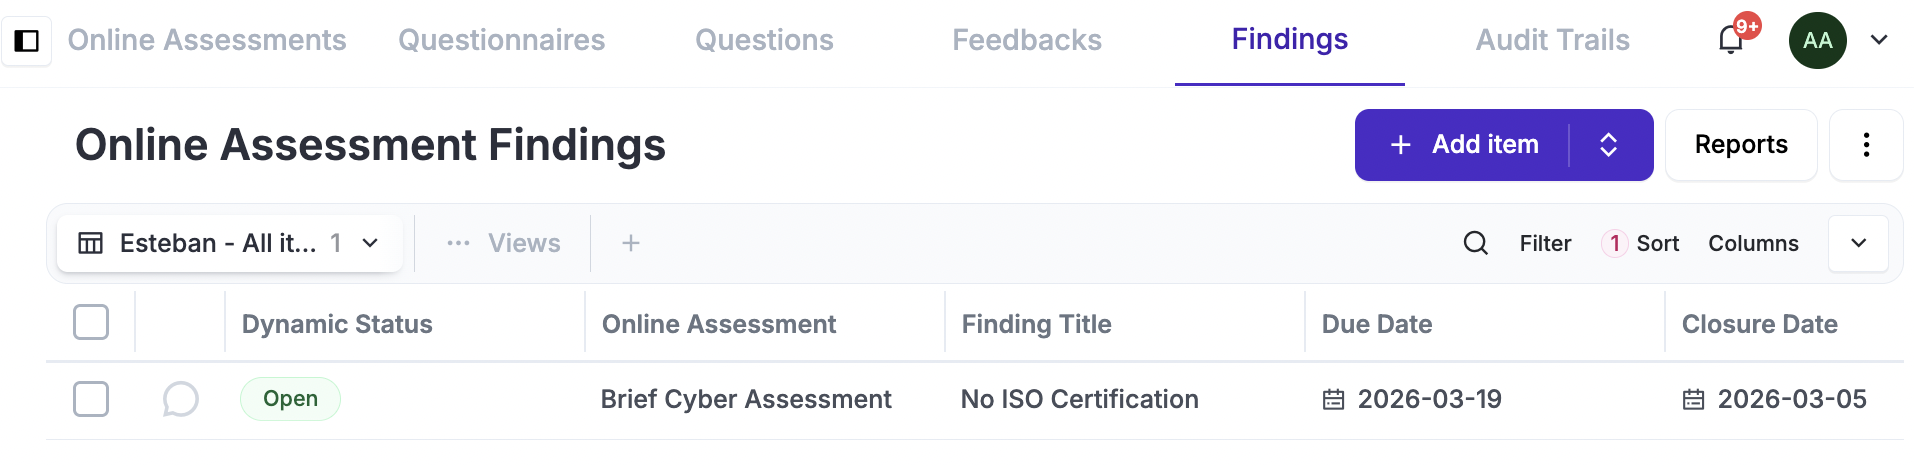
Findings have a Deadline (which can trigger automated notifications) and a Status that can be set to "Open" or "Closed"; this helps you effectively track and manage these findings. Once a Finding is set to "Closed," the "Closure Date" will be automatically updated to reflect that date.
Statuses
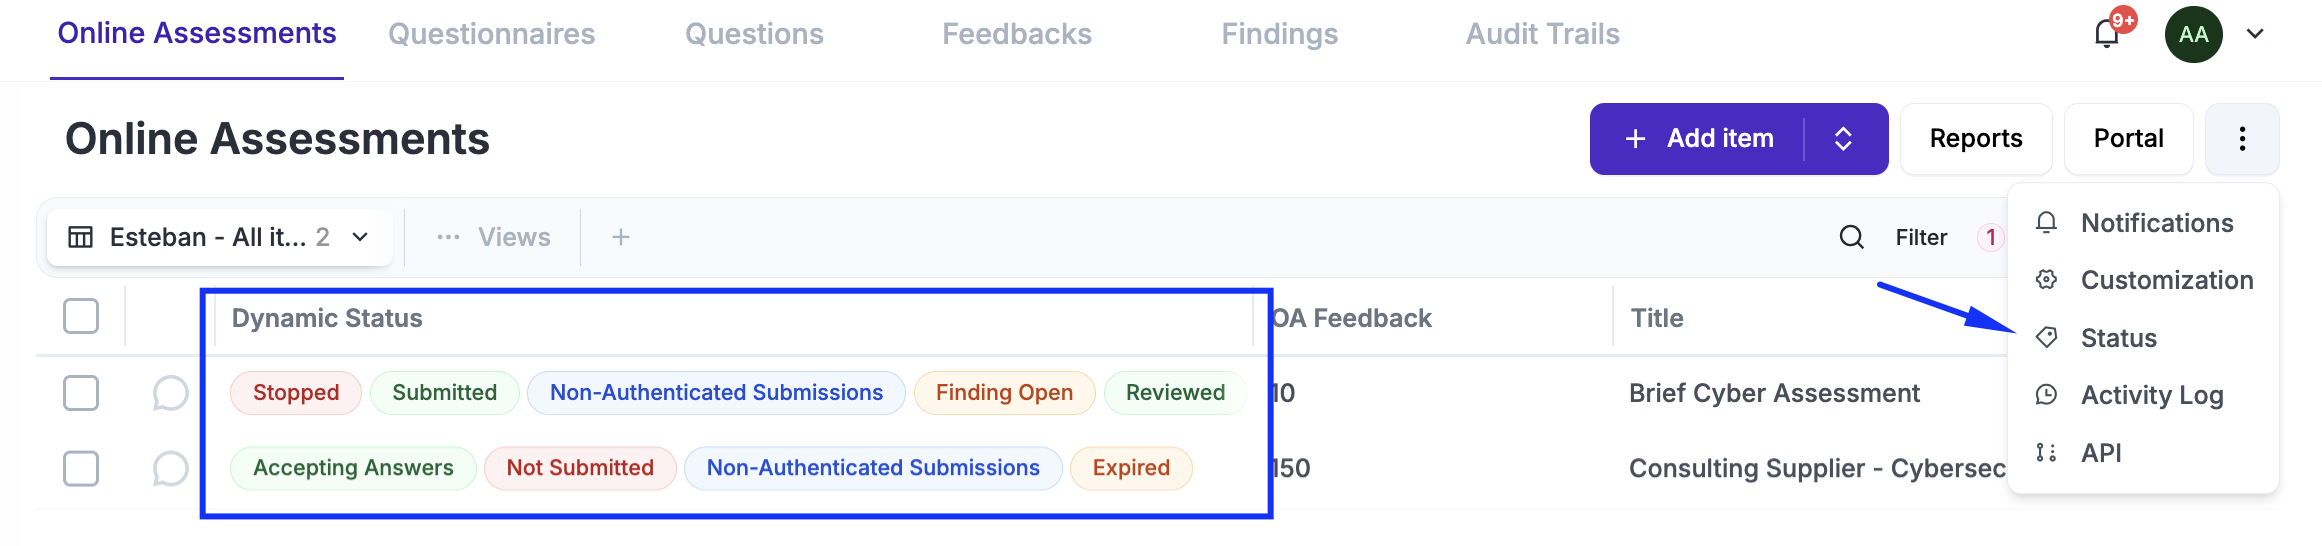
Before continuing, review the following common feature documentation: Dynamic Statuses
"OAs come with a set of pre-defined dynamic statuses that help you visualize which step of the lifecycle the OA is in—for example: Accepting Answers, Submitted, Reviewed, etc."
Implementation
The implementation of the OA module has been structured as:
-
Implementation: An entire end-to-end OA is created, and multiple modules will be configured, all of which will be set to “Testing,” so no one other than you will be contacted. This is a great way to familiarize yourself with the feature.
-
Operation: Once the implementation is completed, you are ready to repeat the previous step, this time targeting real people.
Access Management
Before continuing, review the following common feature documentation: Access Management.
-
Log in to Eramba for the first time and set the Admin password and email (do not use a personal email address).
-
Create a Group for your GRC department (name it according to your department) (How-To) (Theory)
-
Create User Account for the GRC team (How-To) (Theory). Assign the Main and Online Assessments "Portals" and the "Admin" and group created on the previous step. Do not create user accounts for anyone else (IT, Human Resources, Finance, Etc).
-
Create a "Dummy" User Account (How-To) that will be used to test permissions (Theory). Assign the following groups: "No Permissions Allowed" and as fo the "Portal" assign the "Online Assessment" alone.
-
Log out as Admin, from now on always login with your personal account
-
Create one Group for every Department in the scope of your Compliance program (How-To) (Theory)
-
Optional: Set up SAML, Google OAuth, or LDAP Connectors (How-To & Theory)
-
Enable the OA portal at System / Settings / Authentication
Questionaire
Before continuing, review the following common feature documentation: CSV Import.
While questionnaires can be created using the web interface, the process is very slow. We recommend creating them using CSV files and importing them into eramba, using the web interface only for minor corrections if needed. Uploading the CSV import template to an LLM can significantly speed up the creation of advanced questionnaires.
-
Define your OA targets by their unique characteristics, for example: SaaS Suppliers, Organization Departments like HR, Finance, Etc, Etc
-
Create questionnaires for each one of them using CSV files. Refer to the CSV Import functionality if you are unsure how to format these files. (How-To) (Theory)
-
Import them into eramba via Online Assessments / Questionnaires / Import. (How-To)
-
Optional - Adjust them using the web interface, or delete and import corrected CSV versions again. (How-To)
Setup Weekly Reports
Before continuing, review the following common feature documentation: Notifications.
Setup Warning Notifications
Before continuing, review the following common feature documentation: Notifications.
Create Third Party (Optional)
Before continuing, review the following supporting module documentation: Business Units, Assets and Third Parties
-
Create a Third Party, make sure the contact is the dummy account created in earlier steps (How-To) (Theory)
Create Test OA
It is recommended to first create (User Interface guide) a test OA to ensure you fully understand how the module works, in particular if you have enabled notifications.
-
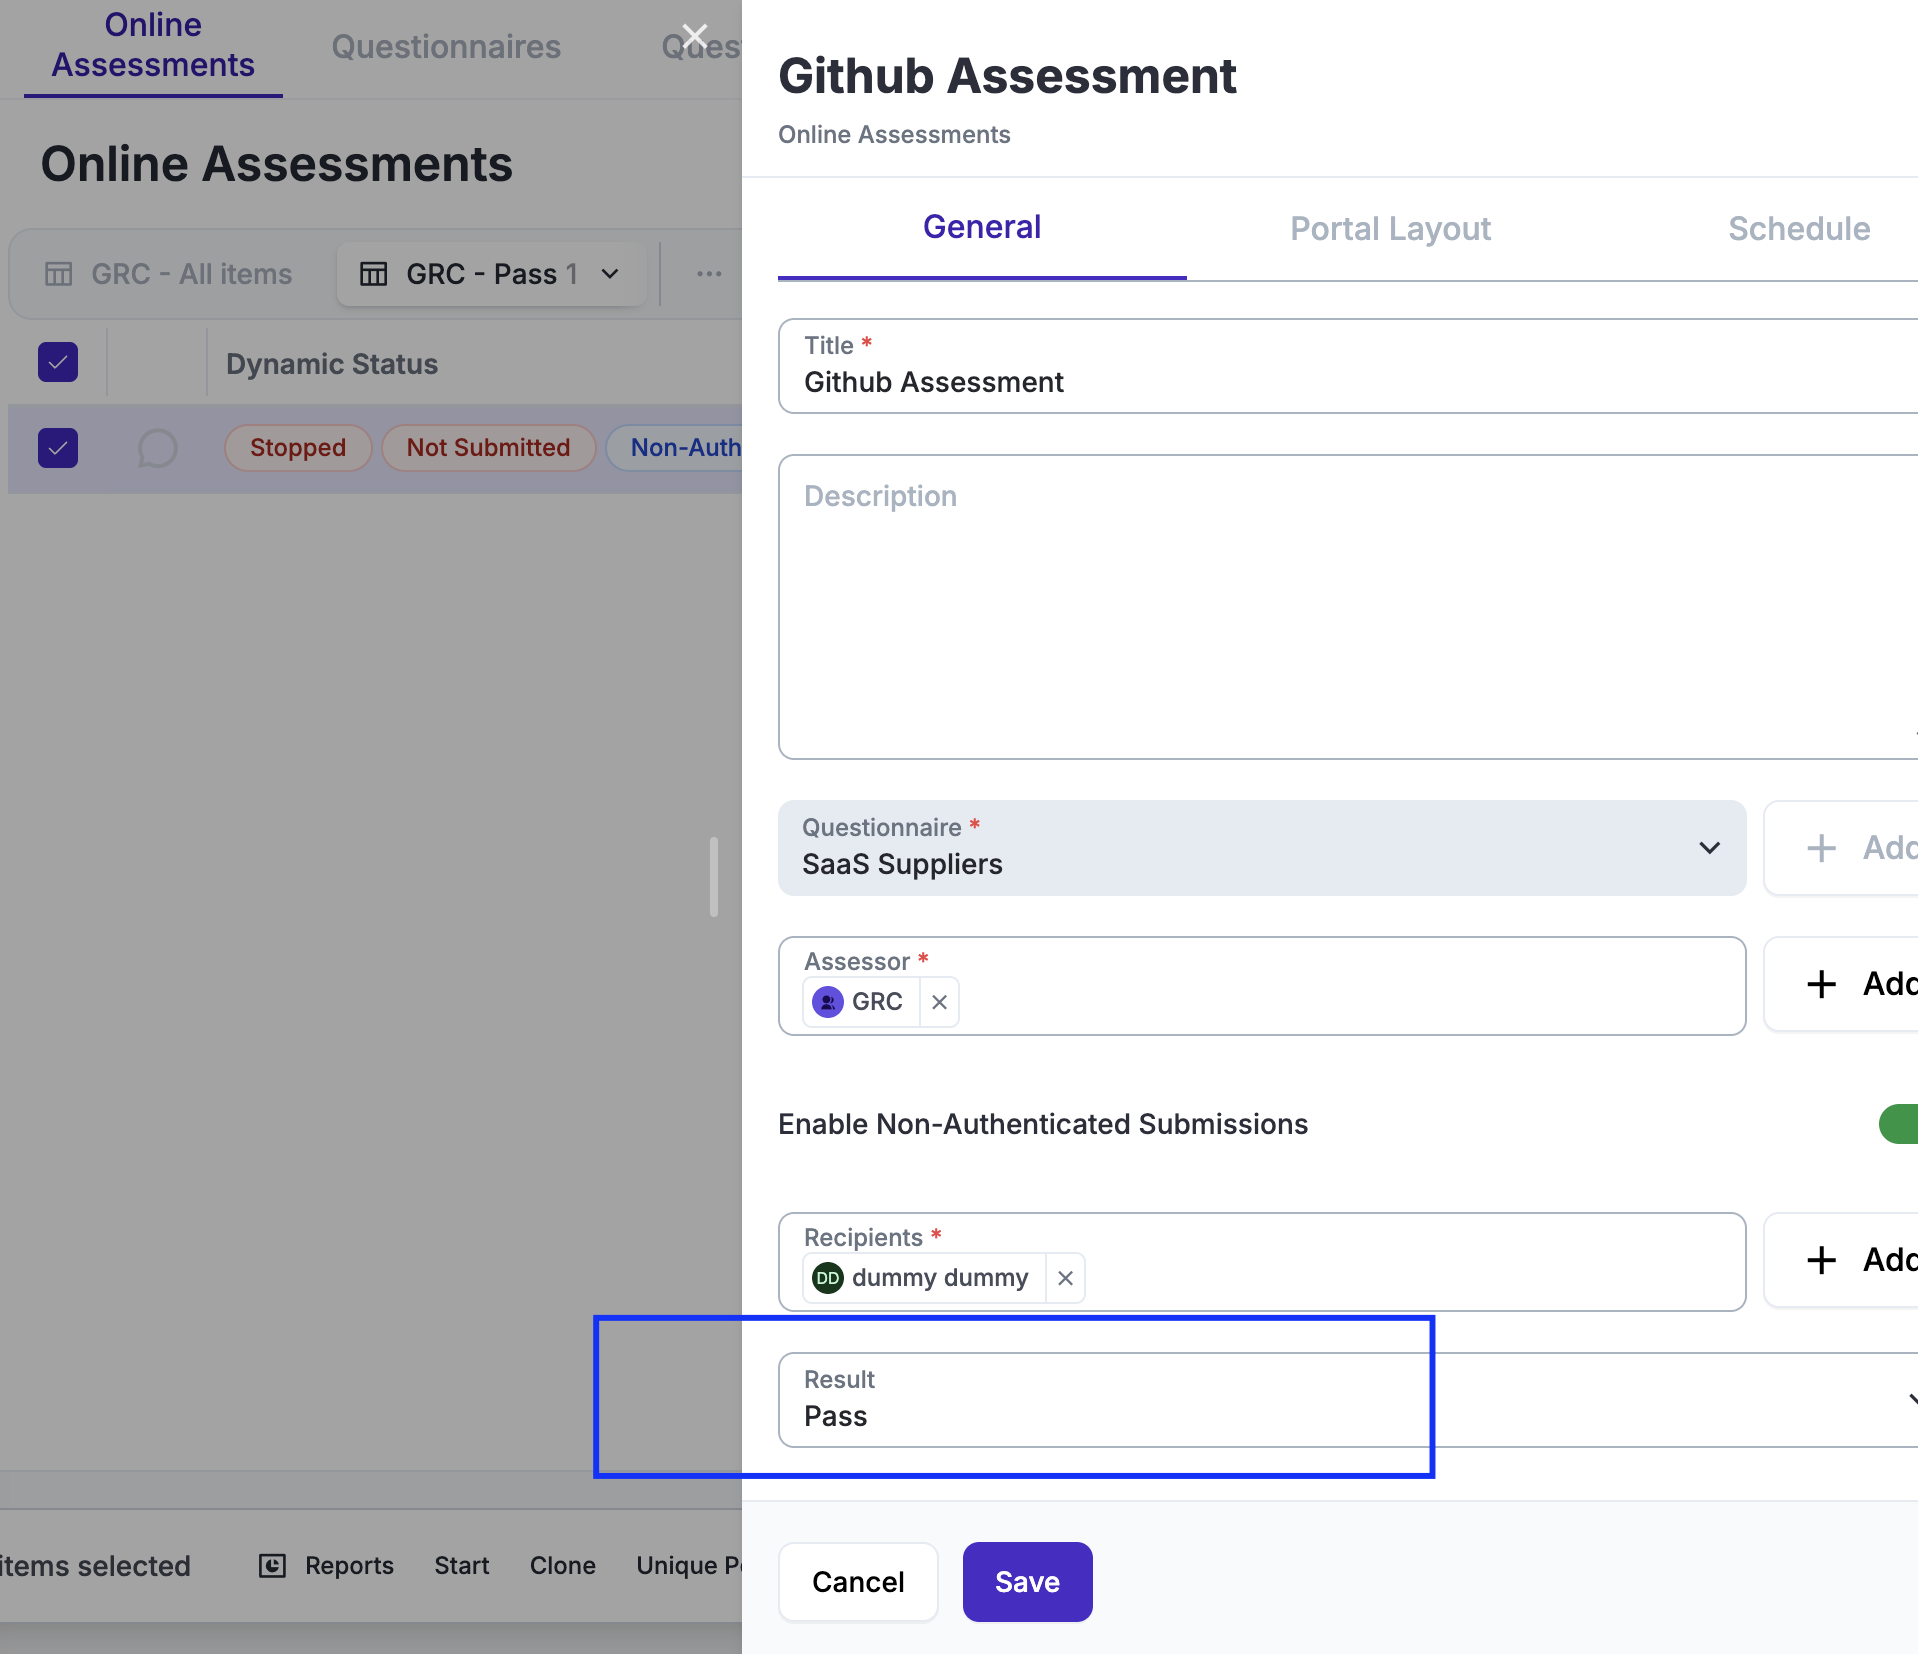
Create an OA, the following fields are particularly important:
-
Assessor Contact: Set this to your GRC group (ensure your account is a member of that group).
-
Recipient: Select the dummy account created previously.
-
Authentication: Choose your preferred option. Remember, if you select Authenticated, you will need the password for your dummy account.
-
Submit Incomplete: It is likely to be useful to enable this feature as you test your OA, so you do not have to answer all questions before being able to "Submit."
-
Questionnaire: Ensure the questionnaire you select is the one you intend to test.
-
Timeline: Set both the Start Date and End Date to tomorrow.
-
Recurrence: Do not enable recurrence just yet; we are creating this initial OA to test your questionnaire and the entire process.
-
-
Start the OA (How-To) (Theory)
-
Access the OA as the "Assessor" (How-To) (Theory)
-
Respond and Submit the OA (How-To) (Theory)
Basic Module Configurations
Before continuing, review the following common feature documentation: User Interface and Customisations
For every module in scope (Online Assessments, Feedback, Findings, Third Parties, Etc) that you have used perform the following tasks:
-
Adjust the module form fields using customisations (How-To) (Theory)
-
Create your default view (How-To) (Theory) and adjust columns (How-To) (Theory)
OA Feedback Review
As you review answers on the "Feedback" tab, you can already "Close" the ones that have, in your view, been fully answered. We call this process "Reviewing" questions.
-
Review OA Feedback (How-To) (Theory)
-
Complete the OA Review Process (How-To) (Theory)
Feedback Findings
After reviewing your questions, you might want to create a finding and associate it with the questions that were not well addressed:
- Optionally - Create a Finding and link it to an OA Question (How-To) (Theory)
Operations
TBD
How-To Guides
Start/Stop OA
Videos are being recorded during the first week of June 2026
Access OA Portal Link
Videos are being recorded during the first week of June 2026
Respond and Submit OA
Videos are being recorded during the first week of June 2026
Review OA Feedback
Videos are being recorded during the first week of June 2026
Complete OA Review Process
Videos are being recorded during the first week of June 2026
Create OA Finding
Videos are being recorded during the first week of June 2026
Create OA Questionnaires
Videos are being recorded during the first week of June 2026
Import OA Questionnaires
Videos are being recorded during the first week of June 2026
Adjust OA Questionnaires using Web Interface
Videos are being recorded during the first week of June 2026
Create Third-Party
Videos are being recorded during the first week of June 2026
Advanced Settings
Customisations
There are many possibilities when it comes to notifications. It essential to understand the customisation common feature before making configuration decisions.
There are multiple options for customisations (Customisation Guide), and they largely depend on the use case. The most common ones, grouped by module:
-
Security Operations / Online Assessments: use dropdowns to record the “Result” of your OA, for example “Pass/Fail”.
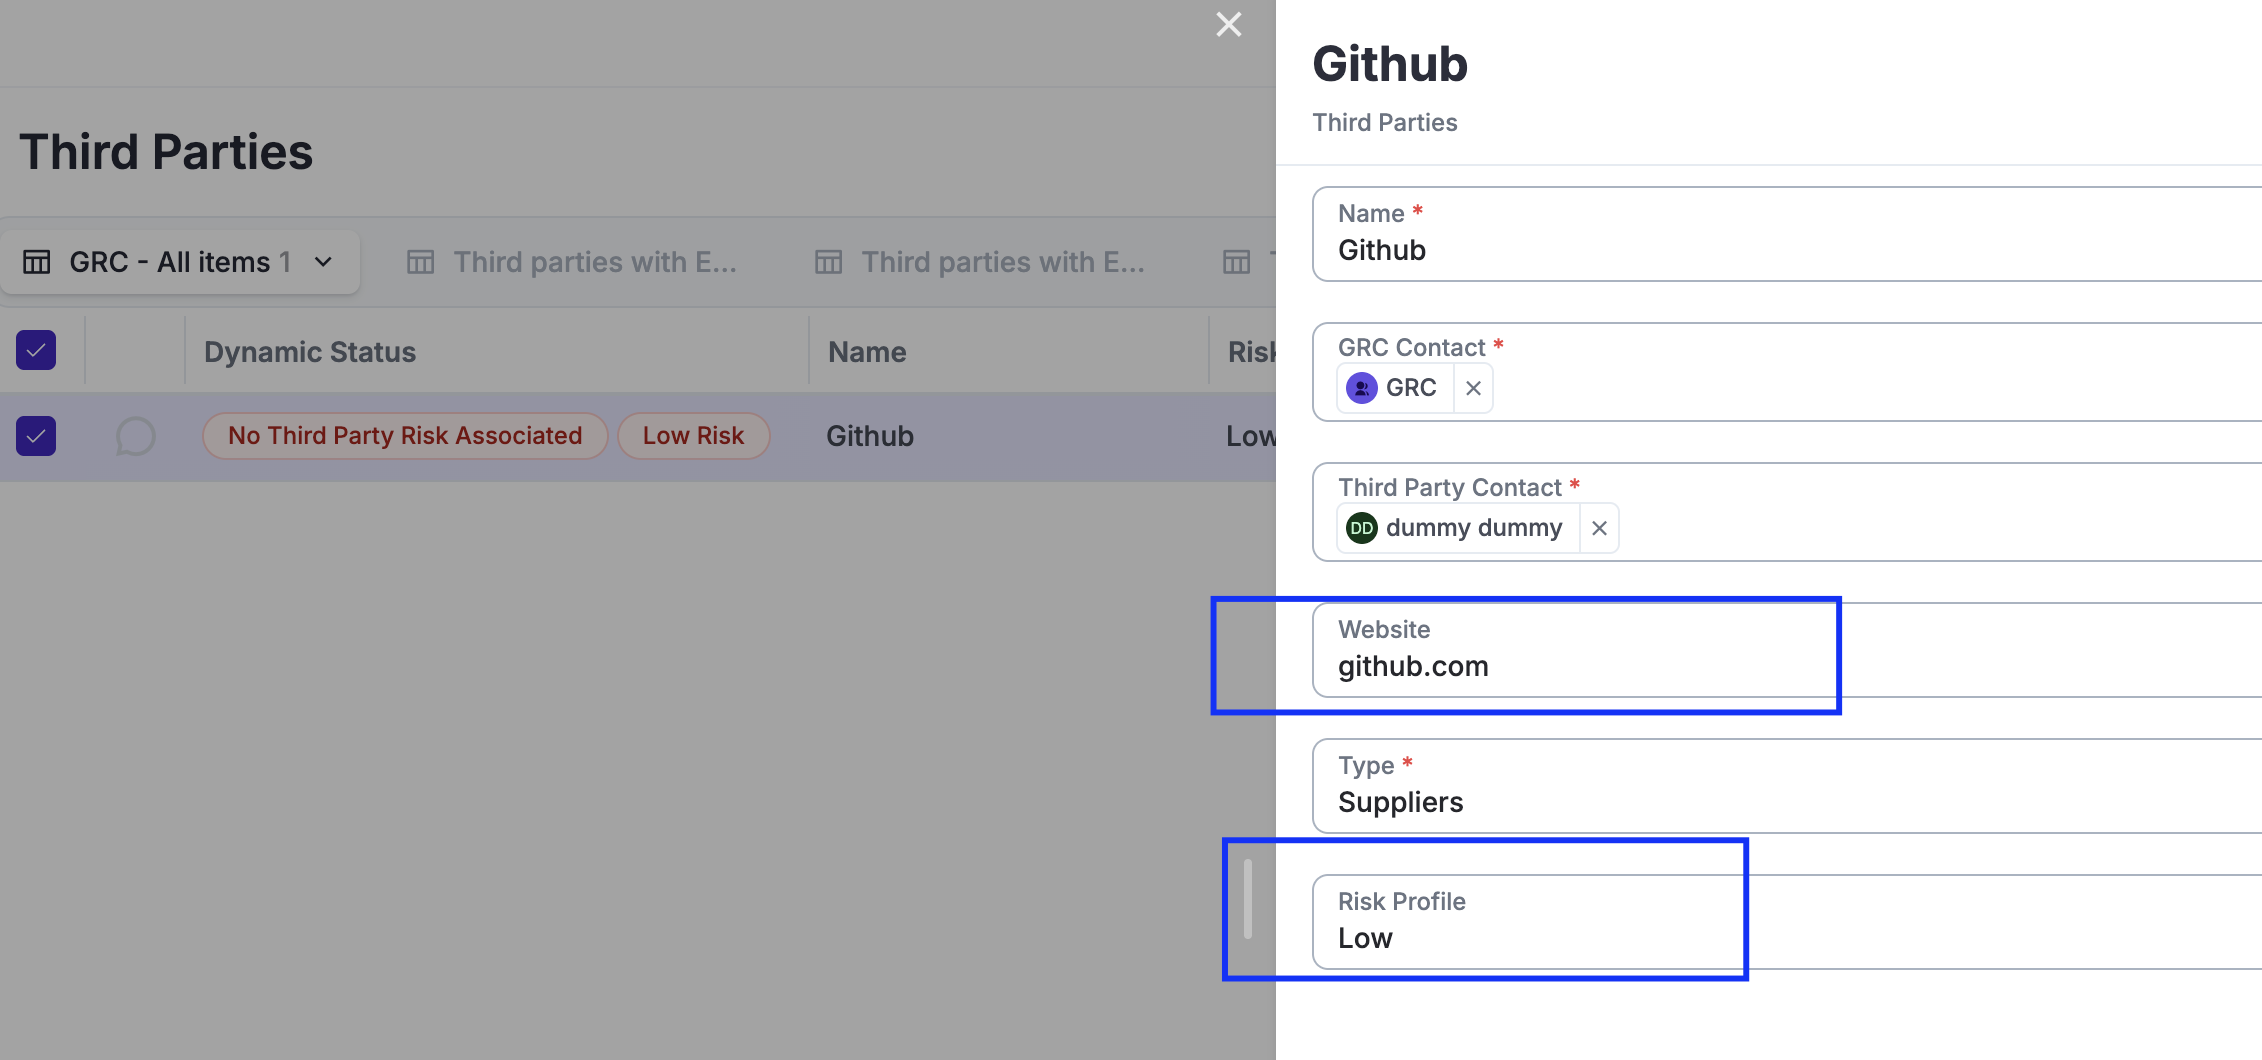
-
Organisation / Third Parties: multiple fields are often used to document attributes of the supplier, for example: address, website, risk profile, type, etc.
Dynamic Status
There are many possibilities when it comes to Dynamic Stauses, in particular using them in combination with Custom Fields, Notifications, Reports and Automations. It essential to understand the Dynamic Status common feature before making configuration decisions.
Typical Dynamic Statuses used in this use case, grouped by module:
-
Security Operations / Online Assessments: highlight custom fields (such as result), findings expired, etc.
-
Organisation / Third Parties: highlight custom field settings, suppliers not assessed, suppliers being assessed, suppliers with expired findings, etc.


Views
Views are essential as is the main interface with data in eramba, you will most likely adjust them to suit your needs. It essential to understand the User Interface guide before making configuration decisions.
You will create default views for yourself on most modules, typically grouping data using filters, often based on custom fields.

Notifications
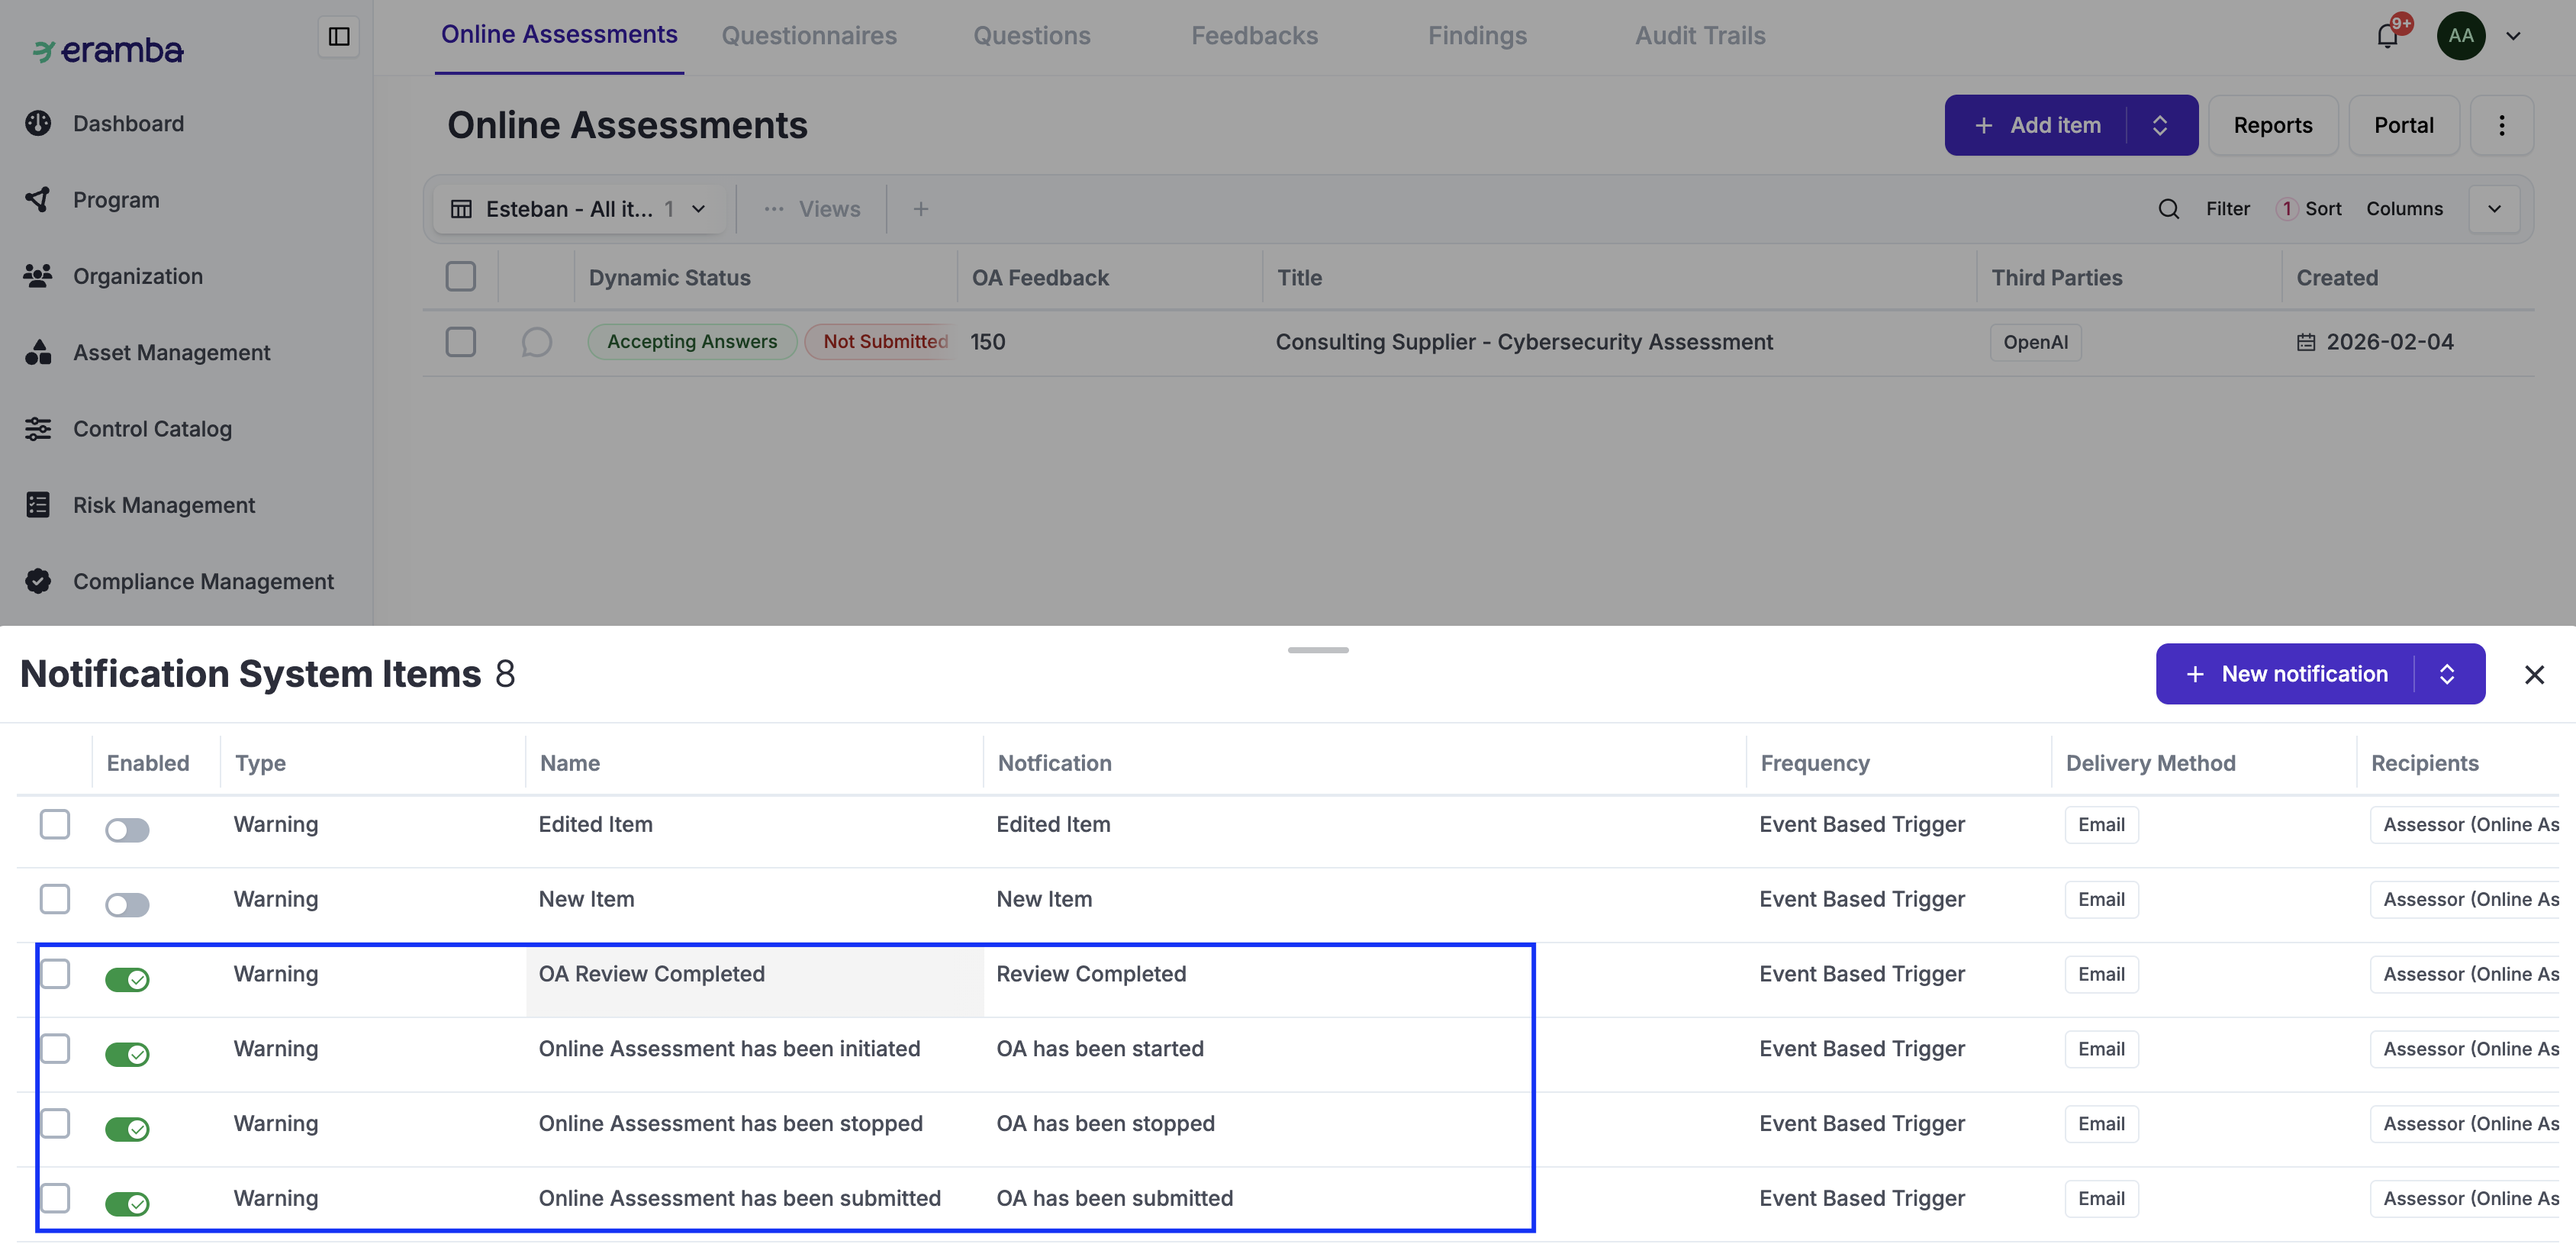
There are many possibilities when it comes to notifications. It essential to understand the notification common feature before making configuration decisions.
There are a few default notifications you will most likely want to enable (as they are disabled by default) in eramba. You must also edit the notification Body and Subject to make sure they reflect exactly what you want to communicate.
Typical notifications:
-
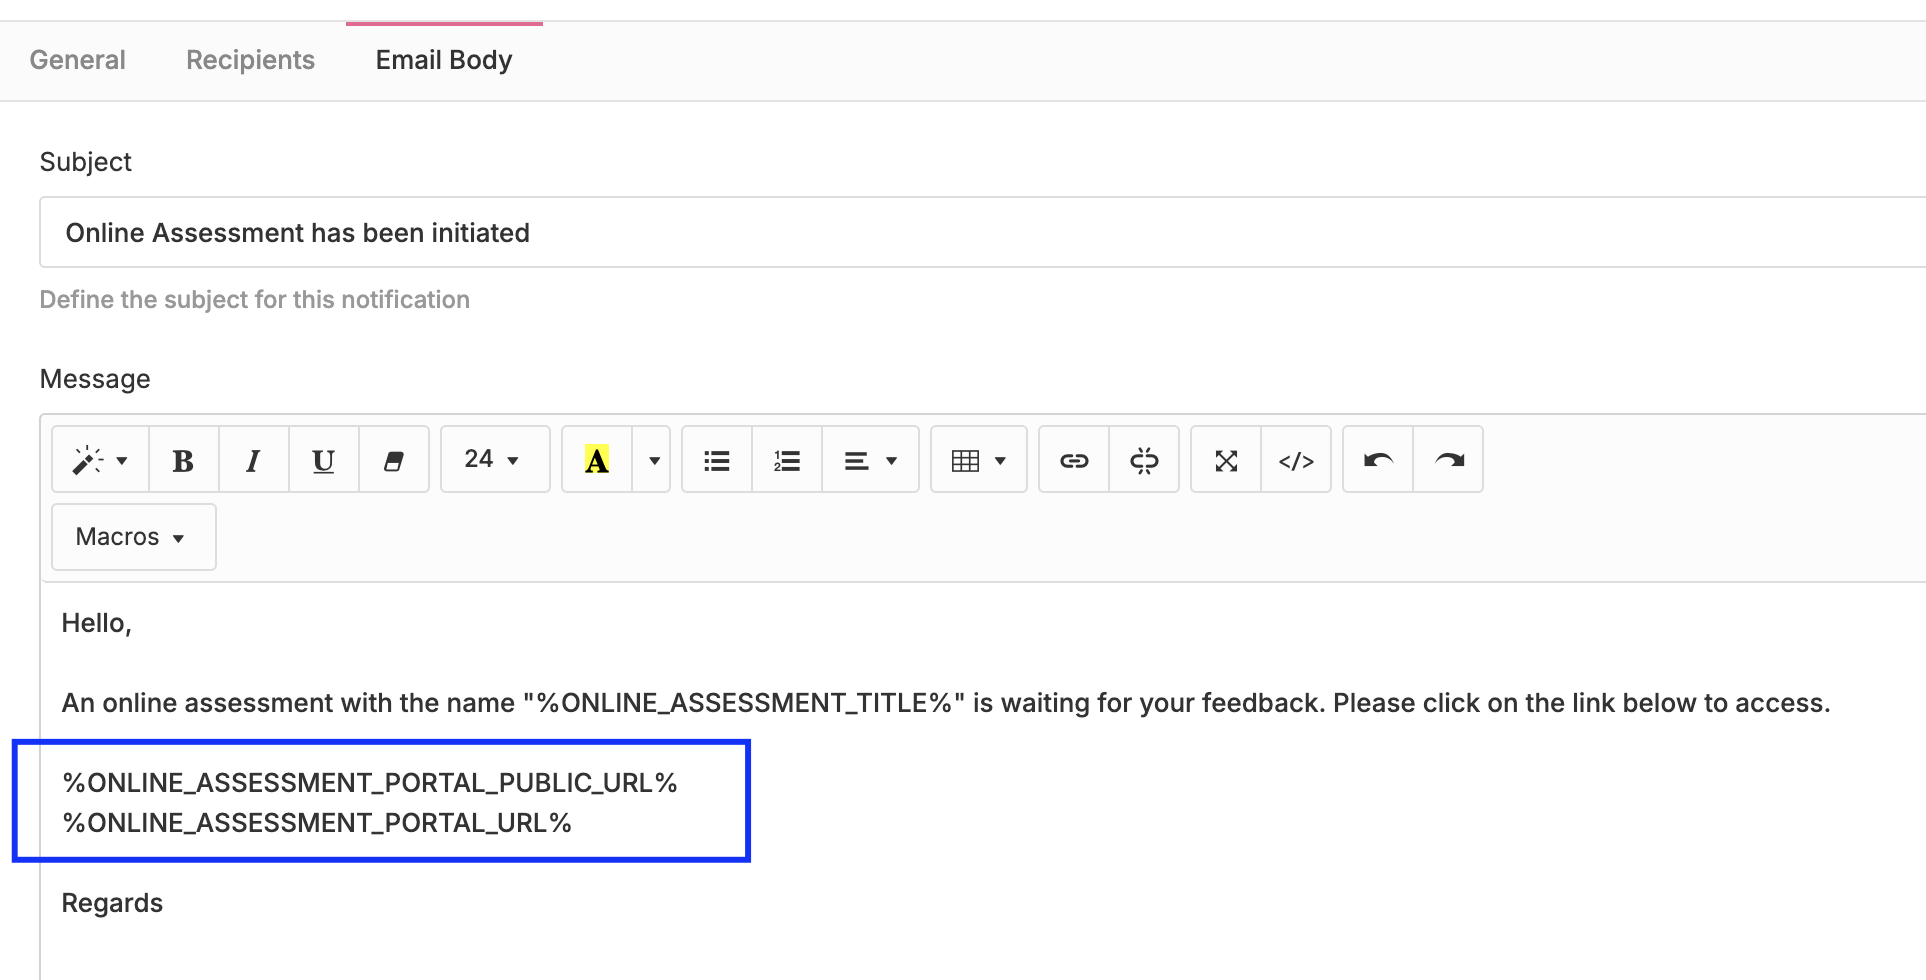
Security Operations / Online Assessment: Send emails when an OA is "Started," when it has been "Submitted," or as reminders a few days before the expected "Stop" date. When editing these notifications, you must adjust the subject and body of the email to reflect your needs—in particular, the URL the recipient must use to access the Portal (if using public, non-authenticated access).
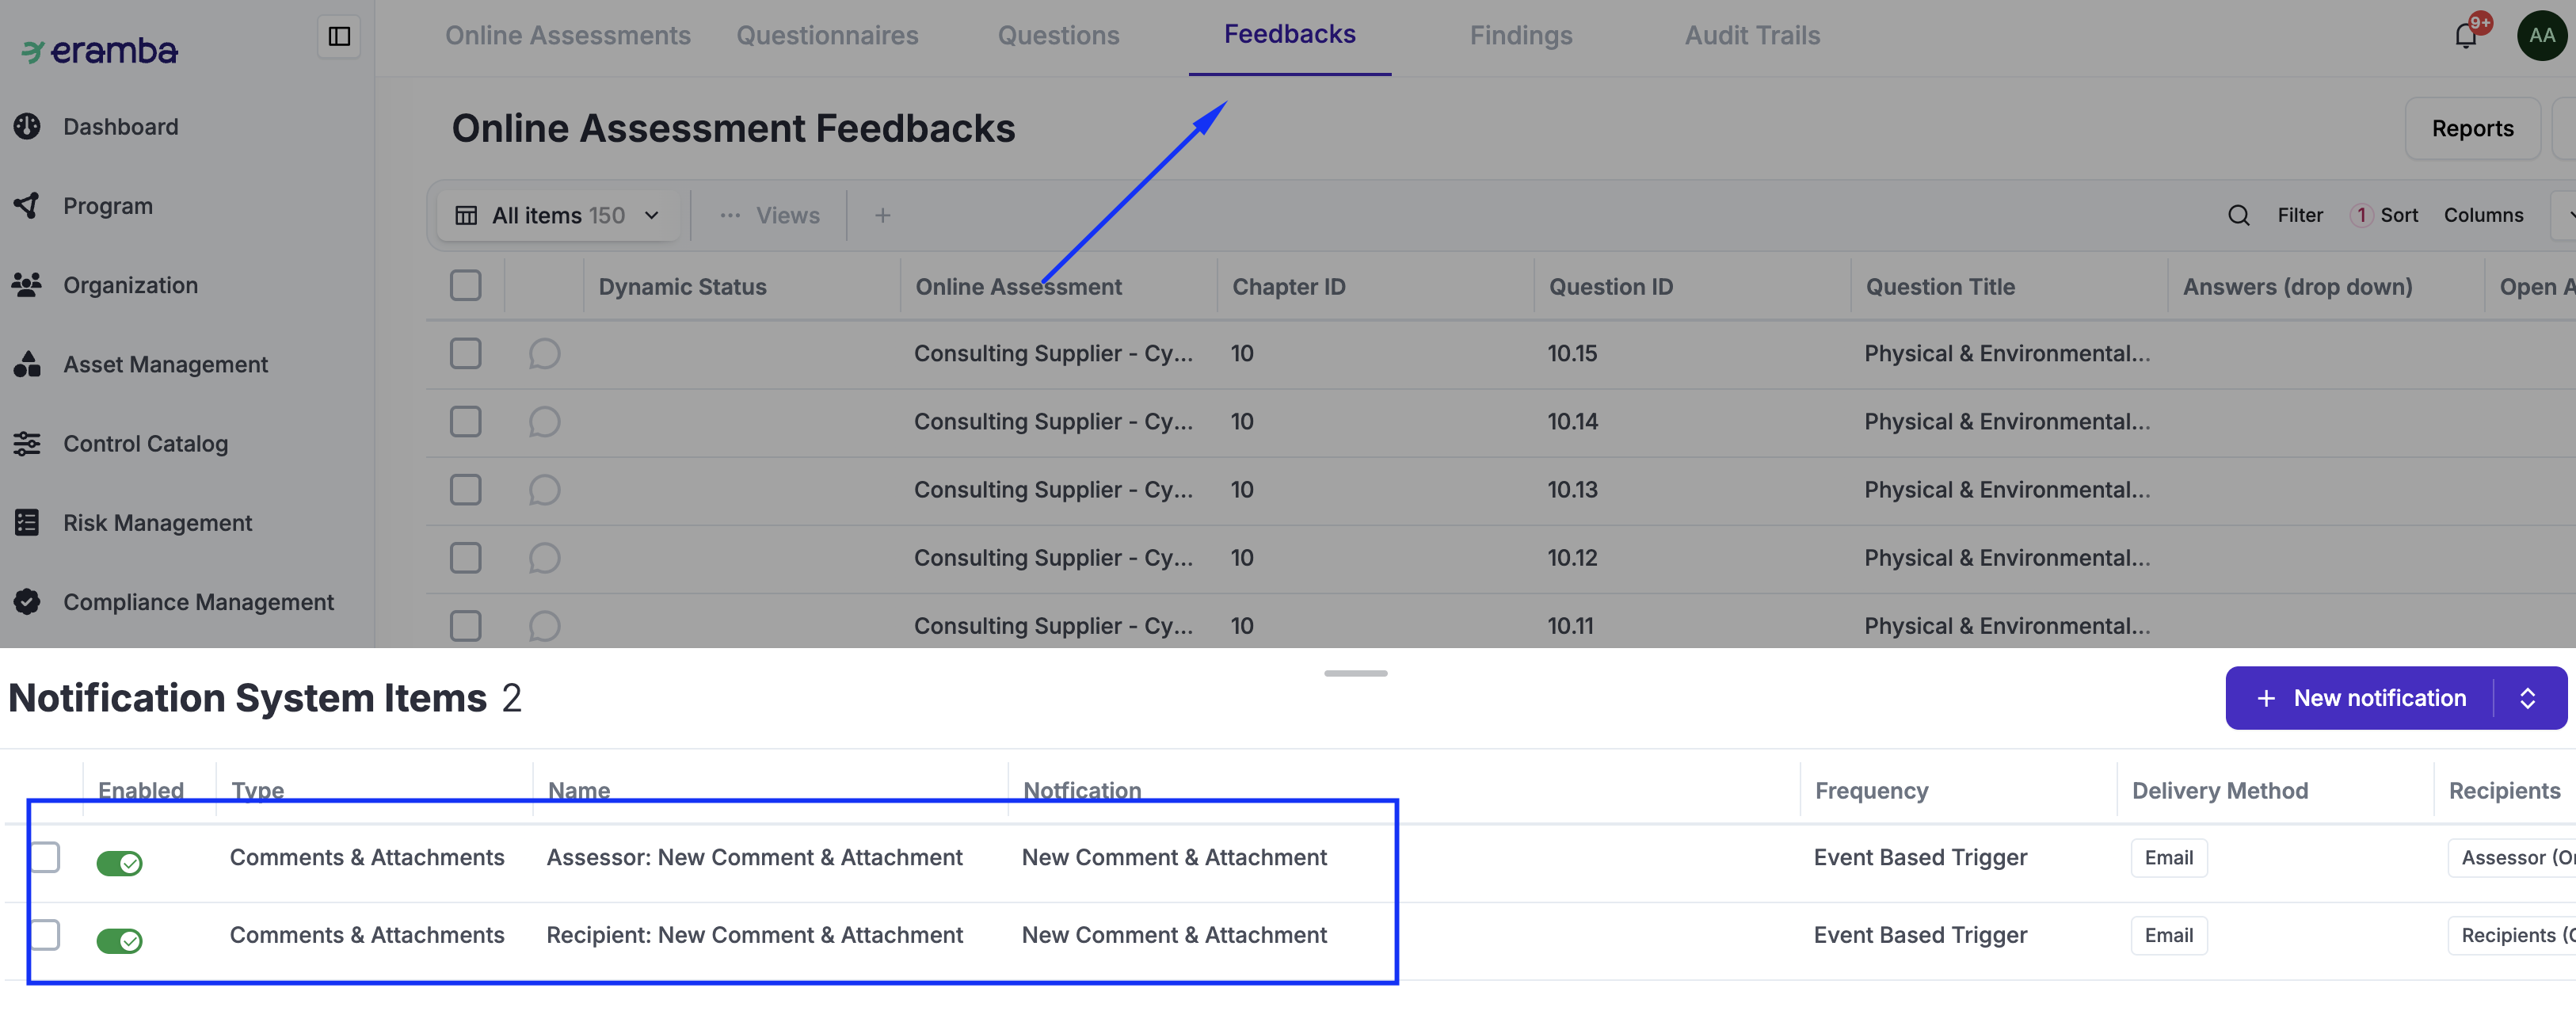
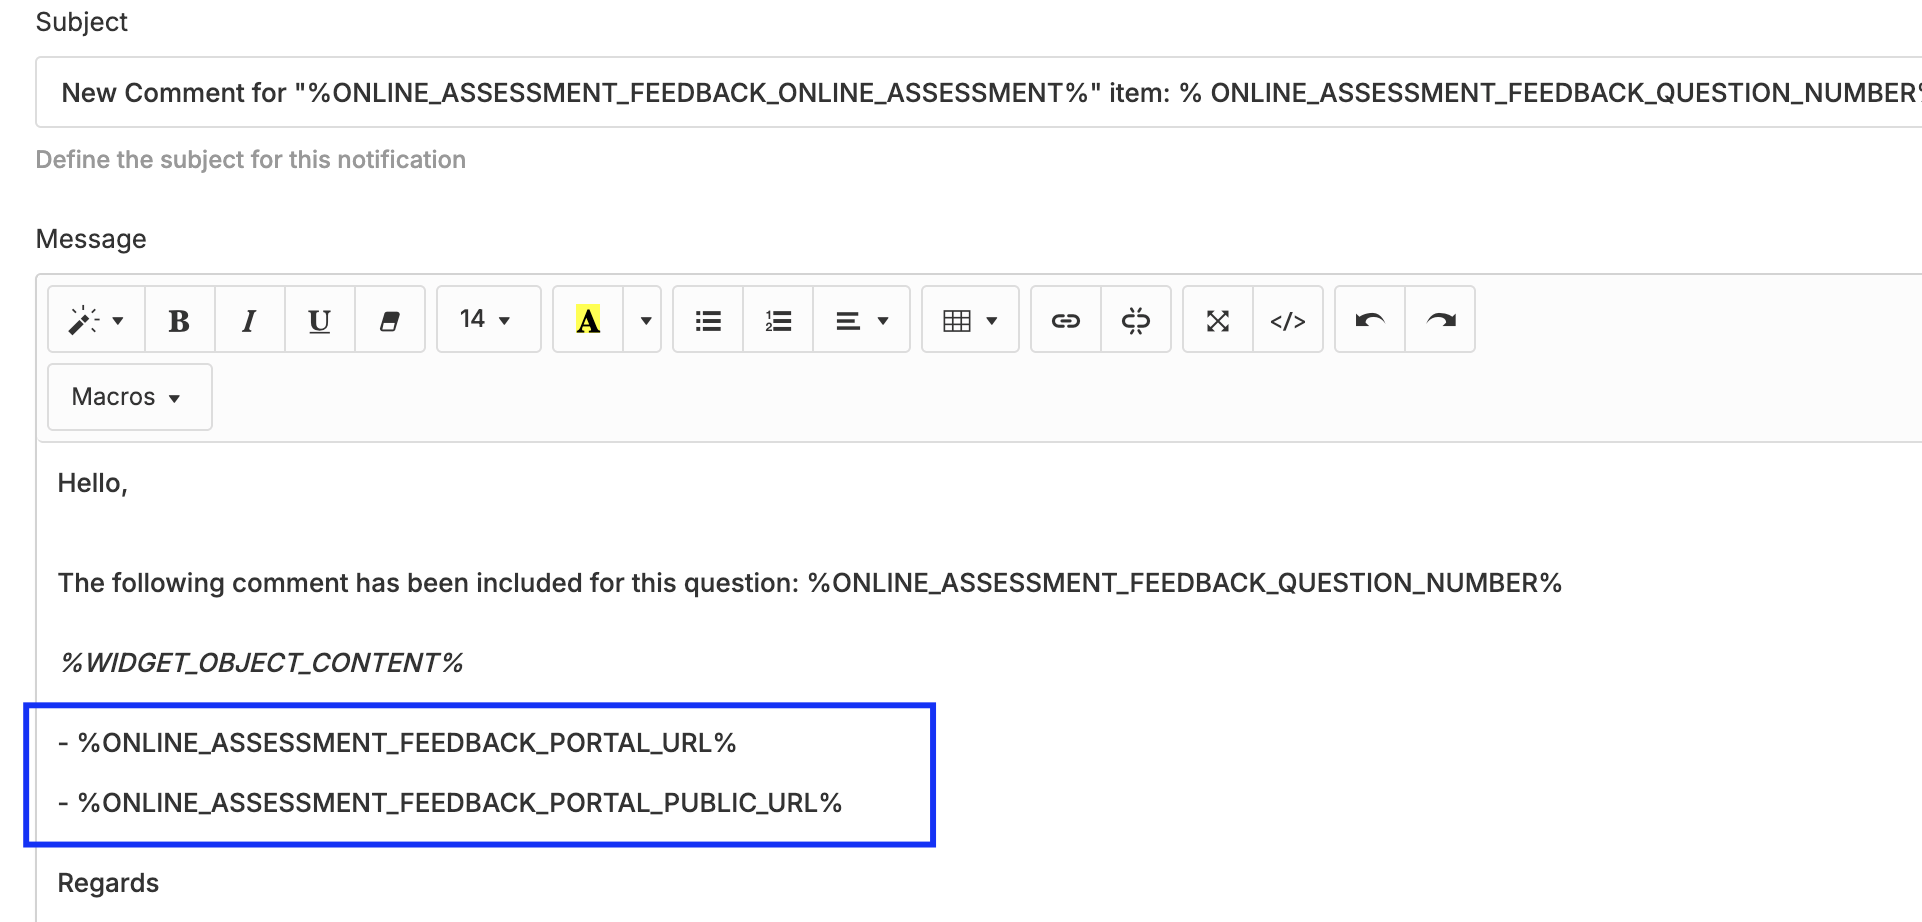
- Security Operations / Online Assessment / Feedback: Comment & Attachment notifications are sent to all involved parties when a comment or attachment is included as part of the recipient's feedback. There are two distinct notifications—one for the assessor and another for the recipient—because the access URLs differ: the recipient logs into the OA portal, while the assessor logs into either the Main portal or the OA portal. Please edit the notification and adjust the URLs based on your preffered method
-
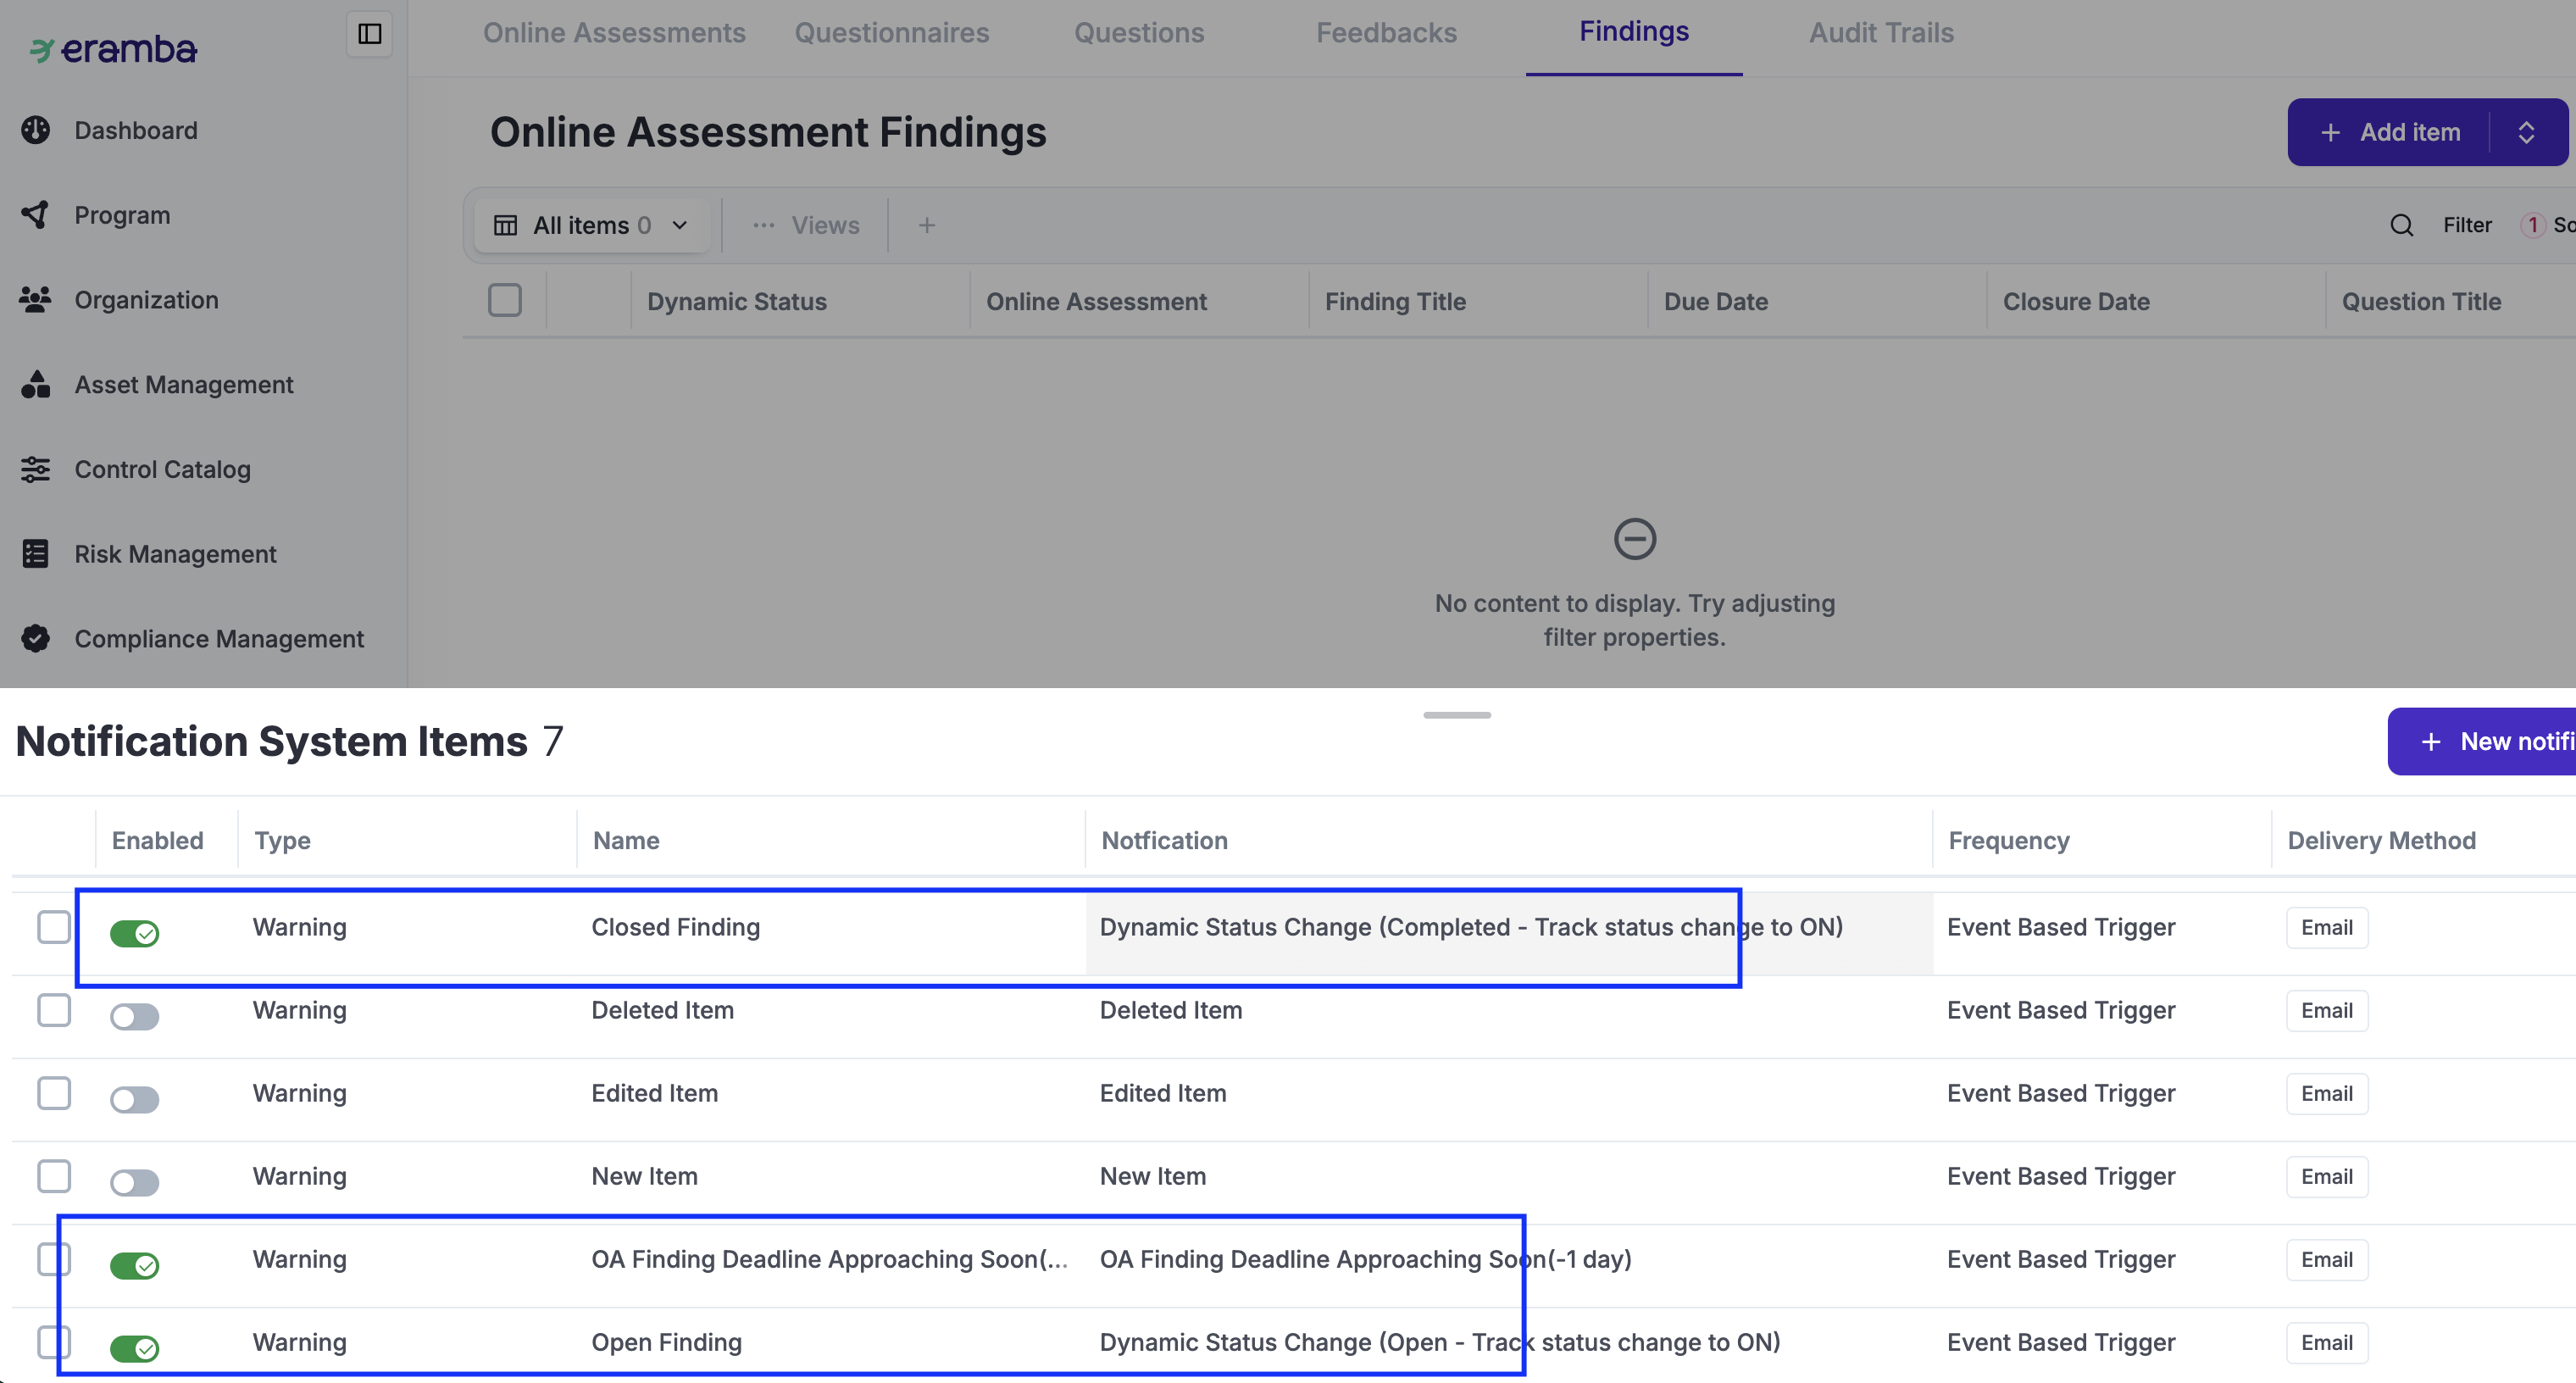
Security Operations / Online Assessment / Findings: Notify users when an OA Finding is created, has expired, or is about to expire:
-
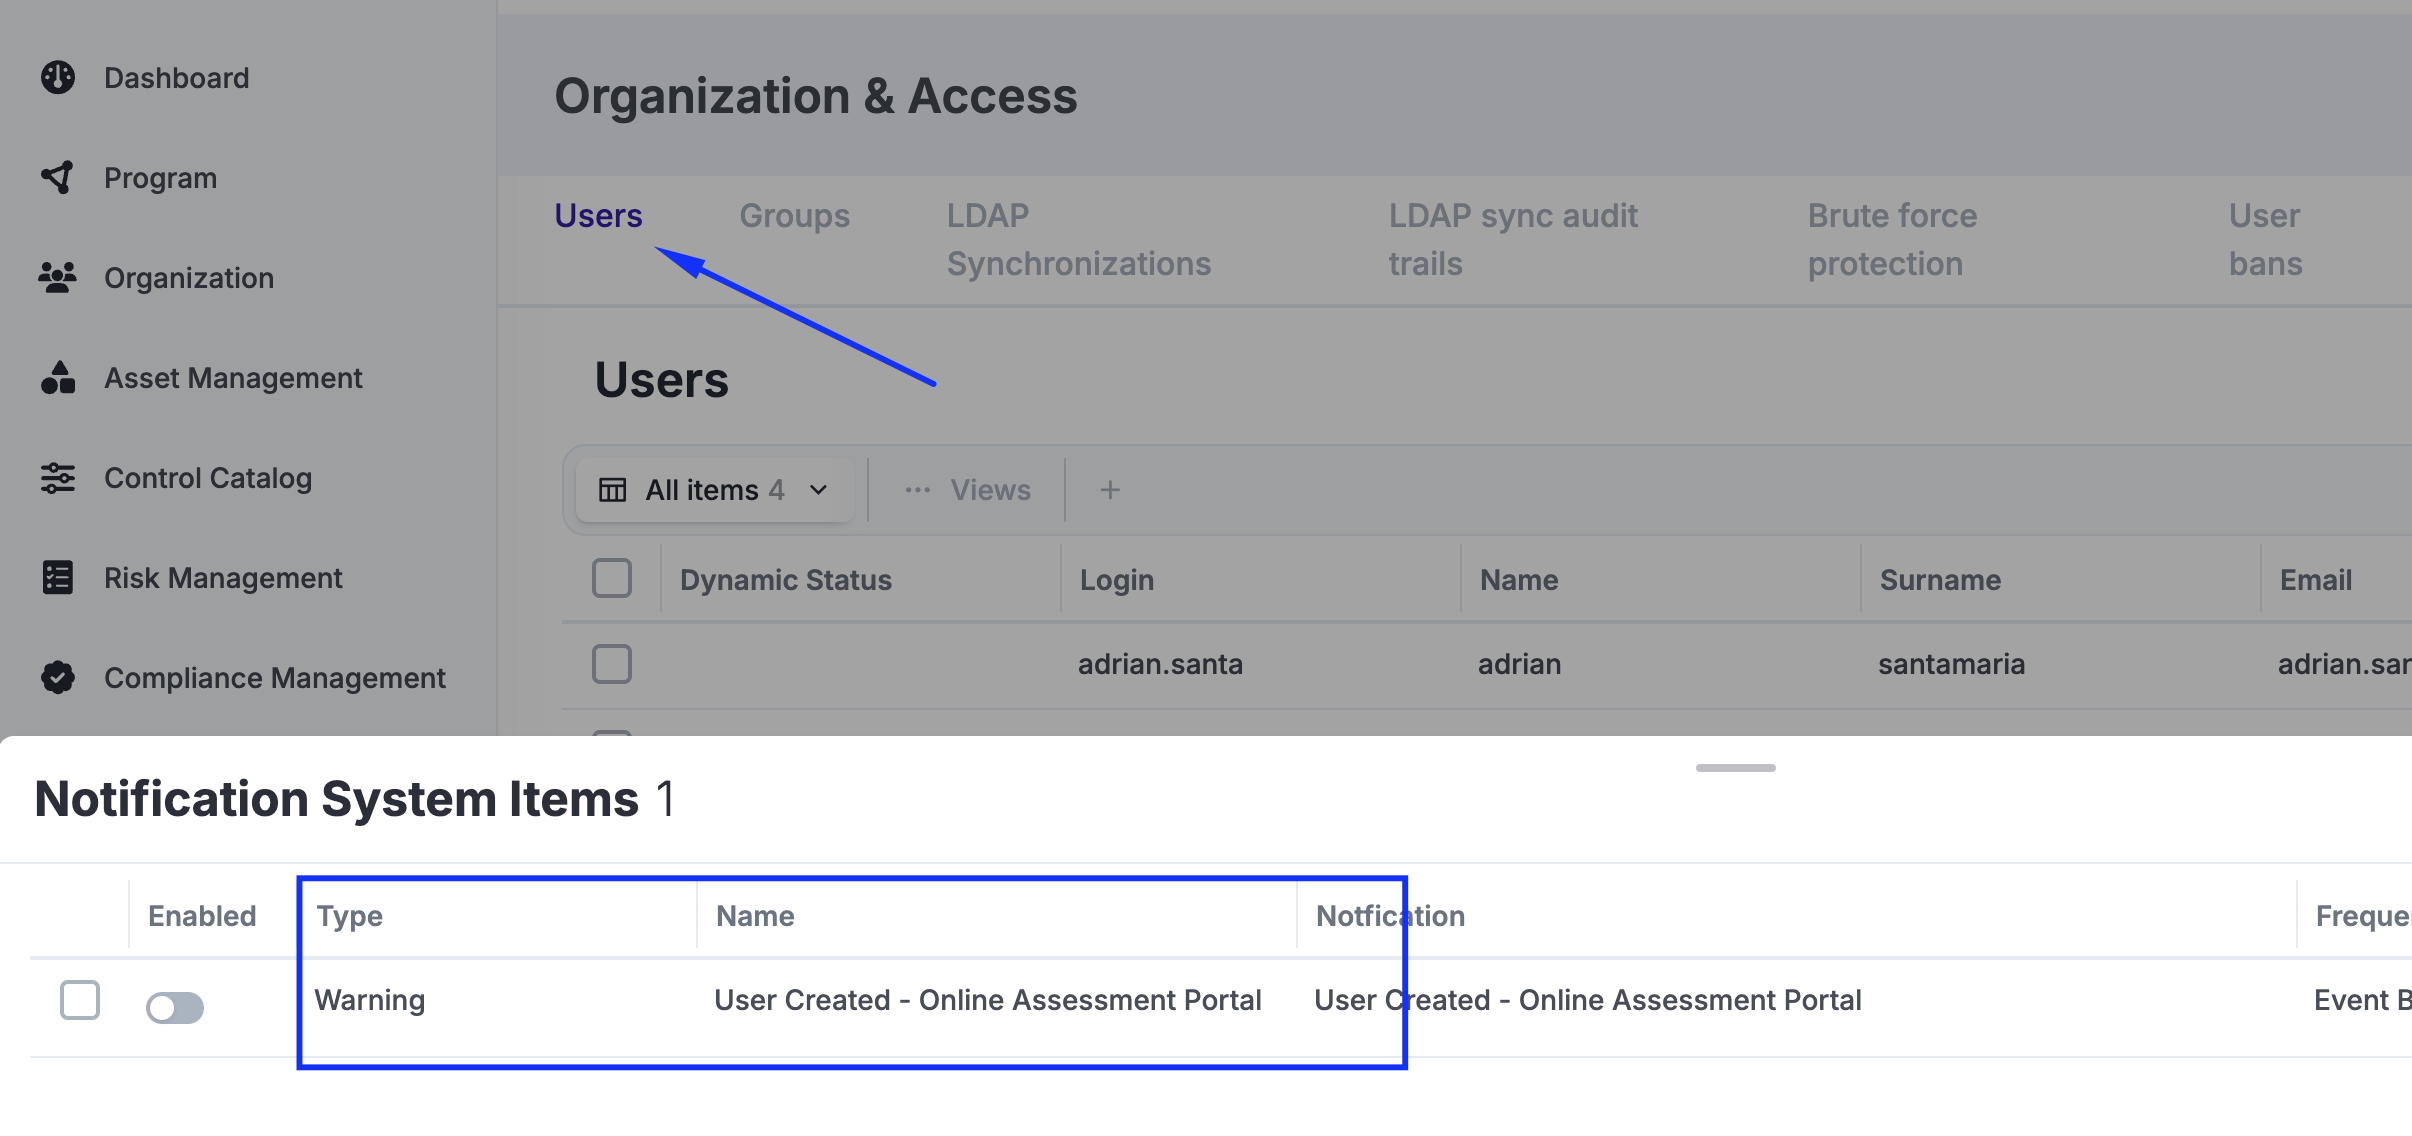
System / Settings / Organization & Access / Users: Notify a user when an OA recipient account has been created (this is optional and only used when you are using authenticated OAs since OAs that use the magic link do not require this notification)