Quick Introduction
Course Introduction
This course helps eramba administrators understand how eramba performs Risk Management, and how it is implemented and operated.
Typical Scenarios
This use case allows you to work with the following common situations:
-
Risk Contextualization: Documenting exactly what is at risk by linking entries to Assets, Third Parties, Business Units, or Processes.
- Risk Classification & Scoring: Defining your own scales (e.g., 1–5 or Low–High) to calculate Inherent and Residual risk scores using a customized matrix.
-
Risk Treatment Mapping: Assigning specific "solutions" to a risk, such as Internal Controls (activities), Policies (documentation), or Projects (future improvements).
-
Life-cycle Automation: Using Dynamic Status to automatically flag risks that are overdue for review or those whose mitigating controls have failed an audit.
-
Stakeholder Accountability: Assigning Risk Owners and GRC Contacts to ensure there is clear responsibility for every identified threat.
-
Risk Reporting: Generating automated dashboards and reports to communicate the organization's risk posture to management and auditors.
Supported Versions
Risk Management runs on both on-premise and cloud deployments and is available in Enterprise and Community editions. Community limitations relate to common functionalities (notifications, reporting, etc), not related modules, as most of these features are not included.
Workshops
Eramba offers instructor-led implementation workshops for this course, facilitating the understanding and implementation of this use case in your organization. Contact support@eramba.org for details.
Theory
Module Relationships
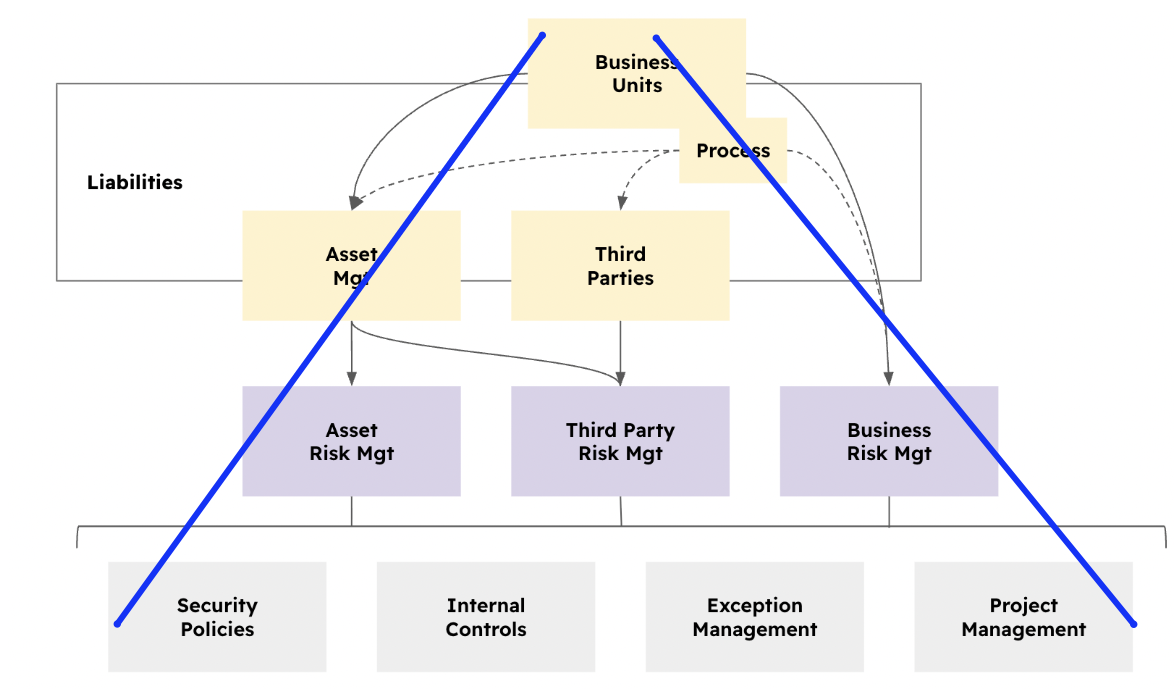
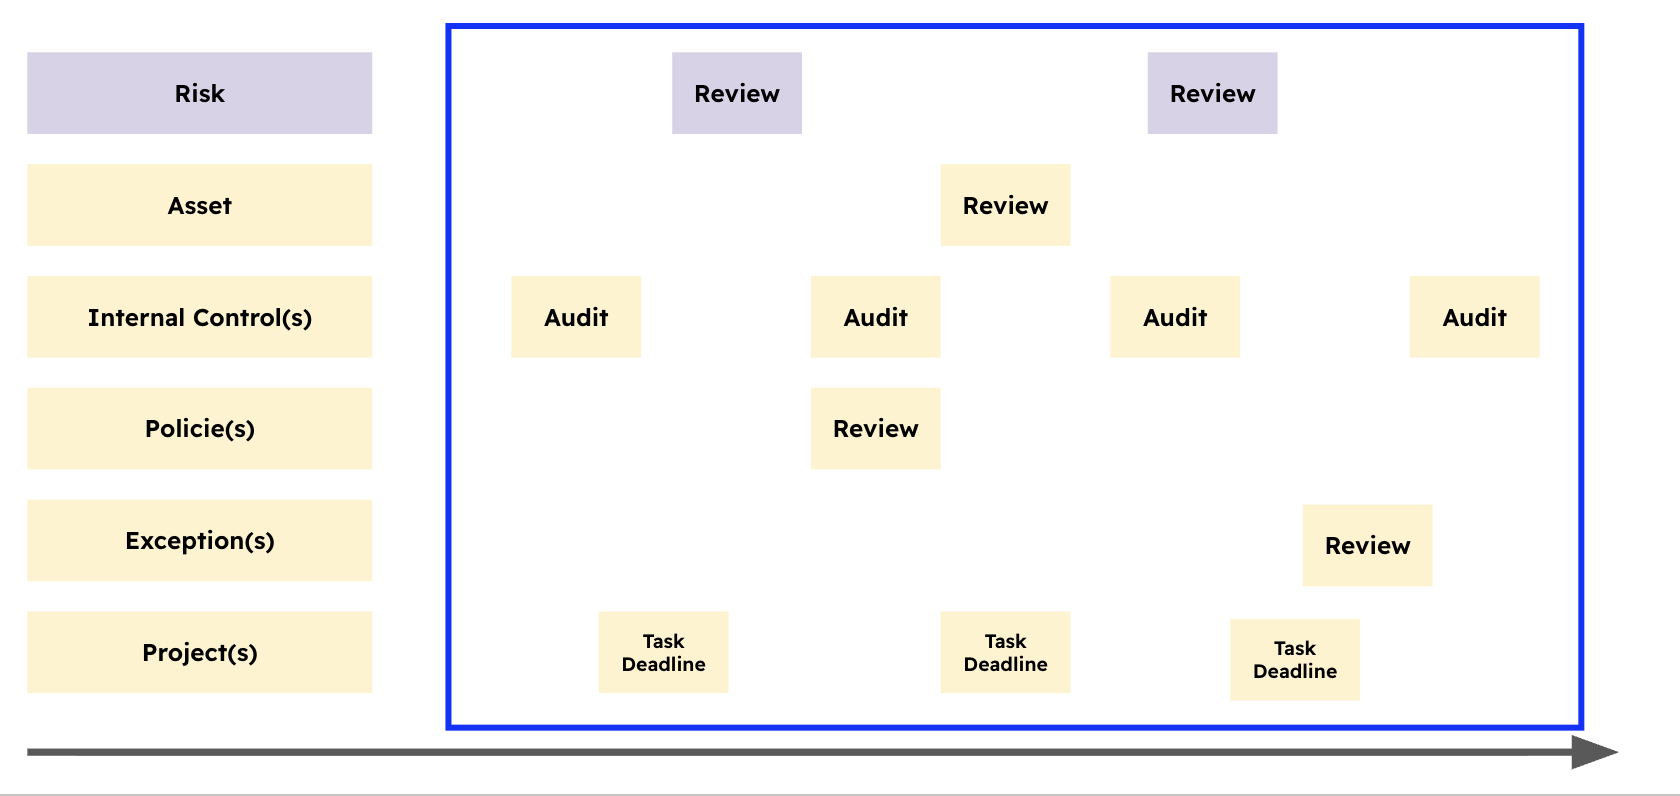
The Risk Management guide requires the use of multiple “related modules” in eramba. Depending on the type of risk you intend to use, there are three options: Asset, Third Party, and Business Risk.
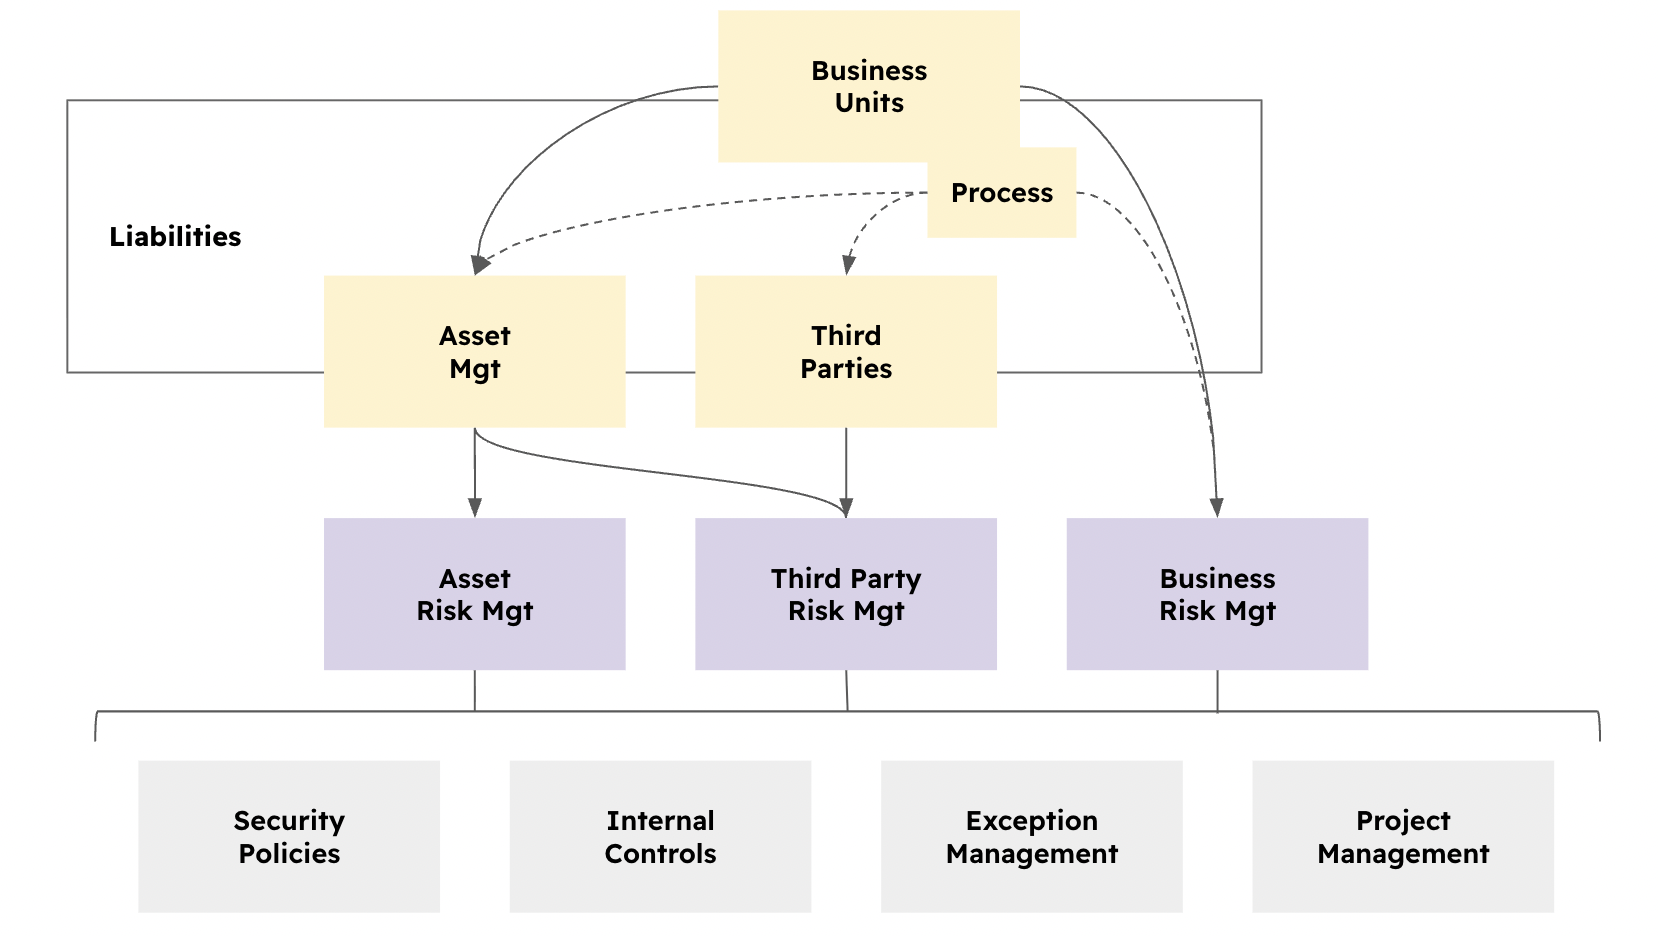
The yellow part of the diagram indicates what we call the risk context, that is, the inputs to the risk:
-
An Asset Risk example could be: “Laptops could be lost or stolen, resulting in data loss.” This would be an Asset Risk with a related asset called “Laptops.” The “Laptops” asset has a related business unit called “IT.”
-
If you then decide to create a Third Party Risk, for example, “Laptops can be stolen during the night shift when the cleaning company is present,” that risk would fall under Third Party Risk Management. In this case, you would reuse the existing asset “Laptops” and create a new third party called “Cleaning Company.”
-
A Business Risk would be different. For example: “If eramba has many bugs, customers will become fed up and go elsewhere.” In this case, the related business unit (in the context of the eramba company) would be “Software Development,” and a specific process would be associated, called “Software Testing.”
In all three scenarios, all risks require treatment. In eramba, this can be achieved using Security Policies, Internal Controls, Exceptions, and Projects:
-
Internal Controls: These are activities performed within the company to treat the risk, for example “laptop encryption” or “strong authentication.” (Internal Control module documentation)
-
Policies: These are documents that support risk treatment, for example “Acceptable Use of Assets” or “Endpoint Security Policy.” (Policy Module documentation)
-
Exceptions: These are used when a risk is intentionally not treated. For example, if Linux computers represent a small subset of your endpoint inventory and are not a priority, you could make this explicit by creating an exception such as “Linux computers not protected.” (Exception module documentation)
-
Projects: These represent future plans, for example “Implement endpoint protection for Linux.” (Project module documentation)
A risk can have one or more solutions. The objective is always to reflect the current reality of your risks.
Problems & Solutions
The diagram above is part of a larger framework within eramba known as "Problems & Solutions." Importantly, these same solutions are equally applicable to Risks and Data Flows.
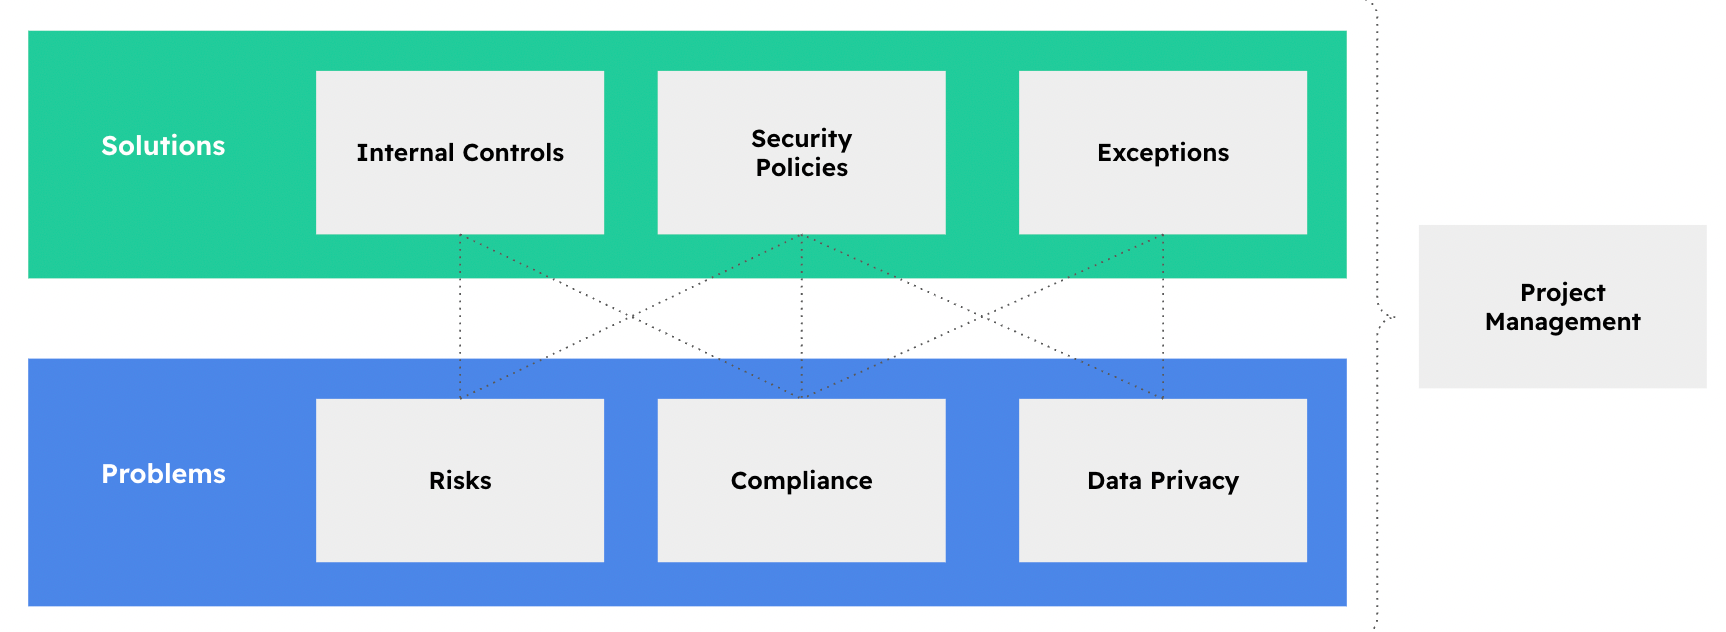
The "Risk" box, located in the bottom left, functions in the same way as the "Problems," "Compliance," and "Data Privacy" boxes. The solutions (Internal Controls, Policies, Etc) mentioned on the previous chapter will automatically be linked in eramba to:
-
Any Compliance you create (ISO, NIST, SOC, etc)
-
Any Data Flow (within the Privacy module) that describes how Personally Identifiable Information (PII) is stored on laptops.
The solutions developed to address "Risk" issues will also be beneficial in tackling the other two sources of problems.
Statuses
There are multiple operational tasks regarding risk management in eramba. These are all aimed at keeping data updated and accurate and, most importantly, ensuring everyone is on board. The last thing you want is for a risk to become a reality and have stakeholders claim they were never informed.
A risk in eramba has multiple related items (Controls, Assets, Exceptions, Policies, etc.), and all of them must be reviewed or tested to ensure they perform as expected.
As seen in the diagram below, a Risk might be reviewed twice a year, while its associated controls are reviewed four times a year and your exceptions only once. Keep in mind that these associated controls and policies are often linked to many different risks and compliance requirements (the "Problems and Solutions" approach).
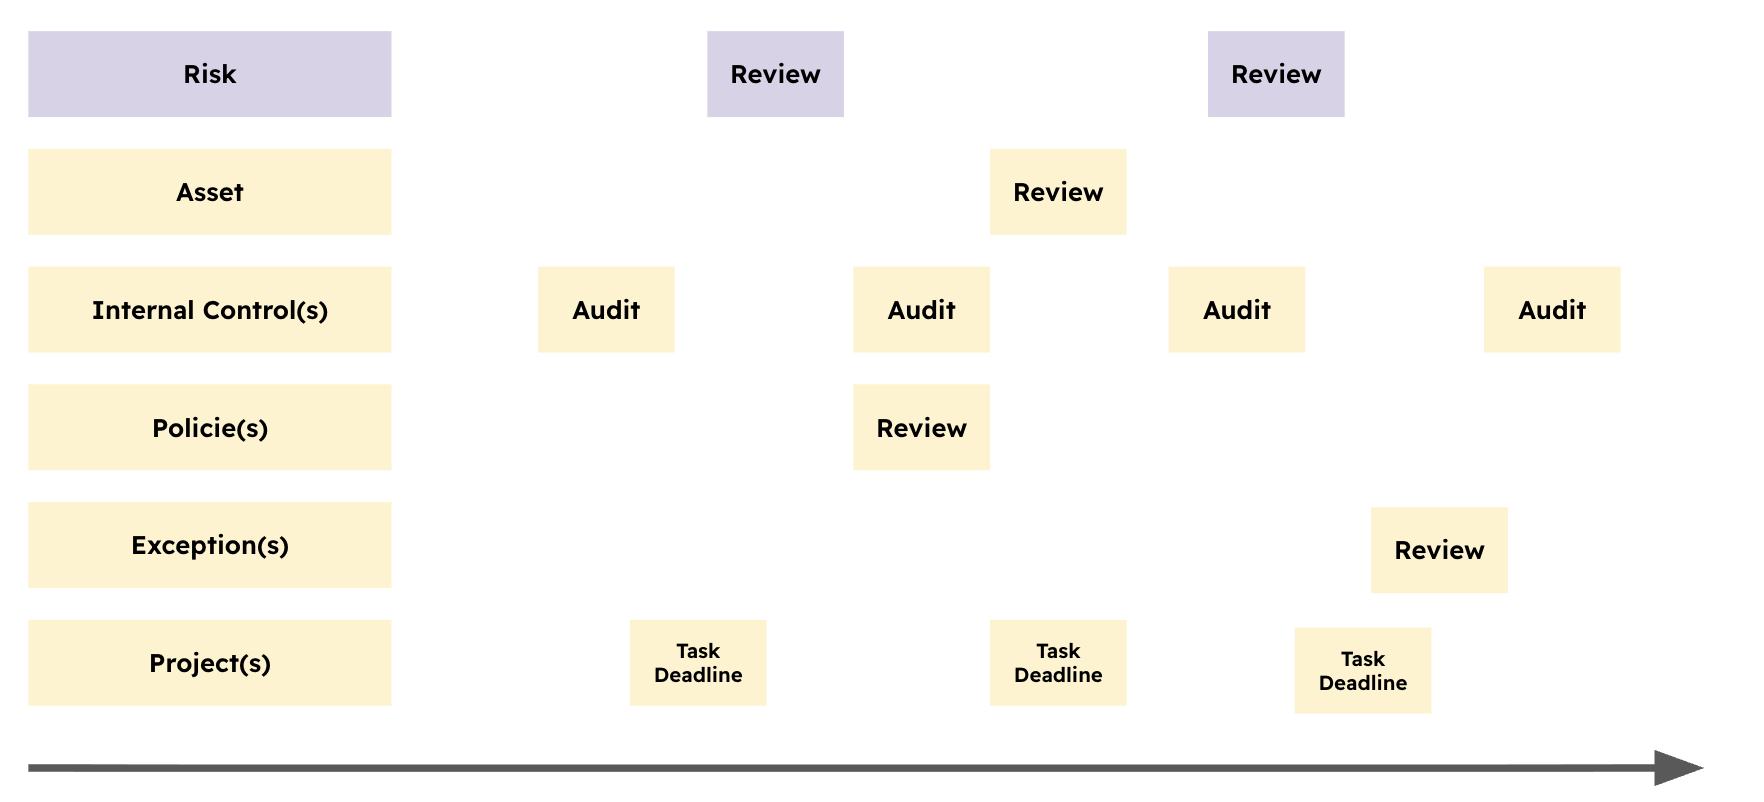
If an associated control fails a test, all risks linked to that internal control will inherit the issue, regardless of when it occurs. This allows you to see clearly from the "Problem" perspective (the risk) whether the treatment is actually effective. The same logic applies to policy reviews, exception reviews, and project deadlines.
Associated Costs
Doing risk management at this level of maturity costs time and money; however, these costs can be calculated in advance with some degree of accuracy.
For every business unit, you will identify 4–5 assets, 3–4 third parties, and perhaps 1–2 liabilities. You can think in terms of ratios: one Business Unit leads to 8–11 items of context.
For every 10 contextual items (as mentioned above), you can expect to identify 5–10 critical risks that cannot be ignored. For every risk identified, you must determine solutions, which will be leveraged across different risks to some degree. Typically, for every risk you identify, you will need a mix of 3–5 solutions.
If you (or better an LLM) do the math, you will find that if you have five Busienss Unit you then have somewhere in between 20 and 55 Risks and 60 to 275 solutions. The power of multiplication and ratios is that it grows linealy.
If the top of the pyramid is wide (because you make the scope enormous or identify millions of assets), the bottom will become humongous. The problem is not the time it takes to create these htings in eramna (CSV imports make it easy), the problem is the cost of keeping it all updated.
Risks must be reviewed, as must Assets and Third Parties. Policies, Exceptions, and Projects require reviews too. If you imagine an hour and a half for each review per year, you are looking at 174 hours a year. That equates to 22 working days for a single employee. Controls must also be tested—typically twice a year—and while testing duration can vary widely, let’s assume a couple of hours per test. That adds another 80 working days a year for a single employee.
The name of the game is not quantity, is quality.
Templates
We are working on an integrated list of Template Risks, please review our Product Roadmap for details and updates.
Risk Attributes
When creating or editing a Risk, users are presented with a form composed of multiple fields. Some fields are mandatory and must be completed in order to save the Risk, while others are optional and may be used to enrich the Risk record depending on the organization’s needs.
The Risk form is organized into three main tabs: General, Analysis, and Treatment. A fourth tab, Risk Response Plan, is optional and hidden by default.

Remenber you can always customise these forms using the Customisation common feature.
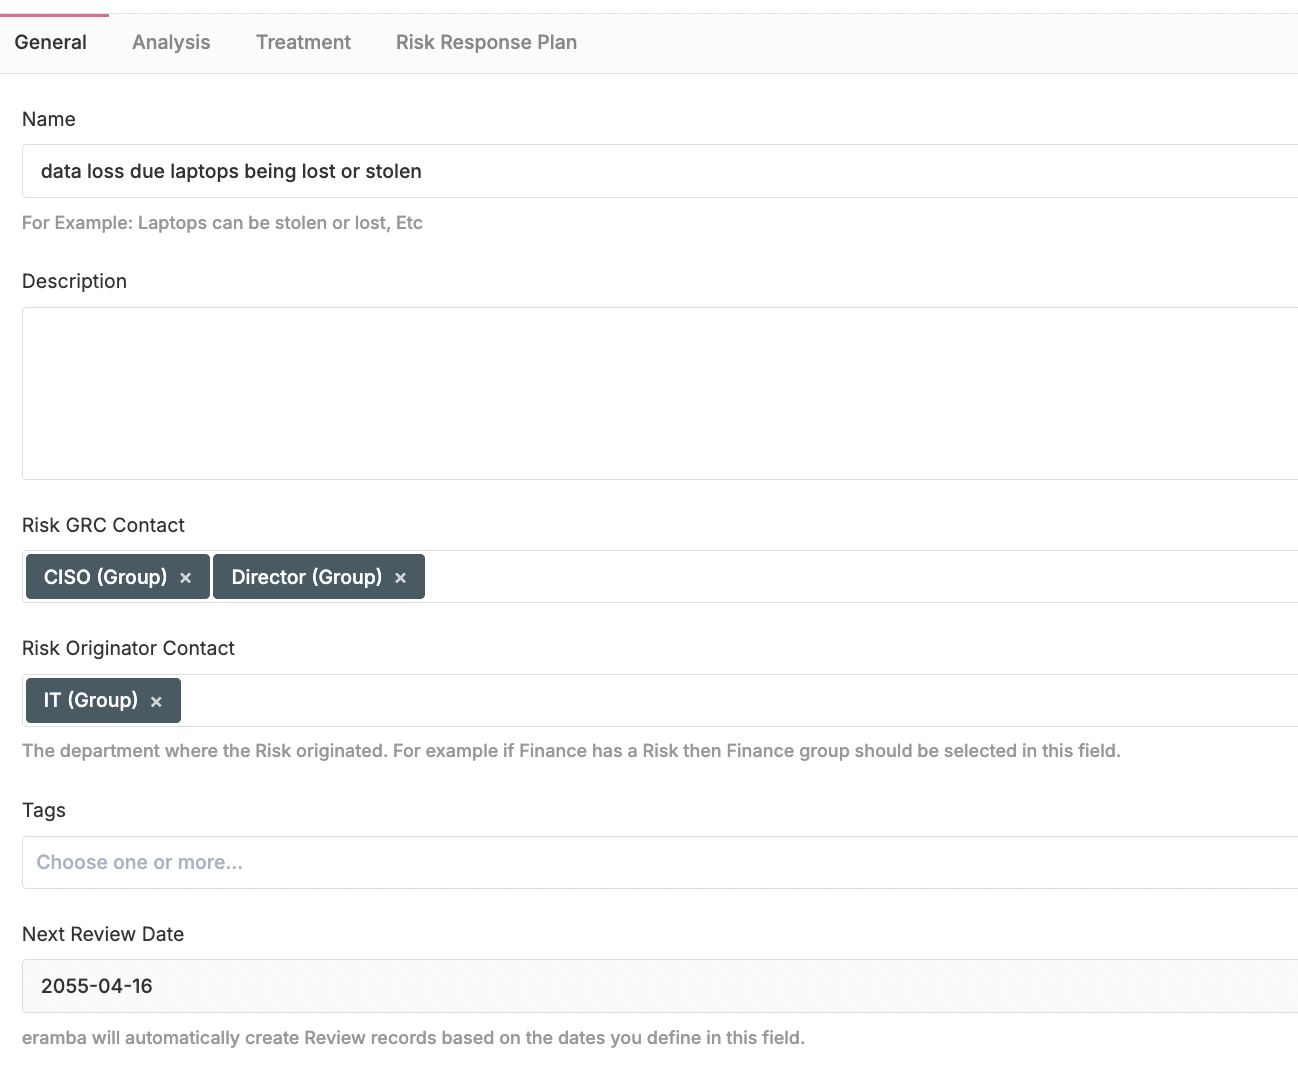
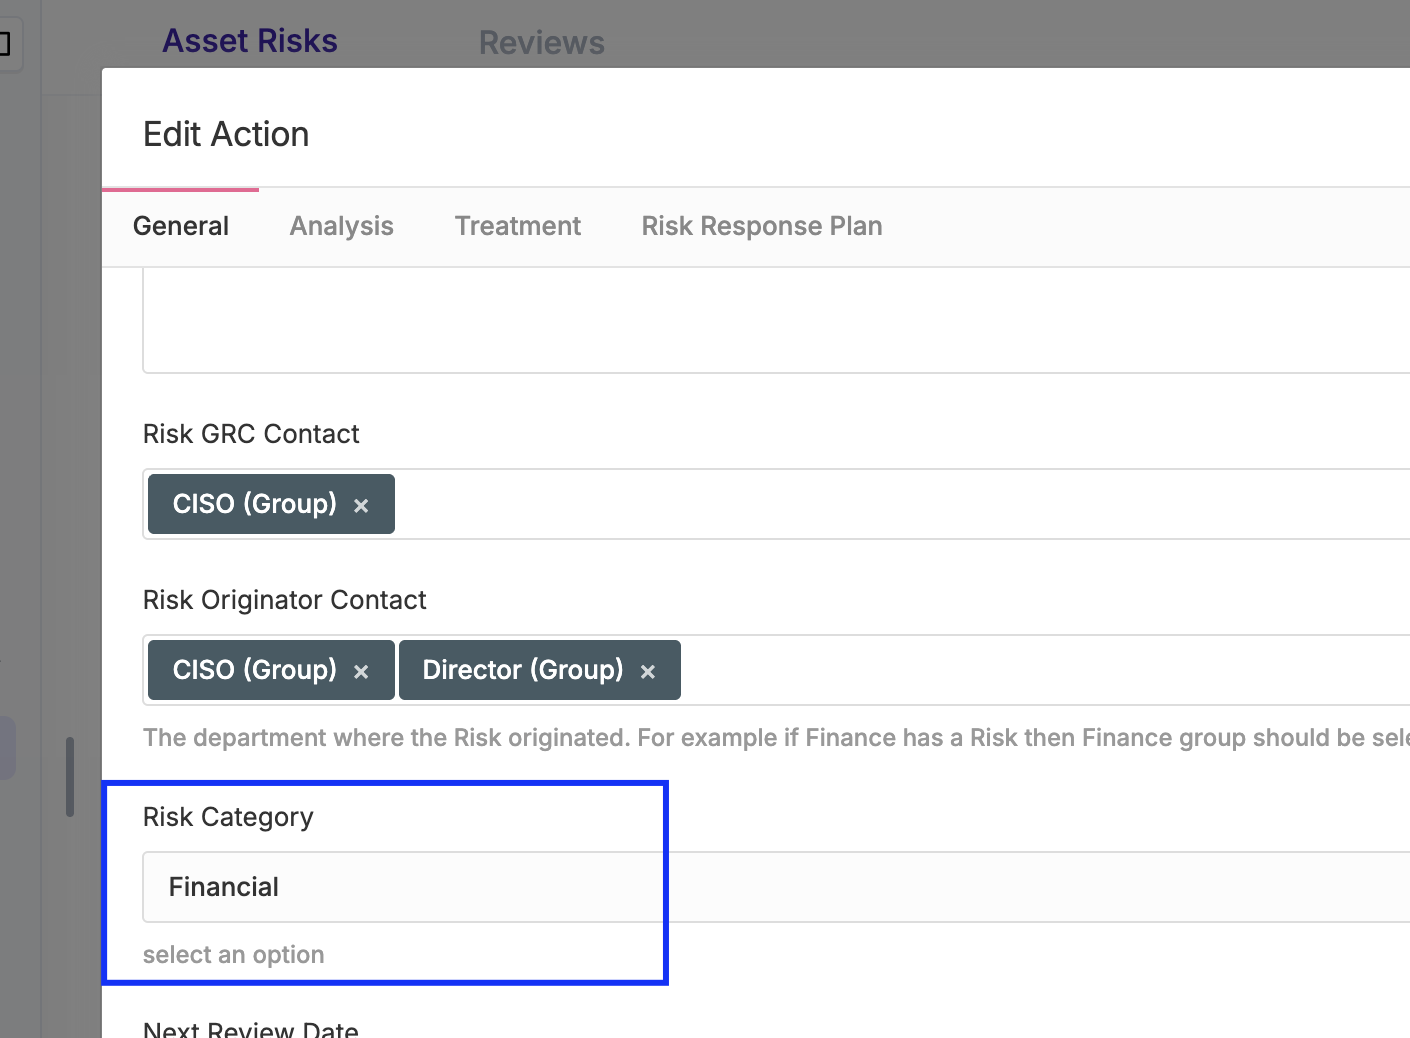
- The General tab defines the core identity and ownership of the Risk. The Risk must be described using a scenario-style title, similar to a newspaper headline, clearly stating what could happen and why it matters. Two roles are always required. The GRC Contact represents the department with an interest in creating and managing the Risk and is typically responsible for its governance and ongoing oversight. The Risk Originator represents the department whose activities generate the Risk, intentionally or unintentionally, and is usually identified during interviews or risk identification workshops. The Risk Review is a mandatory field that is used to force you to perform a review of this risk on the specified date.
Follow our recommendation for "Risk Scenario" best practices in this discussion post.
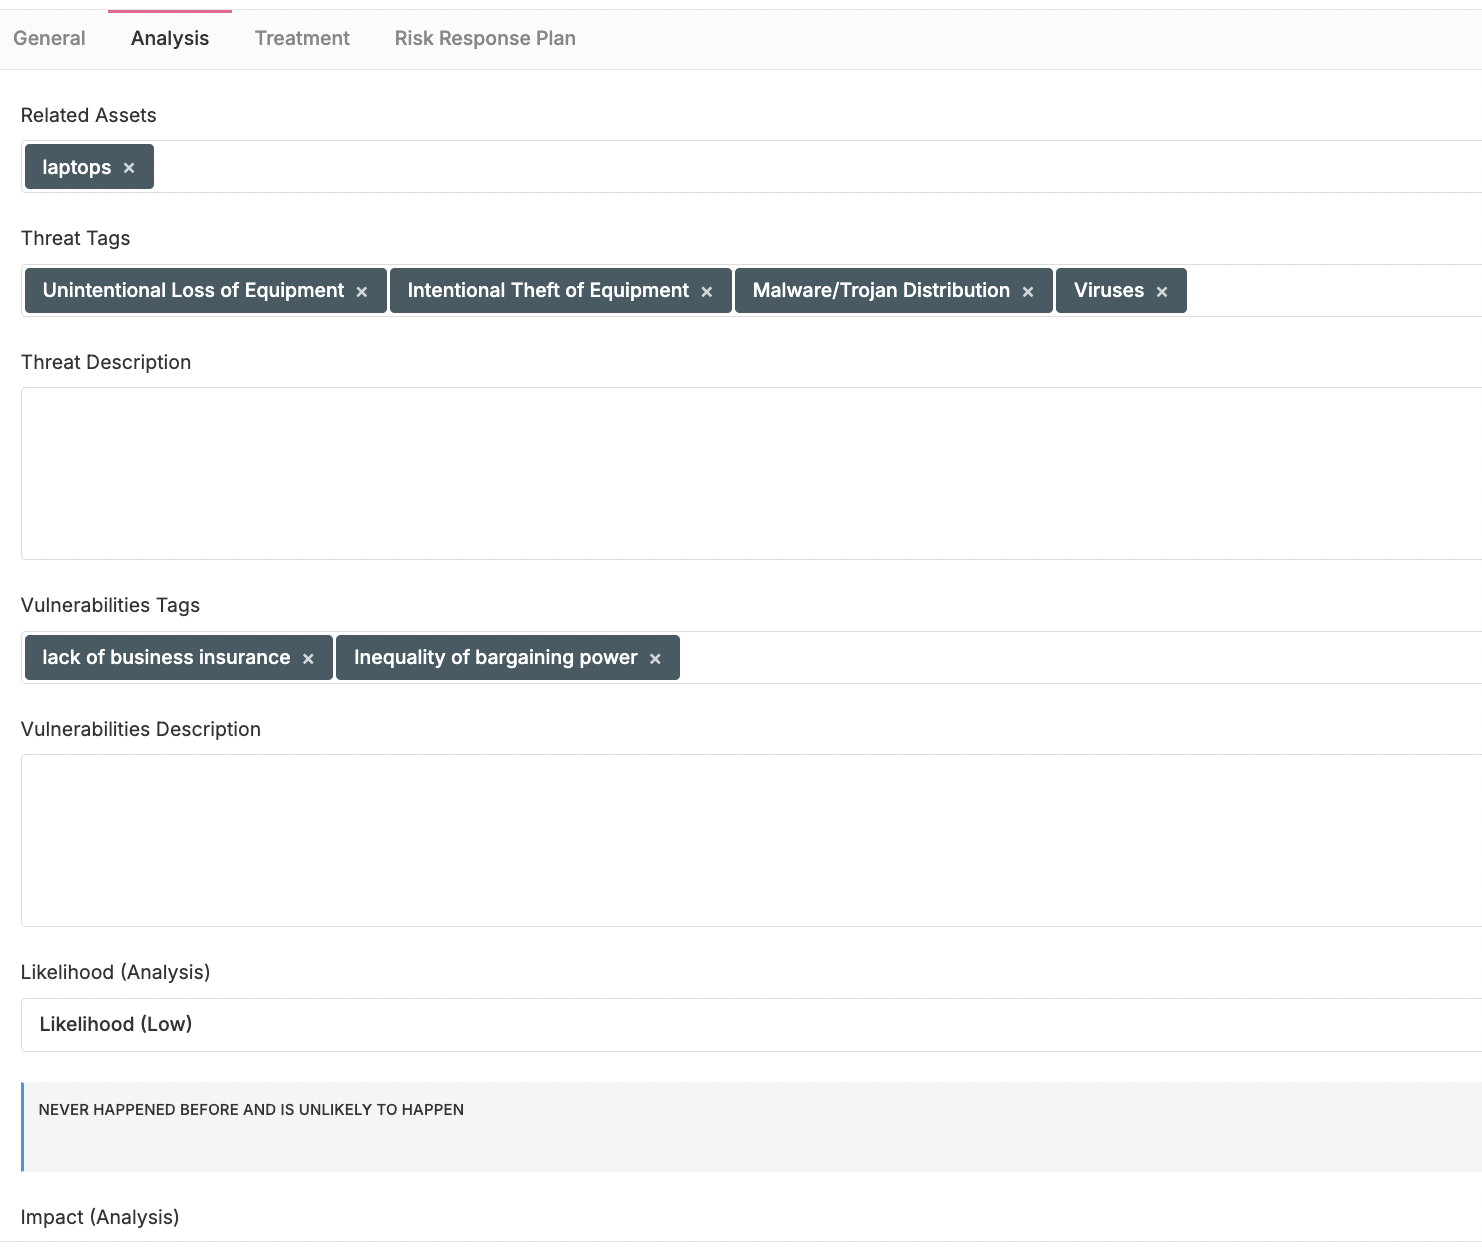
- The Risk Analysis tab is used to analyse (also referred to as assess) the Risk. The structure and fields of this tab change depending on the Risk module in use—Asset, Third Party, or Business—as each module requires different inputs. Threats and vulnerabilities can be defined either as free text or by using tags. When tags are used, they are automatically filtered based on the selected asset; this automated behavior applies only to Asset risks and does not apply to Business risks. Threat and Vulnerability tags are defined and managed under Settings, where they can be added, edited, or removed. At the end of the form, the Risk must be classified in its initial state, before any treatment is applied. This initial classification is commonly referred to as inherent risk. Based on the configured settings, Eramba places the Risk on the risk matrix and calculates the corresponding risk score.
Since 2013, ISO/IEC 27001 does not require an explicit relationship between Risks and Assets, nor the formal identification of Threats and Vulnerabilities. To simplify the risk assessment process, you may use a single generic Asset for all Risks and hide the Threat and Vulnerability fields using the common customization functionality, if desired.
- The Risk Treatment tab is where the current treatment applied by the organization is defined. It is important that this tab reflects today’s treatment, not future or planned actions; future improvements should be managed through Projects. Based on the selected treatment, you can associate the solutions that are currently in place, such as Internal Controls, Policies, Exceptions, and Projects. After defining the treatment, the Risk must be classified again, this time considering how the Risk has changed as a result of the applied treatment.
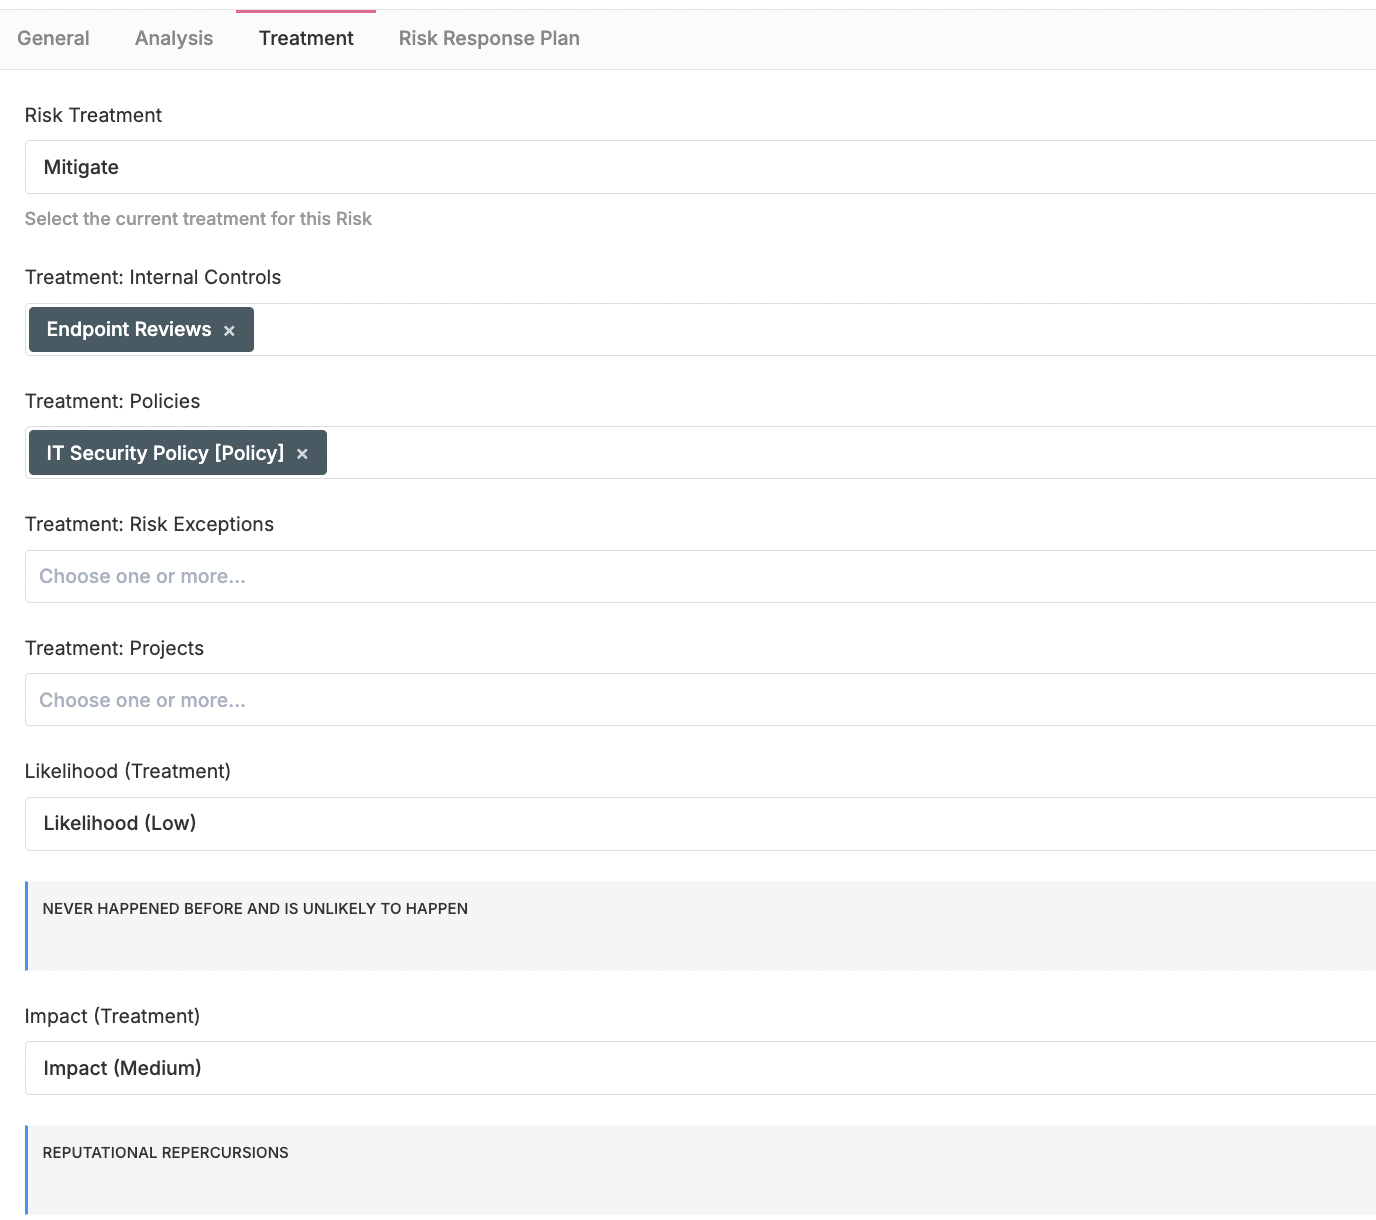
You can define which treatment options are available or mandatory based on the selected treatment by using Settings / Treatment Options. For example, if the user selects Mitigate, Internal Controls and Policies can be set as mandatory, while Exceptions and Projects remain optional.
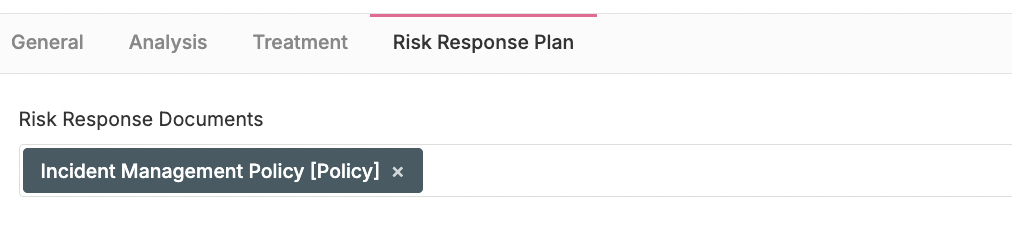
- The Risk Response Plan tab is used to document the actions that must be taken if the documented Risk becomes a reality. This is done by associating one or more documents from the Policy module. The information defined here is also linked to the Incident module, so when an Incident is created, the operator is provided with clear response instructions.
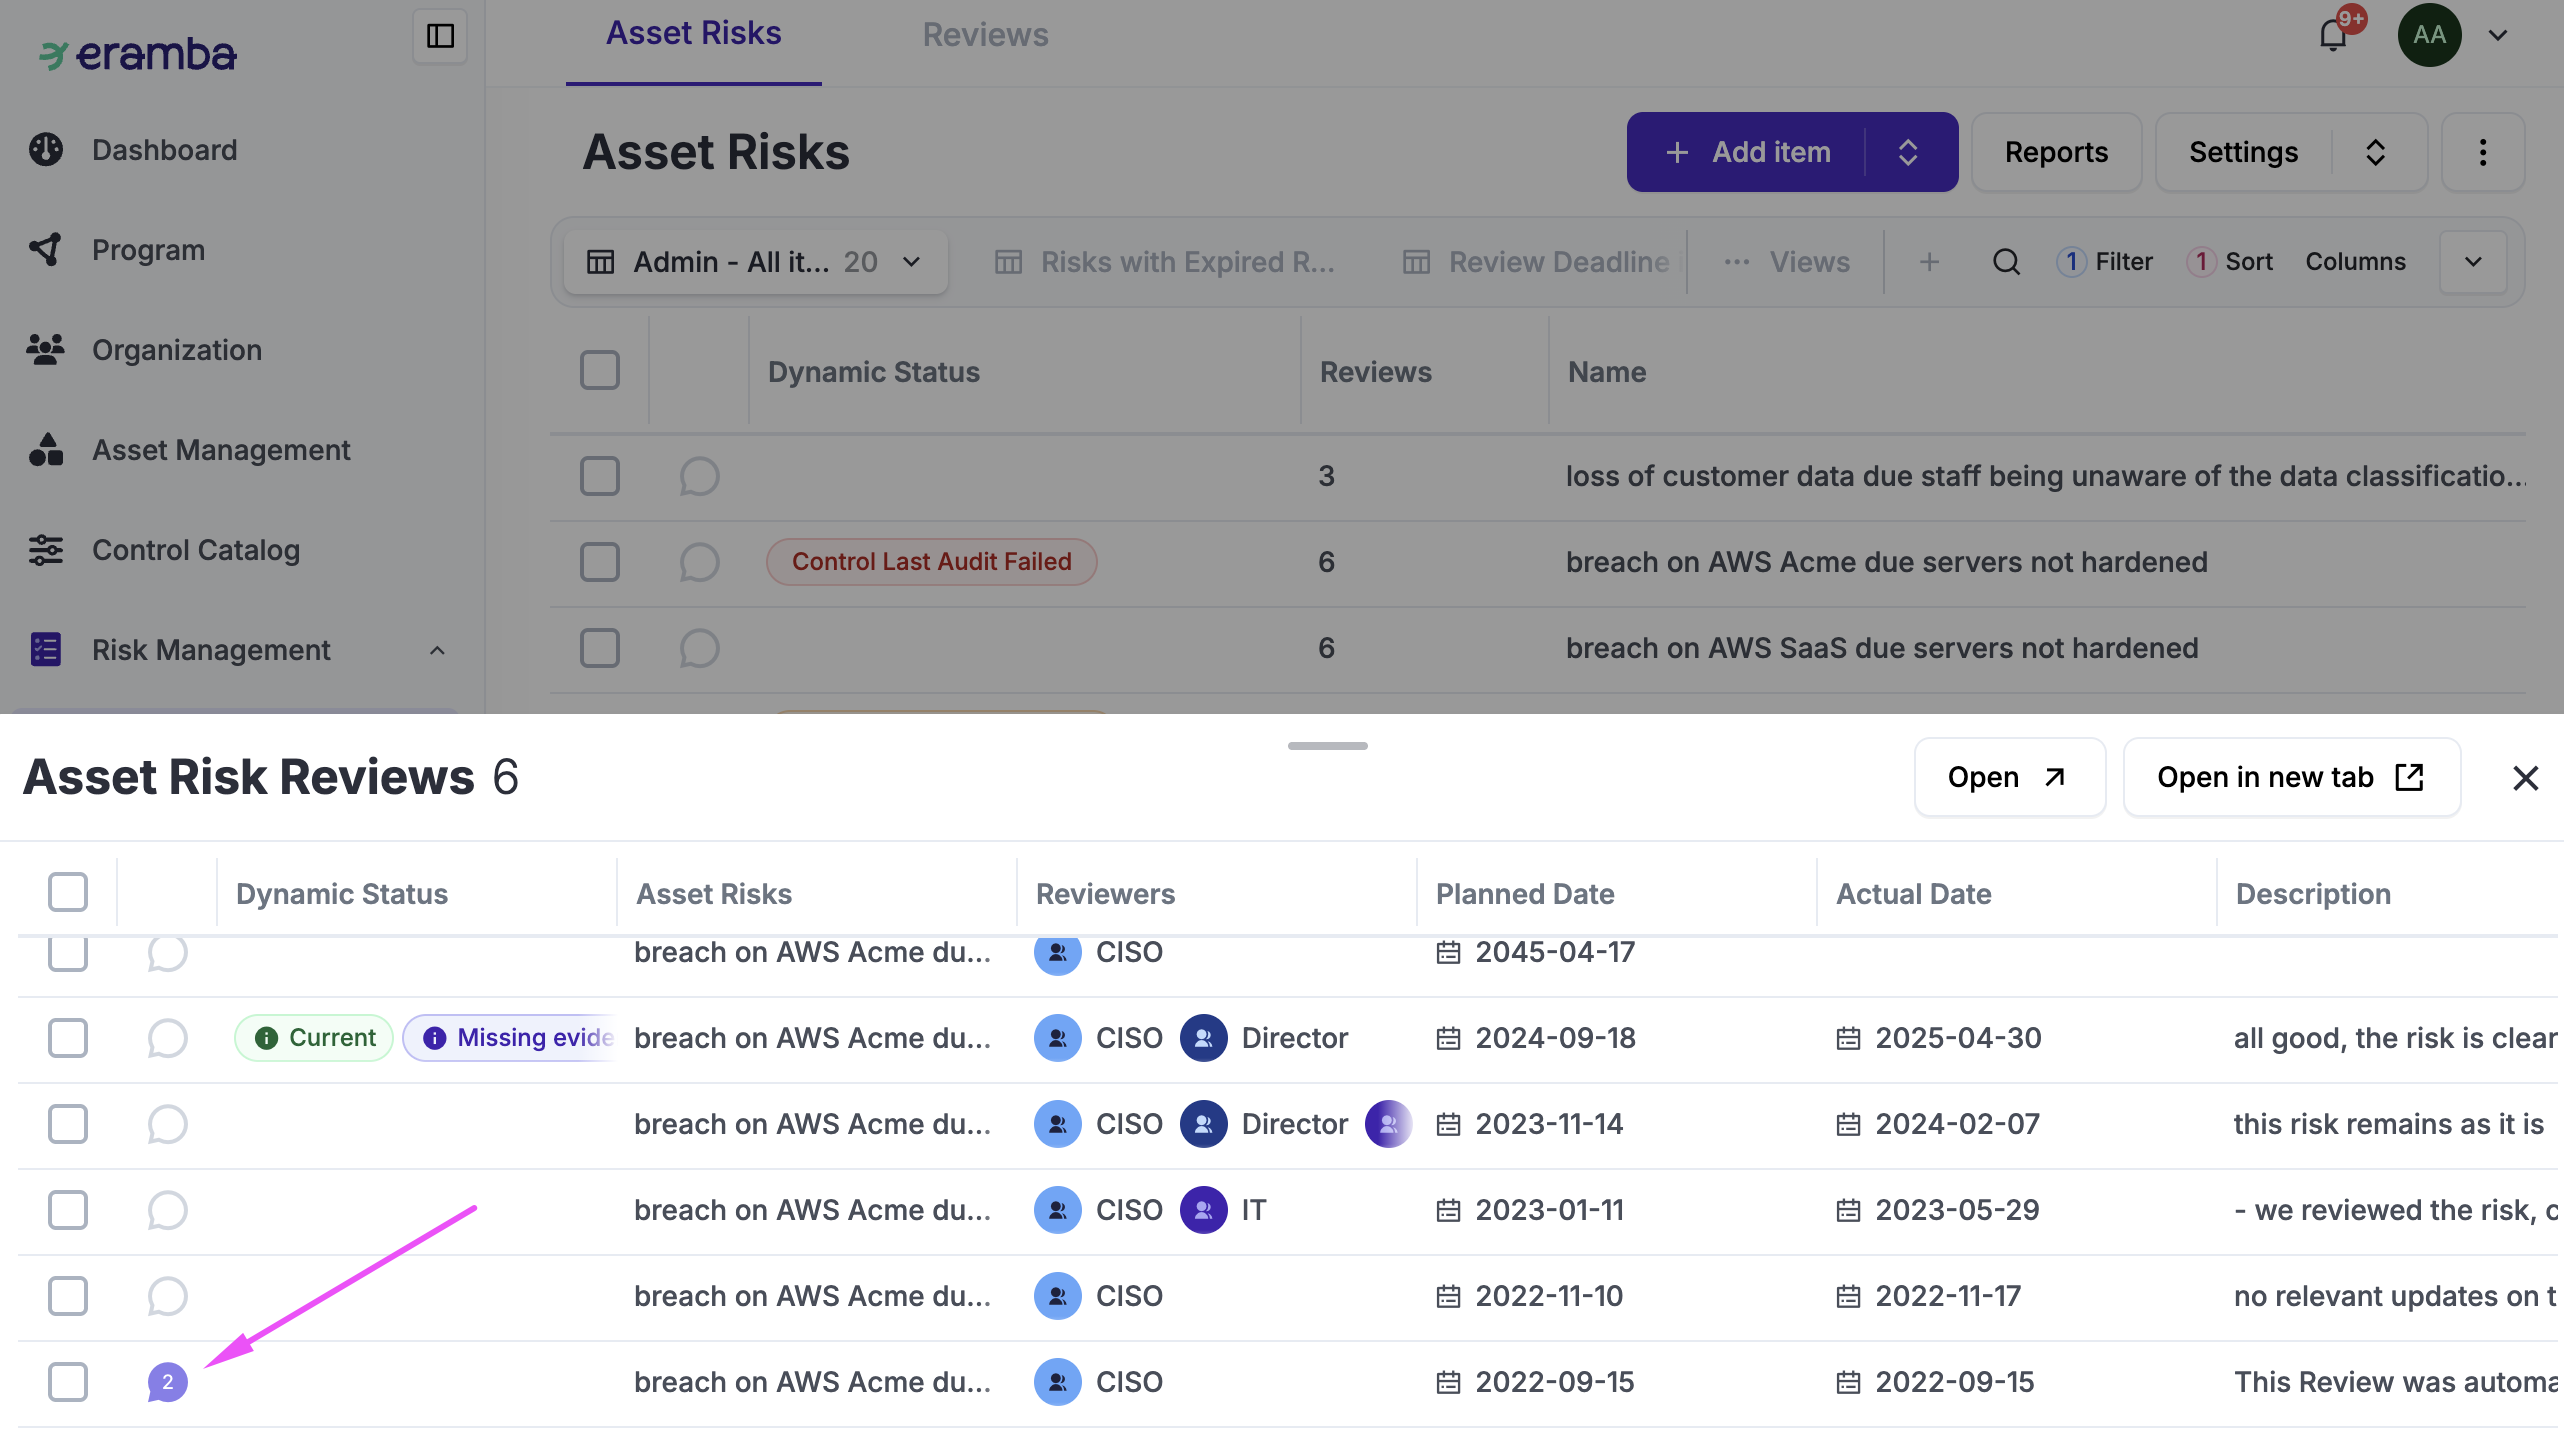
Risk Reviews
Risk must be reviewed at regular intervals, you decide when that dealine is at the time of creation of the Risk.

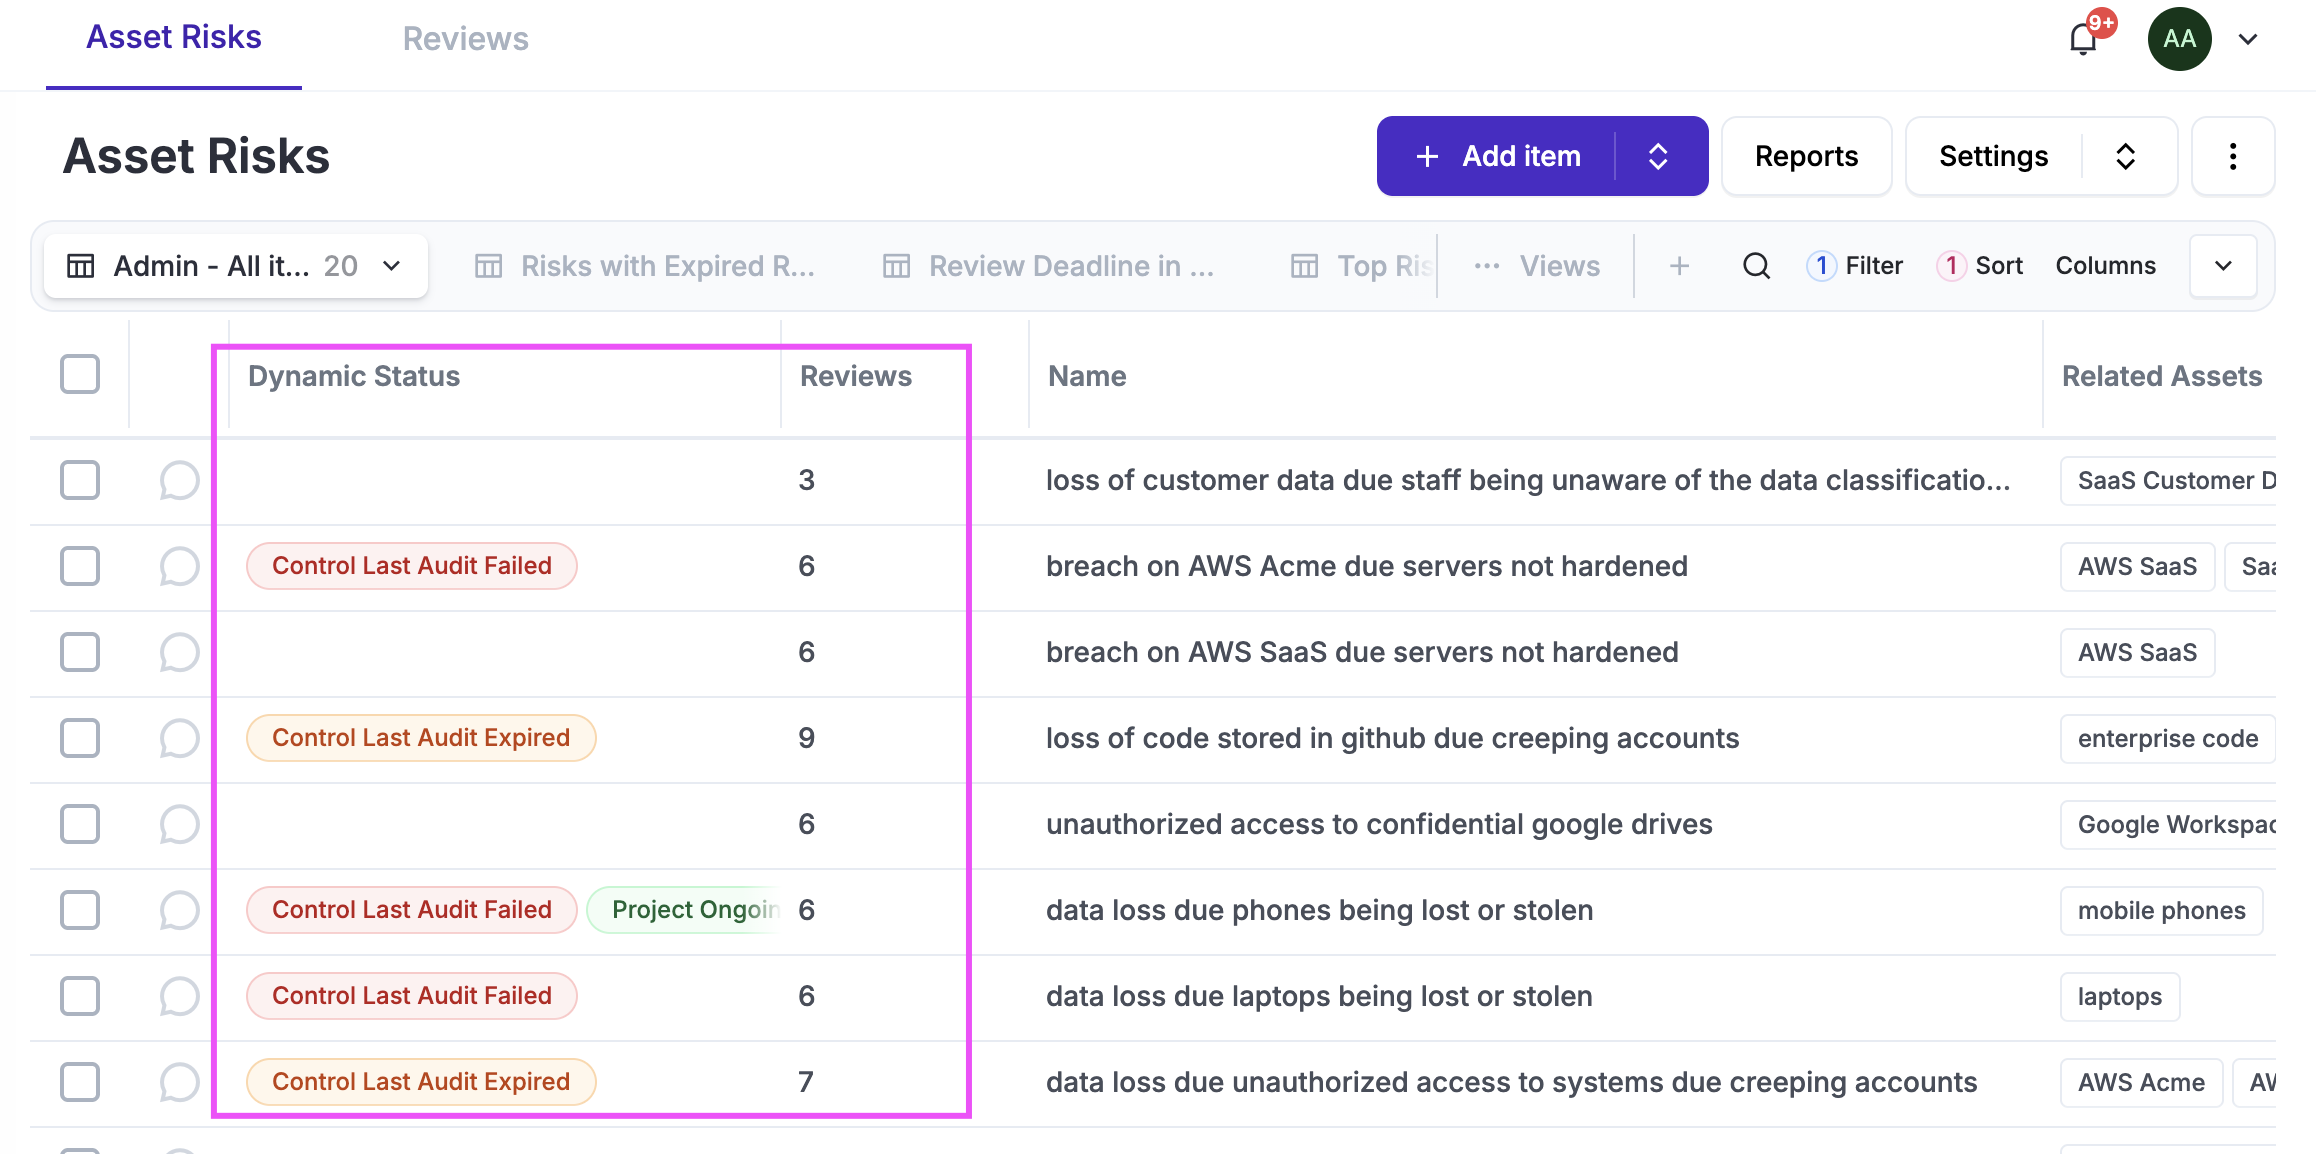
Failure to complete your reviews on time will cause the Dynamic Status (common feature) to trigger a yellow status warning. This is clearly a situation you want to avoid to ensure your risk data remains compliant and up to date.
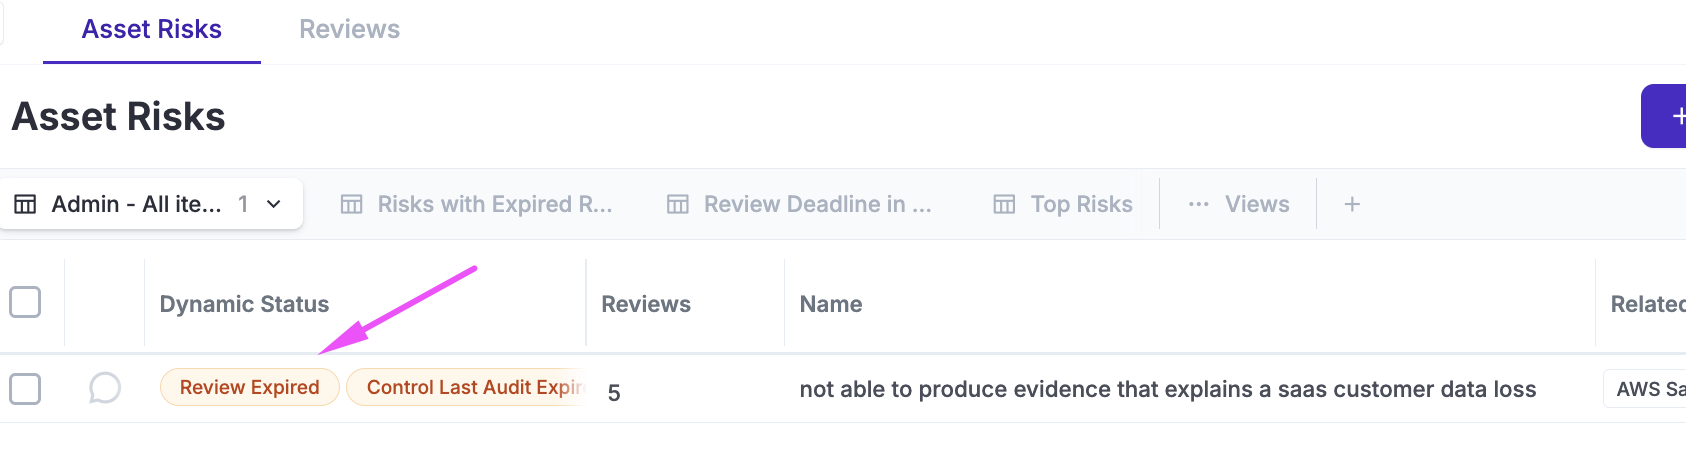
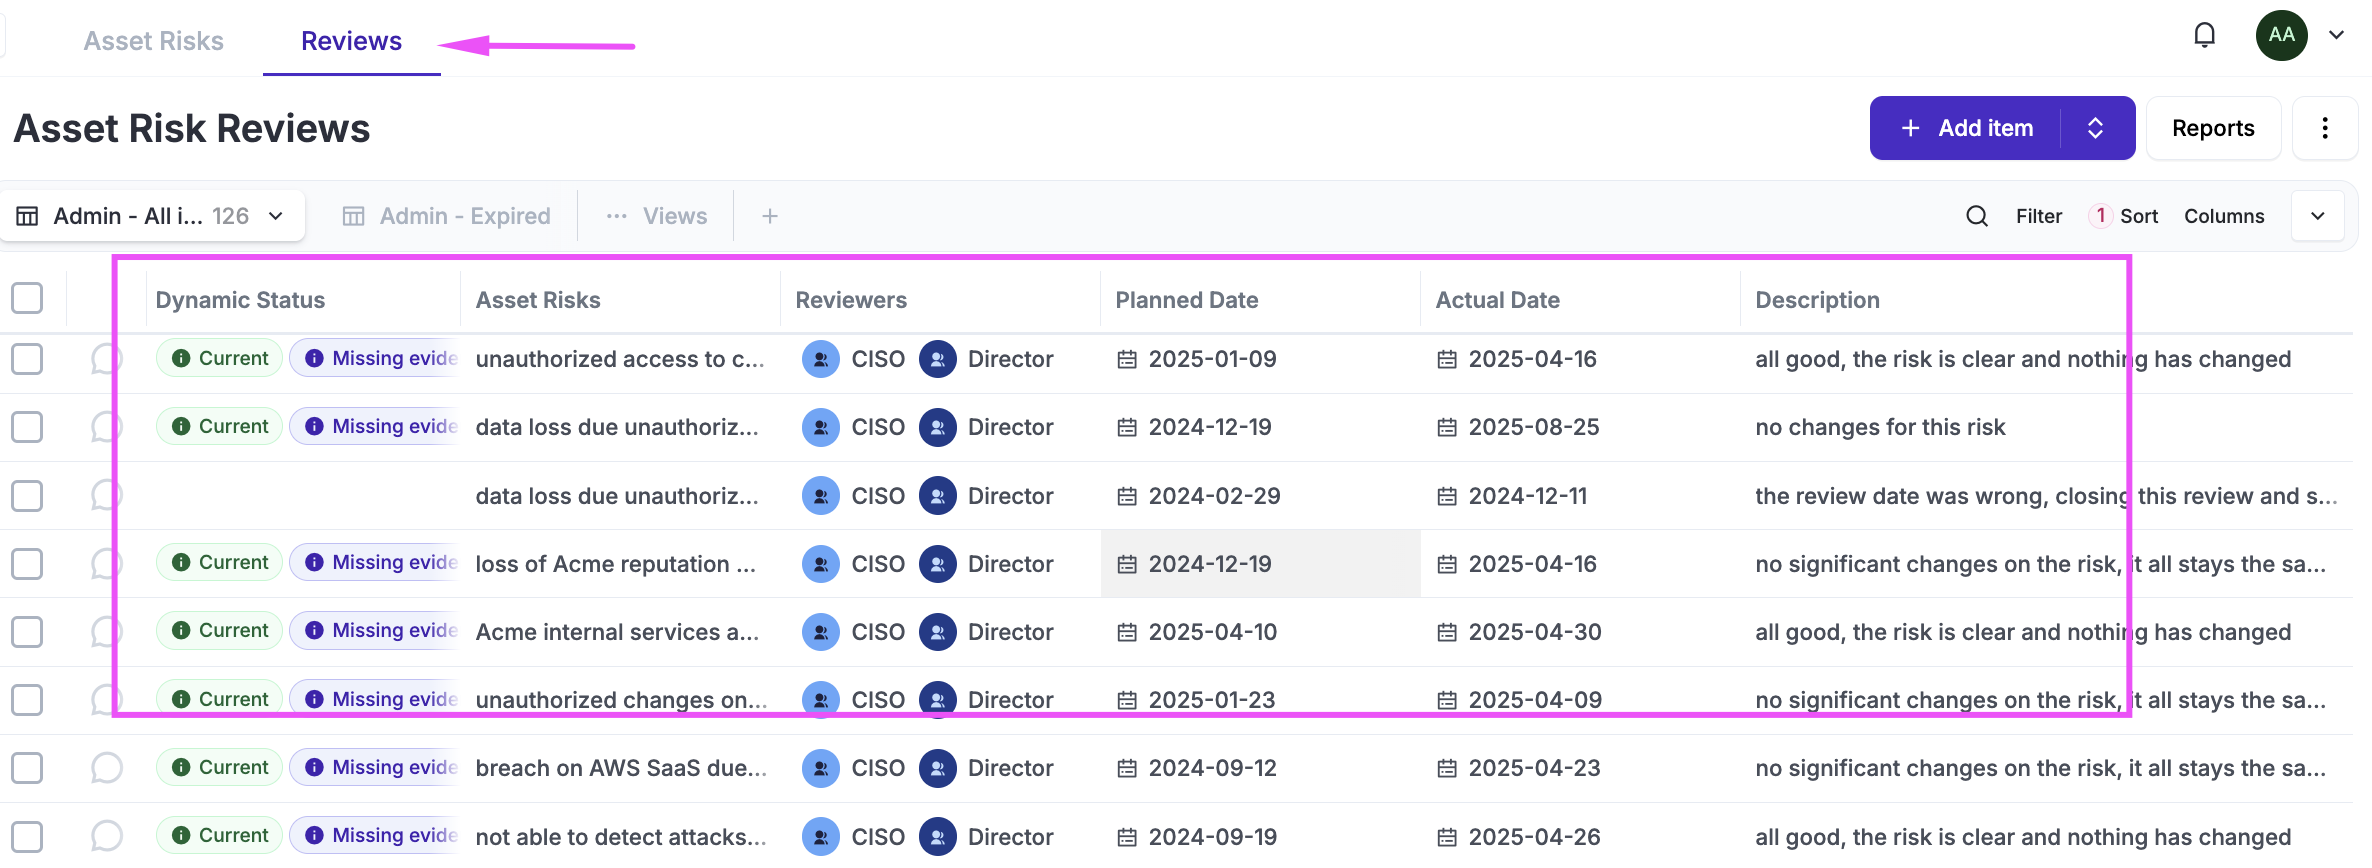
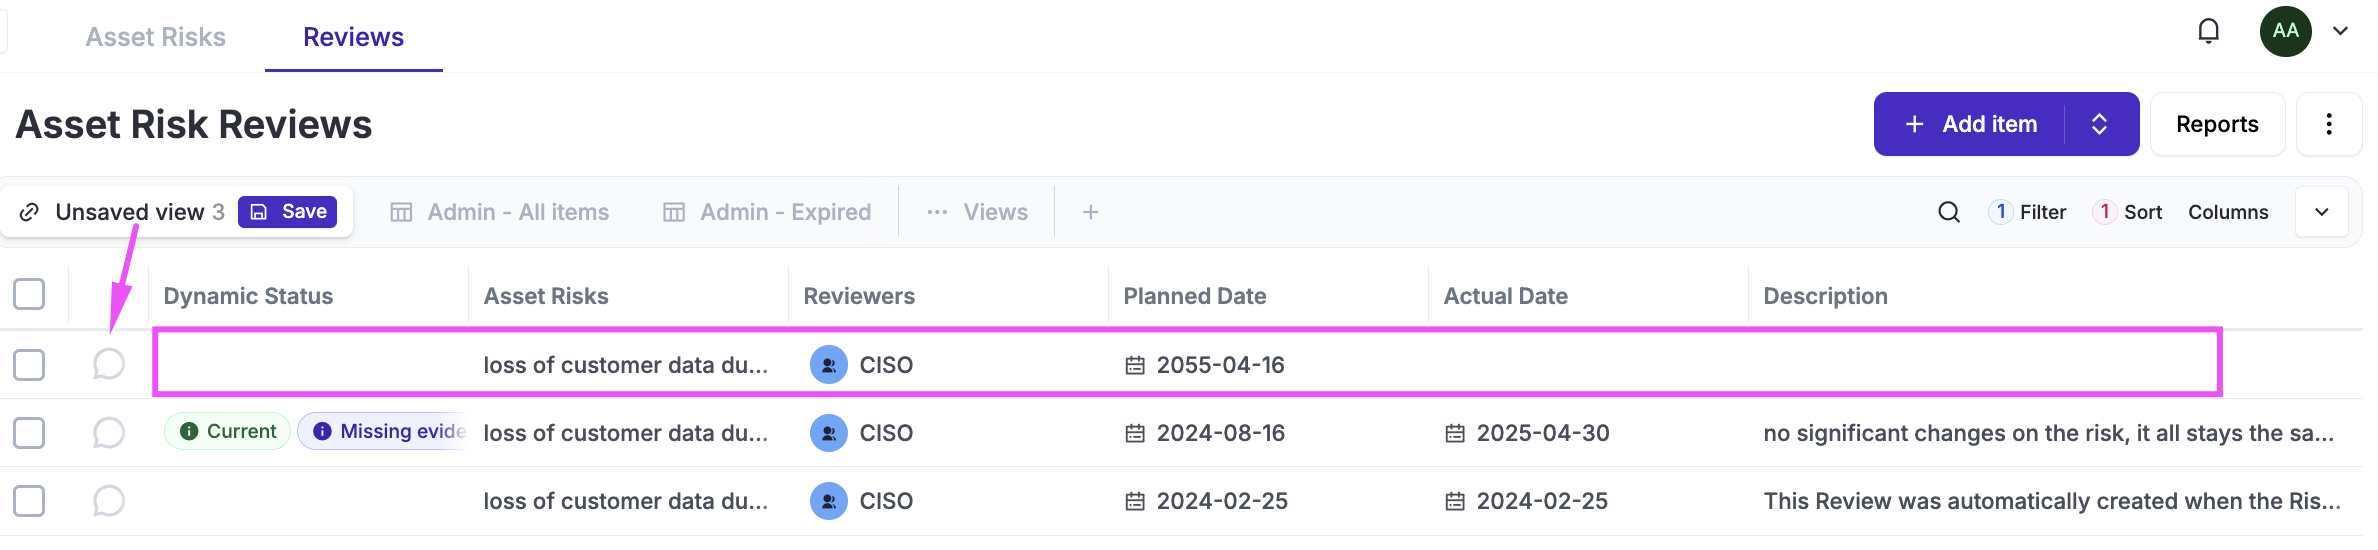
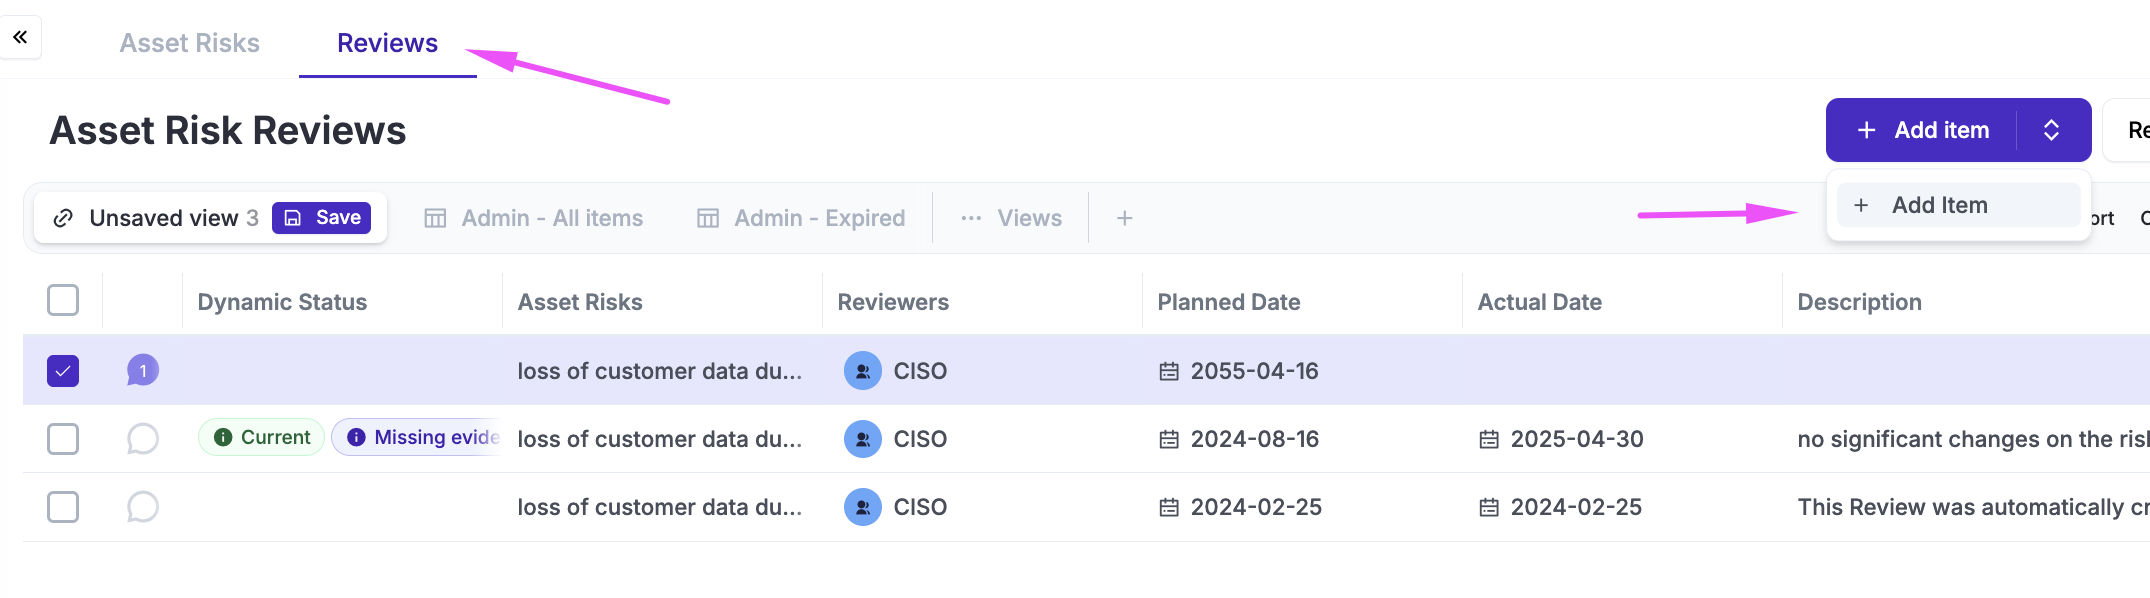
All reviews are stored in the Reviews tab. You can use shortcuts that, when clicked, will filter the full list to show only the reviews applicable to your selected risk.
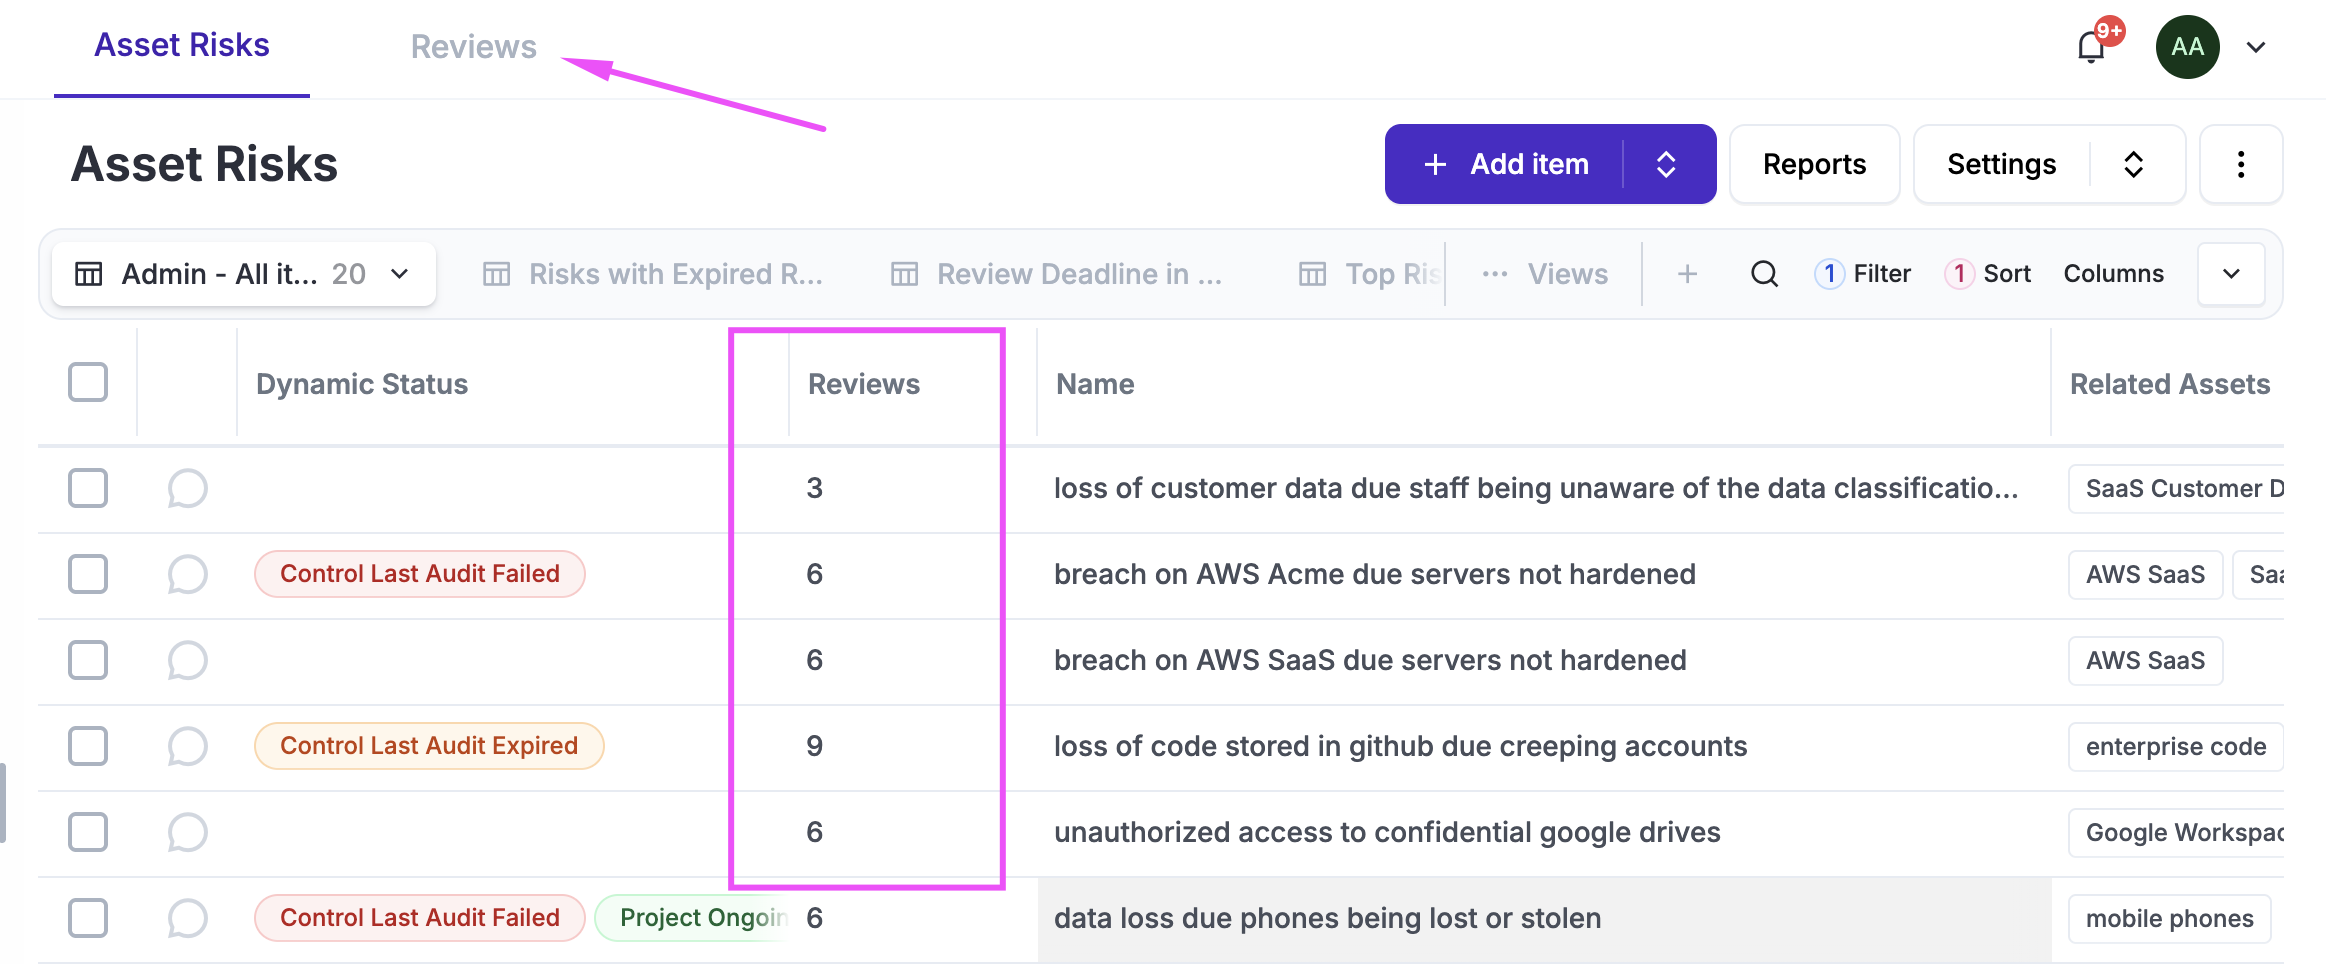
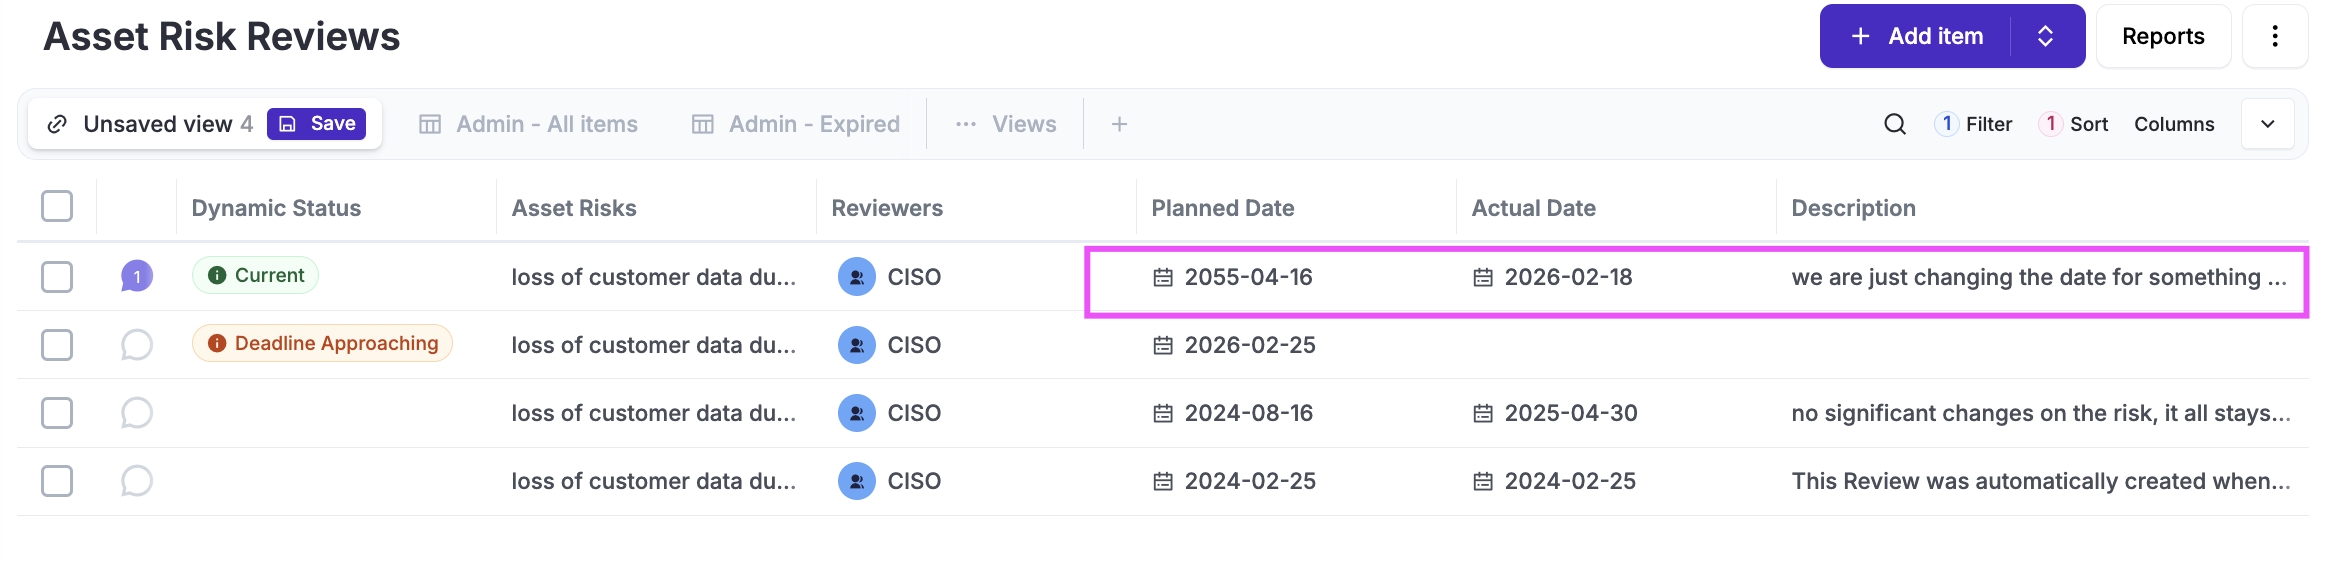
A Review record includes several attributes, as shown in the screenshot below—primarily when it was scheduled to happen, when it actually occurred, and what was discussed. Next to the Dynamic Status, you will see the Comments & Attachments button; this is essential, as it is where stakeholders will provide their feedback, sign-offs, or any other required documentation.
Based on that deadline, eramba will automatically create two Review records for every new Risk you create:
-
An initial record represents the Starting point; this review will have all fields completed, with dates set to the day the risk was created and an automated description. While not mandatory, it is expected that everyone involved will include relevant comments and attachments.
-
A second record, which remains incomplete, is for the Next Review date you defined when the risk was created. eramba monitors this planned date to trigger notifications (via the Notifications common feature) and update Dynamic Statuses (via the Dynamic Status common feature).

At this point, there are three typical scenarios:
-
Change Review Date: You need to change the "Planned Date" for your next review.
-
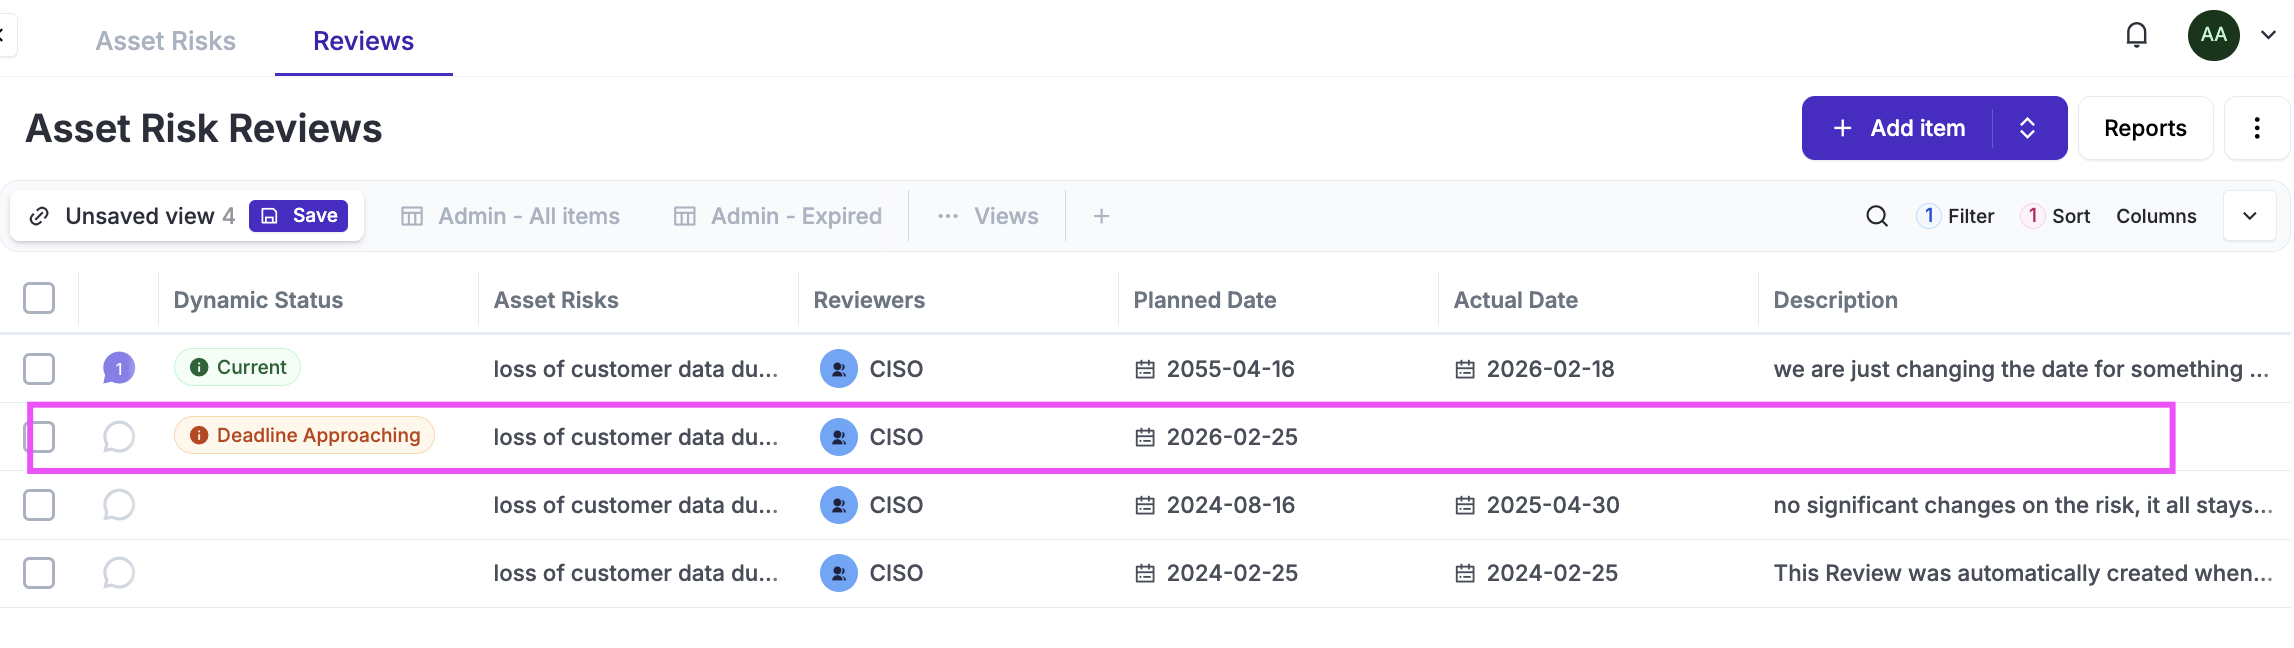
Scheduled Review: Your "Planned Date" is overdue or approaching, and you need to complete the review record.
-
Ad-Hoc Review: You have changed something on the risk (such as its classification) and need to complete a new review to sign off on this change.
-
You might not want to do Reviews anymore for this Risk
Scheduled Review
This type of review takes place before, on, or after the planned review date and is the most common scenario. Eramba will notify users (via common notification features) of this deadline and expect their feedback in the form of comments and attachments inserted into the specific review record.
The review is meant to be agreed upon by both parties (the Risk Originator and GRC Contact), where both provide feedback through comments and attachments.
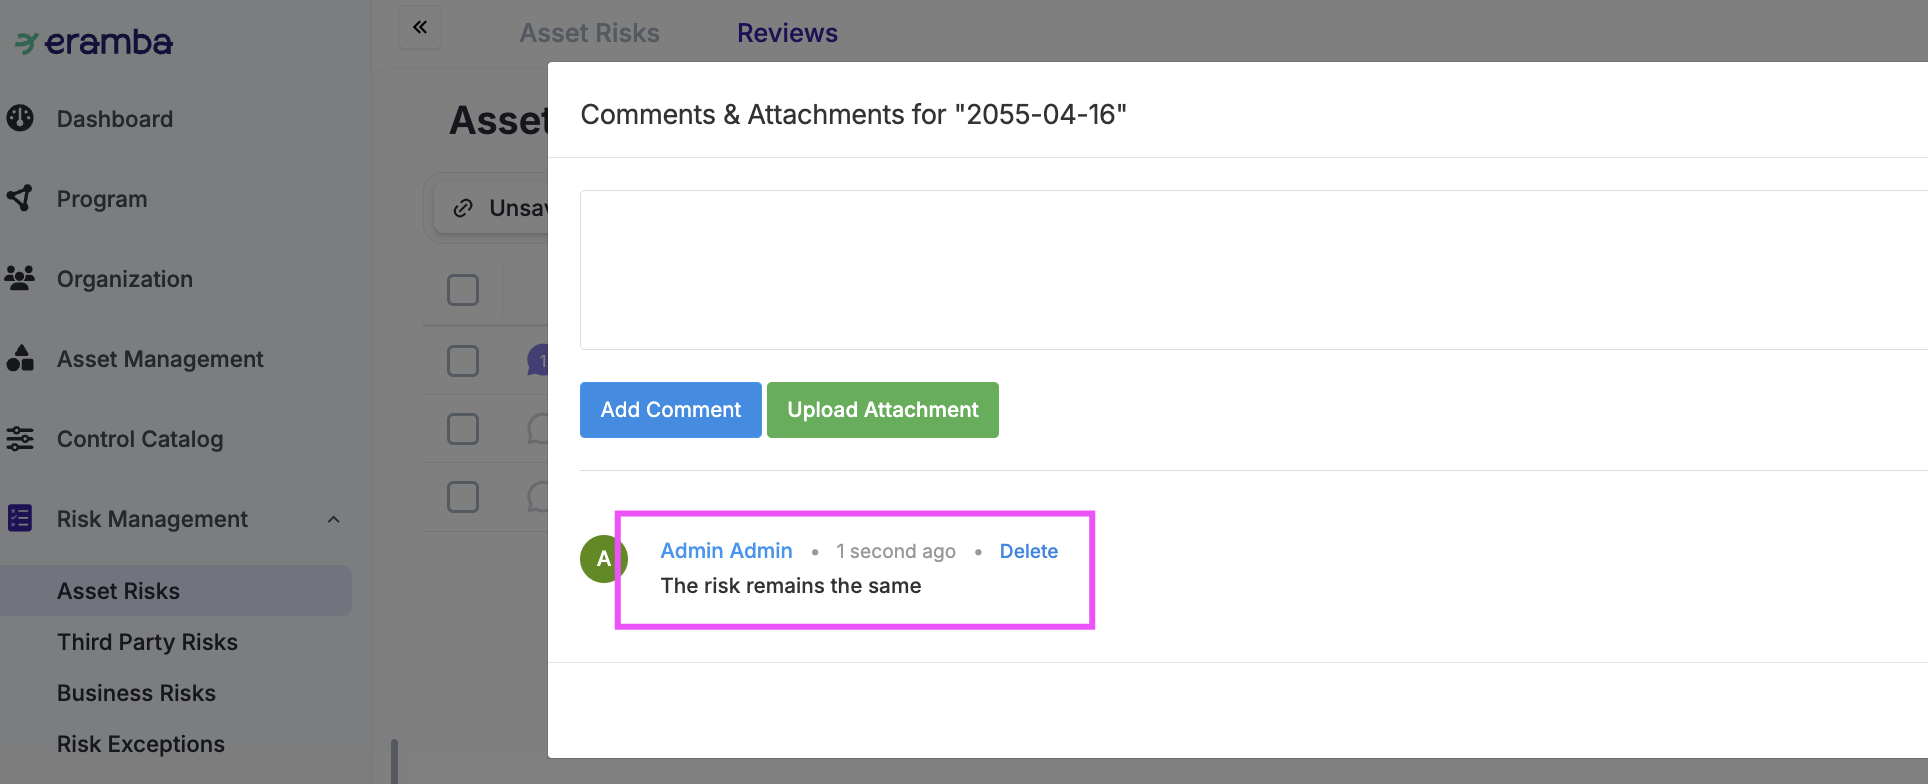
Once the discussion is completed, the GRC Contact can select the review record, click Edit, and complete the form with the other review attributes (Description, Actual Date, Next Review Date, etc.).
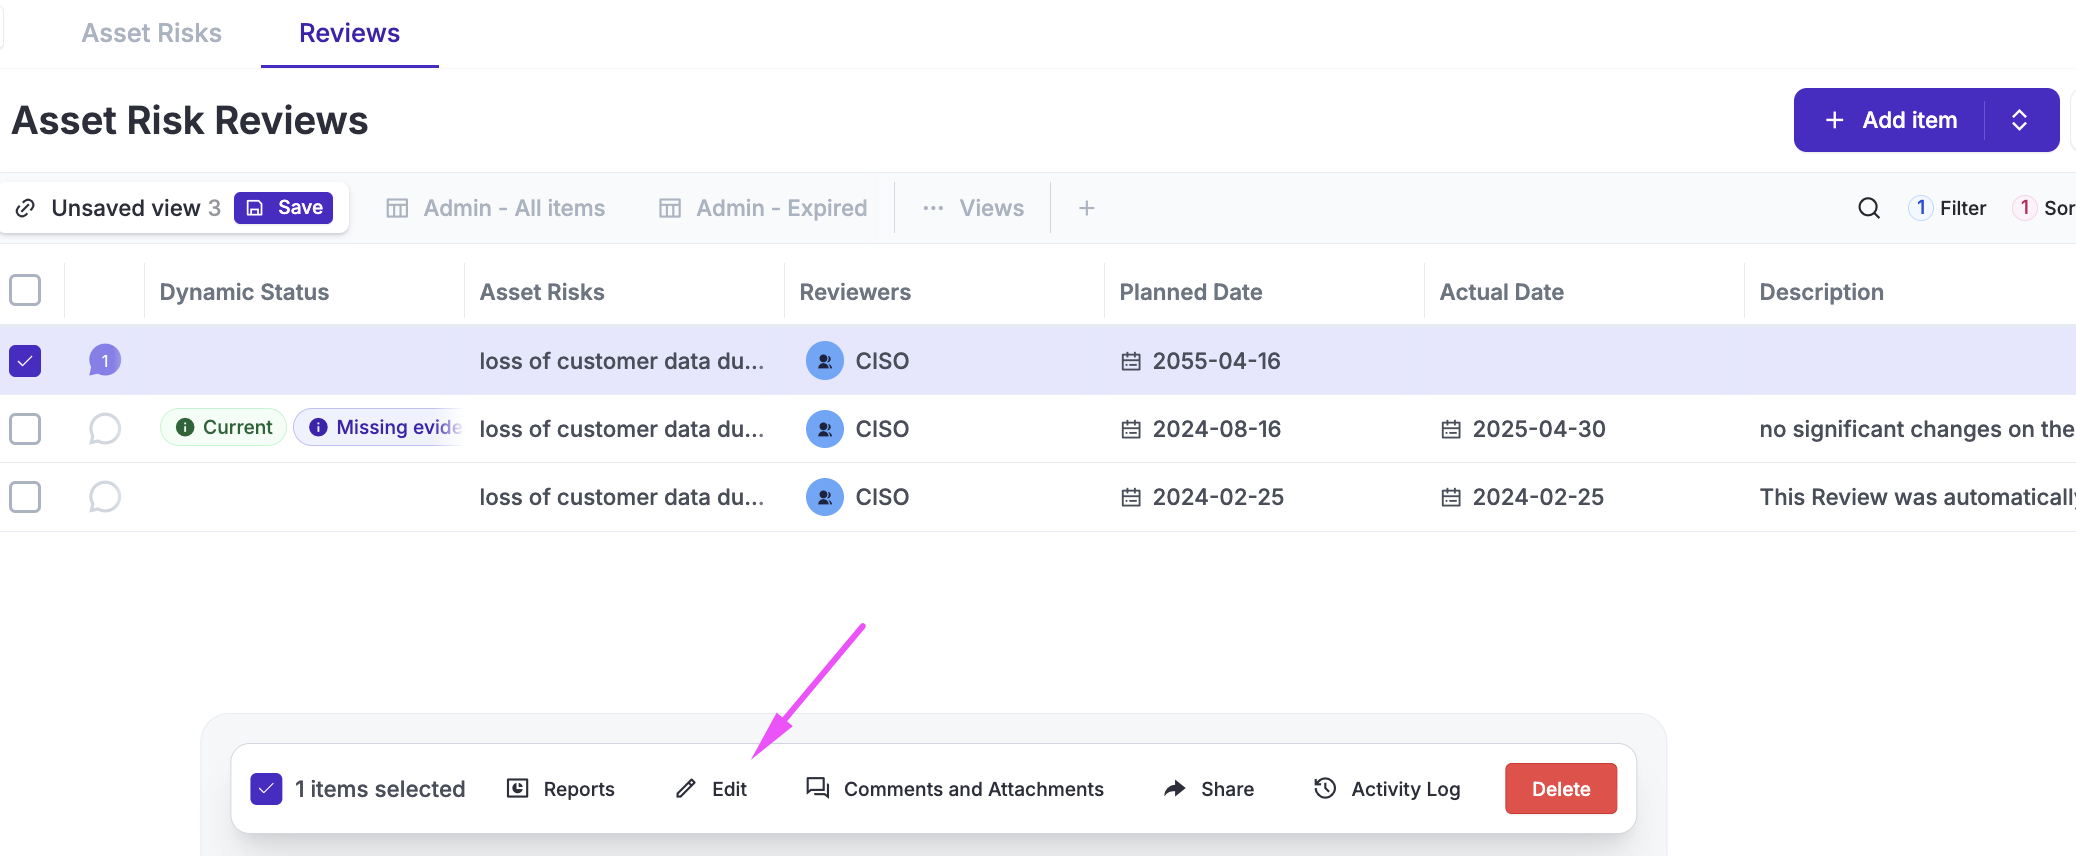
Once a review is completed, it can no longer be edited. Once saved, Eramba will automatically create a new review record with the planned date you specified.
Ad-Hoc Review
This type of review is a spontaneous need to create a new review record that does not exist in Eramba. Typically, this happens if the next scheduled review is set too far in the future and a review is required immediately.
To create an ad hoc review, click Add under the Review tab and complete the form. Once the record is created, you should include your feedback in Comments & Attachments.
Change Review
If you want to change the date of your next Scheduled Review, simply edit the record, complete it (stating that you are specifically changing the next review date), and set the new date. Once you save, you will close that record and create a new one with the date you required.
Remove Reviews
If you no longer want to conduct reviews for a risk, simply delete the current incomplete review record.
Risk Classifications
We see many times organizations doing this in a very complicated, impossible-to-sustain way. We strongly advise you to follow some reading guidance on what we see works well and the logic behind it.
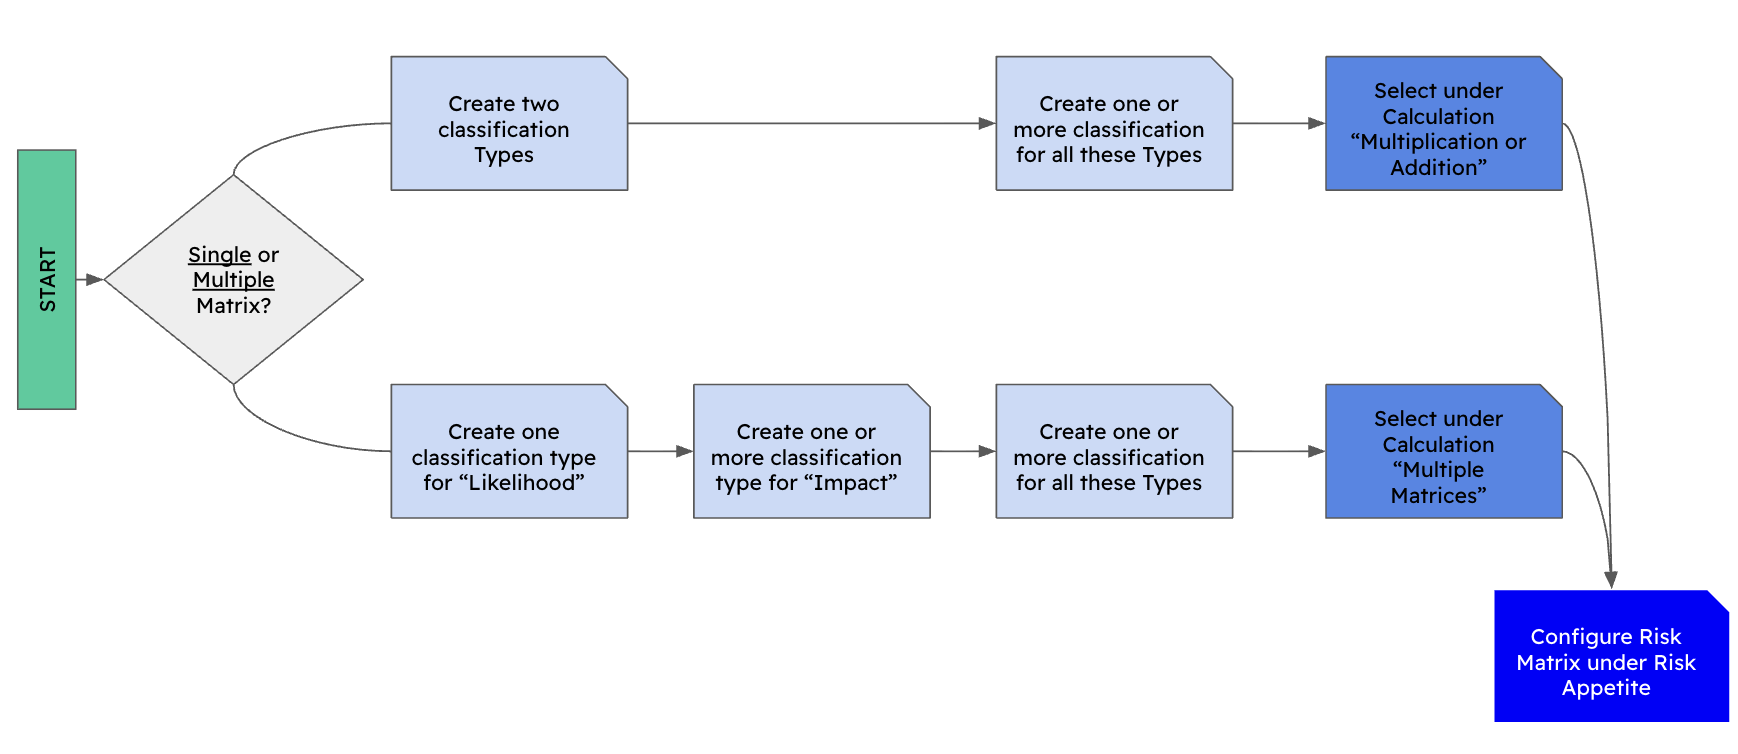
The process of configuring eramba for Risk Management is a three-step process centered on one crucial initial decision: whether to use a Single Matrix or a Multiple Matrix setup.
-
This is the recommended choice for most organizations. It involves a single matrix with two axes—typically Likelihood and Impact. It is straightforward to maintain and provides a clear, unified view of risk across the organization.
-
This approach is significantly more complex and is typically chosen by advanced practitioners. It involves setting up several "simple matrices," one for each specific Impact Type. For example, you might have separate matrices for: Financial Impact, Regulatory Impact, etc.
Once that decision is made, you will need to define three specific settings:
-
Classification Names, etc. (Light Blue): Define the labels and values for your axes (e.g., Low to High, 1 to 5).
-
Calculation Method (Darker Blue): Determine how the system calculates the intersection between these classifications (e.g., Addition or Multiplication).
-
Risk Matrix "Cell" Configuration (Very Dark Blue): Map the results to specific risk levels (e.g., defining which intersections result in a "Critical" or "Low" risk).
The overall process is described in the diagram below:
Classification
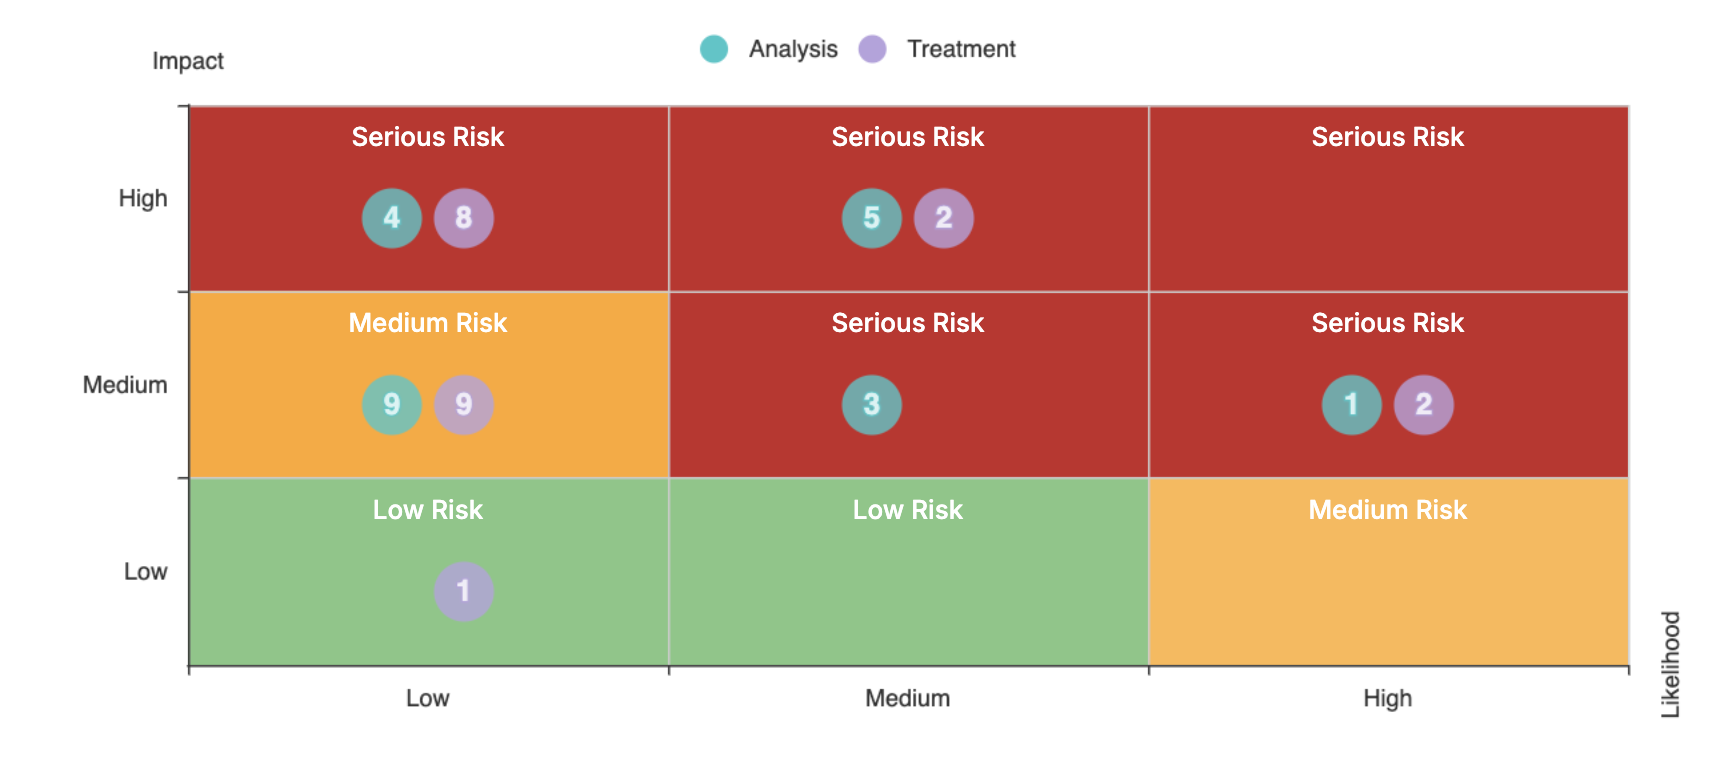
The final objective of risk classification in Eramba is to place Risks on a two-axis Risk Matrix (for example, Likelihood and Impact).
There are two supported approaches:
-
Single matrix with two axes, such as Likelihood and Impact
-
Multiple matrices with two axes, where a single Likelihood is combined with multiple Impact types (for example, Financial, Reputational, etc.)
The multiple-matrix approach is much more complex to configure and maintain; therefore, it should be used only after careful consideration in very particular scenarios.
If you are starting and you don't know what to do, we recommend following instructions from this simple forum article
Classifications are managed from Settings / Classification and Settings / Classification Types, where classifications can be added, edited, or removed.

Once a classification is defined and used by multiple Risks, changing it later requires updating the classification on all affected Risks. For this reason, it is recommended to avoid modifying classifications after they are in active use.
Classifications defined in any one Risk module are shared across all three Risk modules, so changes apply globally and will impact Asset, Third Party, and Business Risks alike.
Calculation
If you like math or if you don't and you wish to get an advice we strongly suggest you revew this article on what we see works well and the logic behind it.
Once the classification is defined and you have chosen between a single matrix (recommended) or multiple matrices, the next step is to define the risk calculation. Under Settings / Risk Calculation, you can select from the following options:
-
Addition or Multiplication (for a single matrix)
-
Multiplication only (for multiple matrices)
Note: Magerit is no longer supported and should not be used. 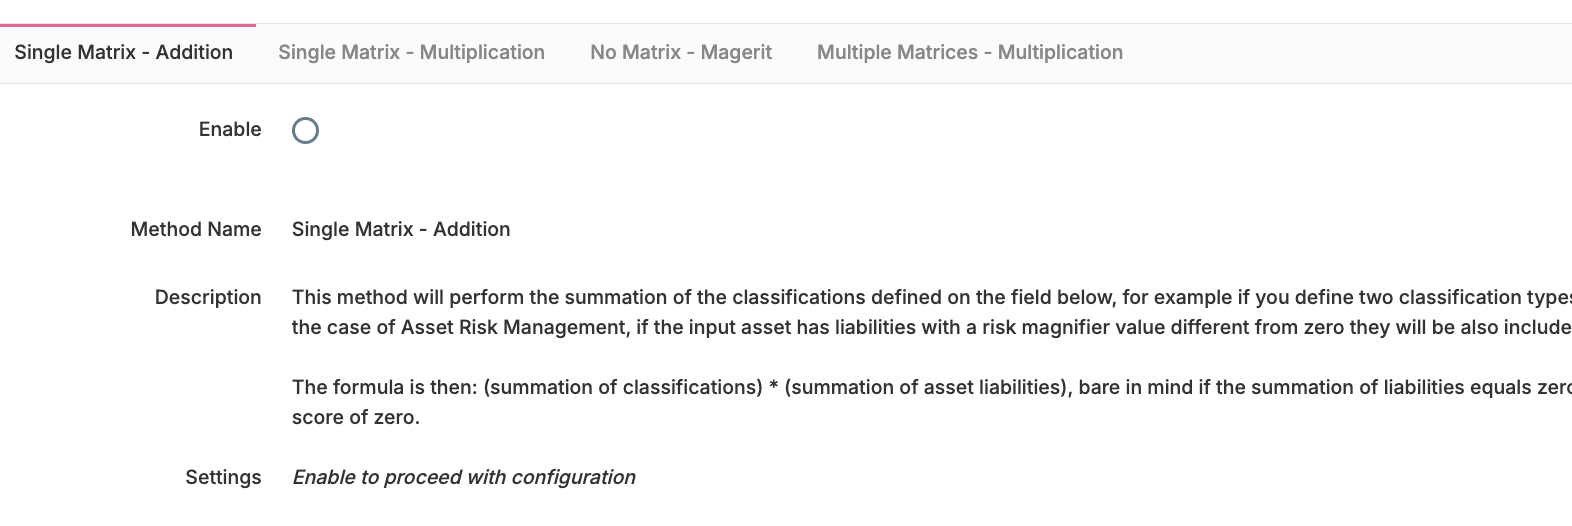
Matrix
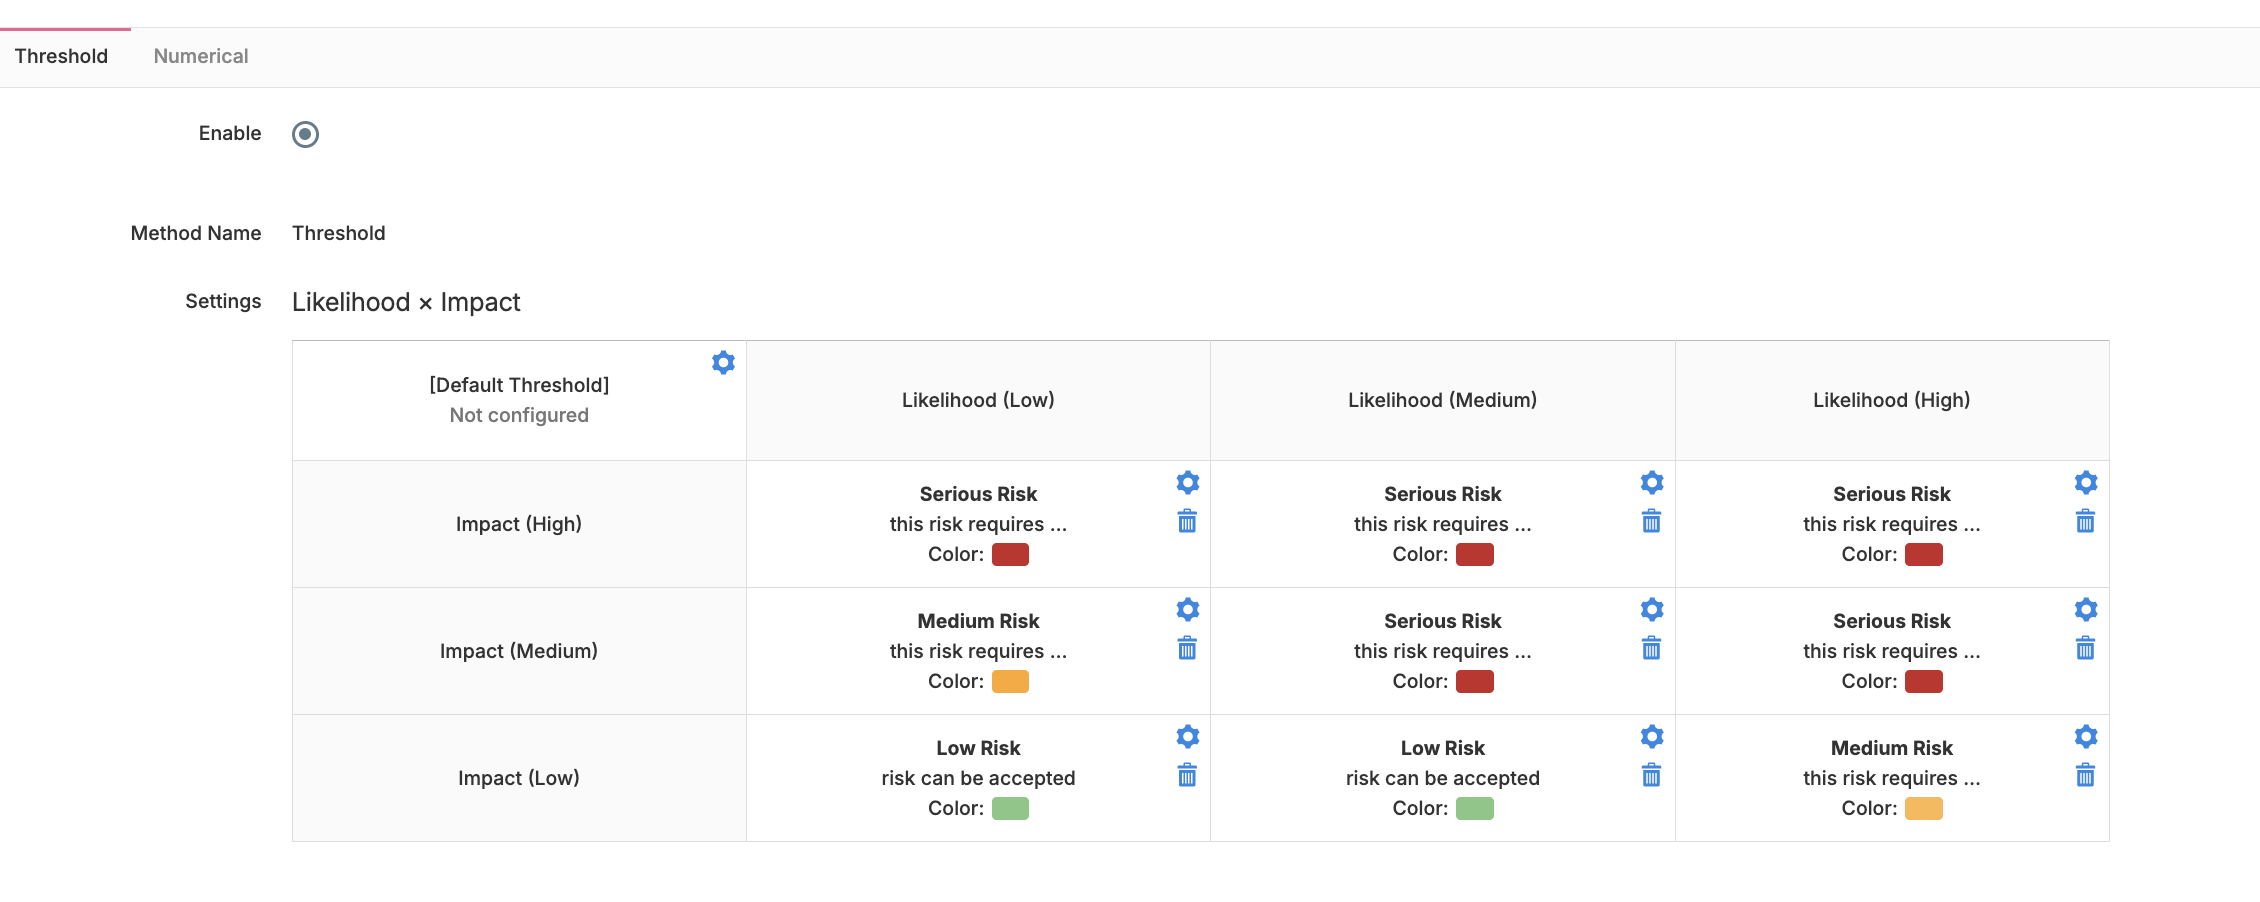
Once the classification and calculation steps are completed, you can define the Risk Matrix settings. Under Settings / Risk Appetite, you define how the matrix is structured.
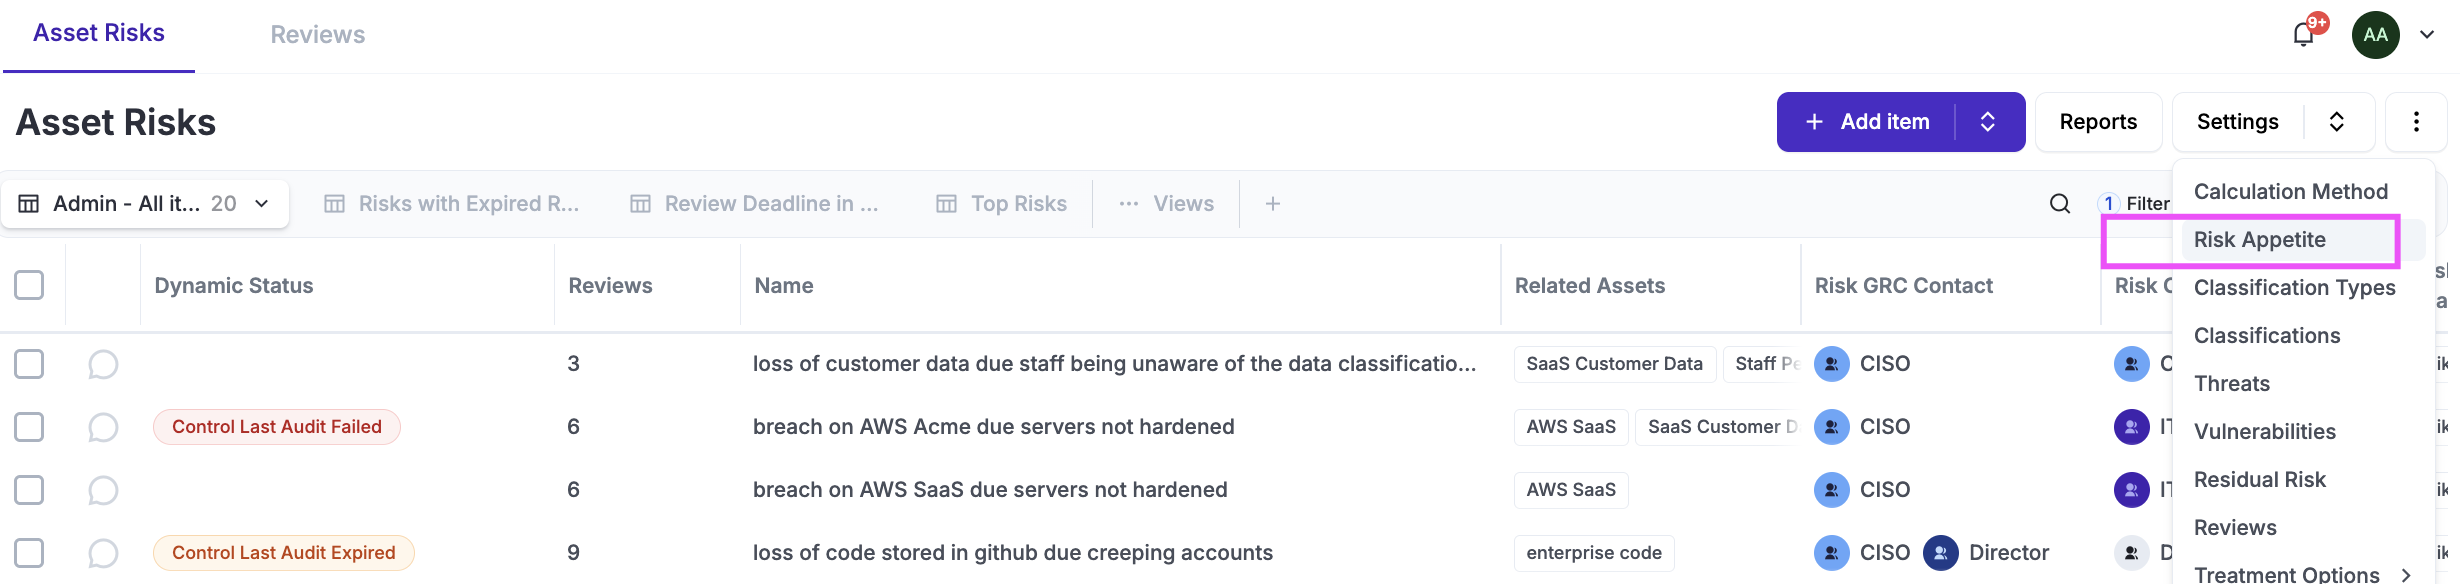
For every possible combination in the matrix, you must assign a title, description, and color. These settings can be modified at any time.
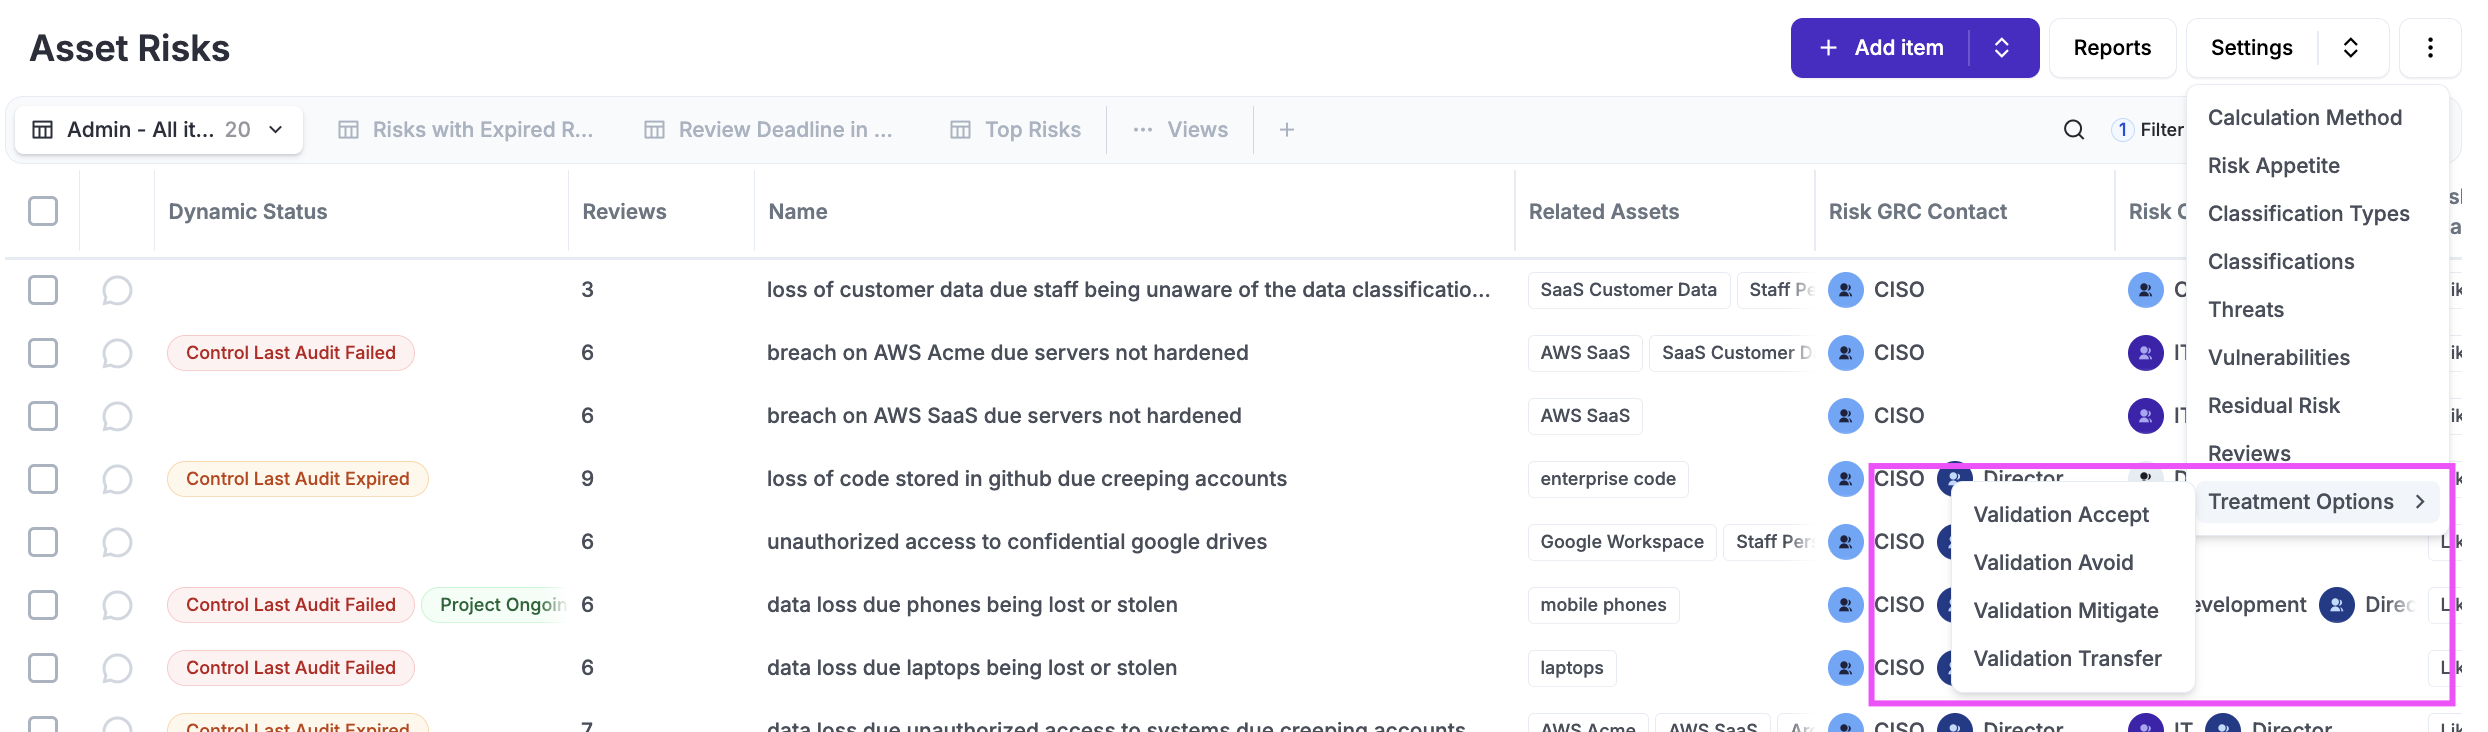
Treatment Options
Under Settings / Treatment options you can define, for each treament option (Accept, Avoid, Transfer and Mitigate) what solutiosn are mandantory or optional. This is often times useful to enfroce a systematic treatment of Risks.
Threats & Vulnerabilities
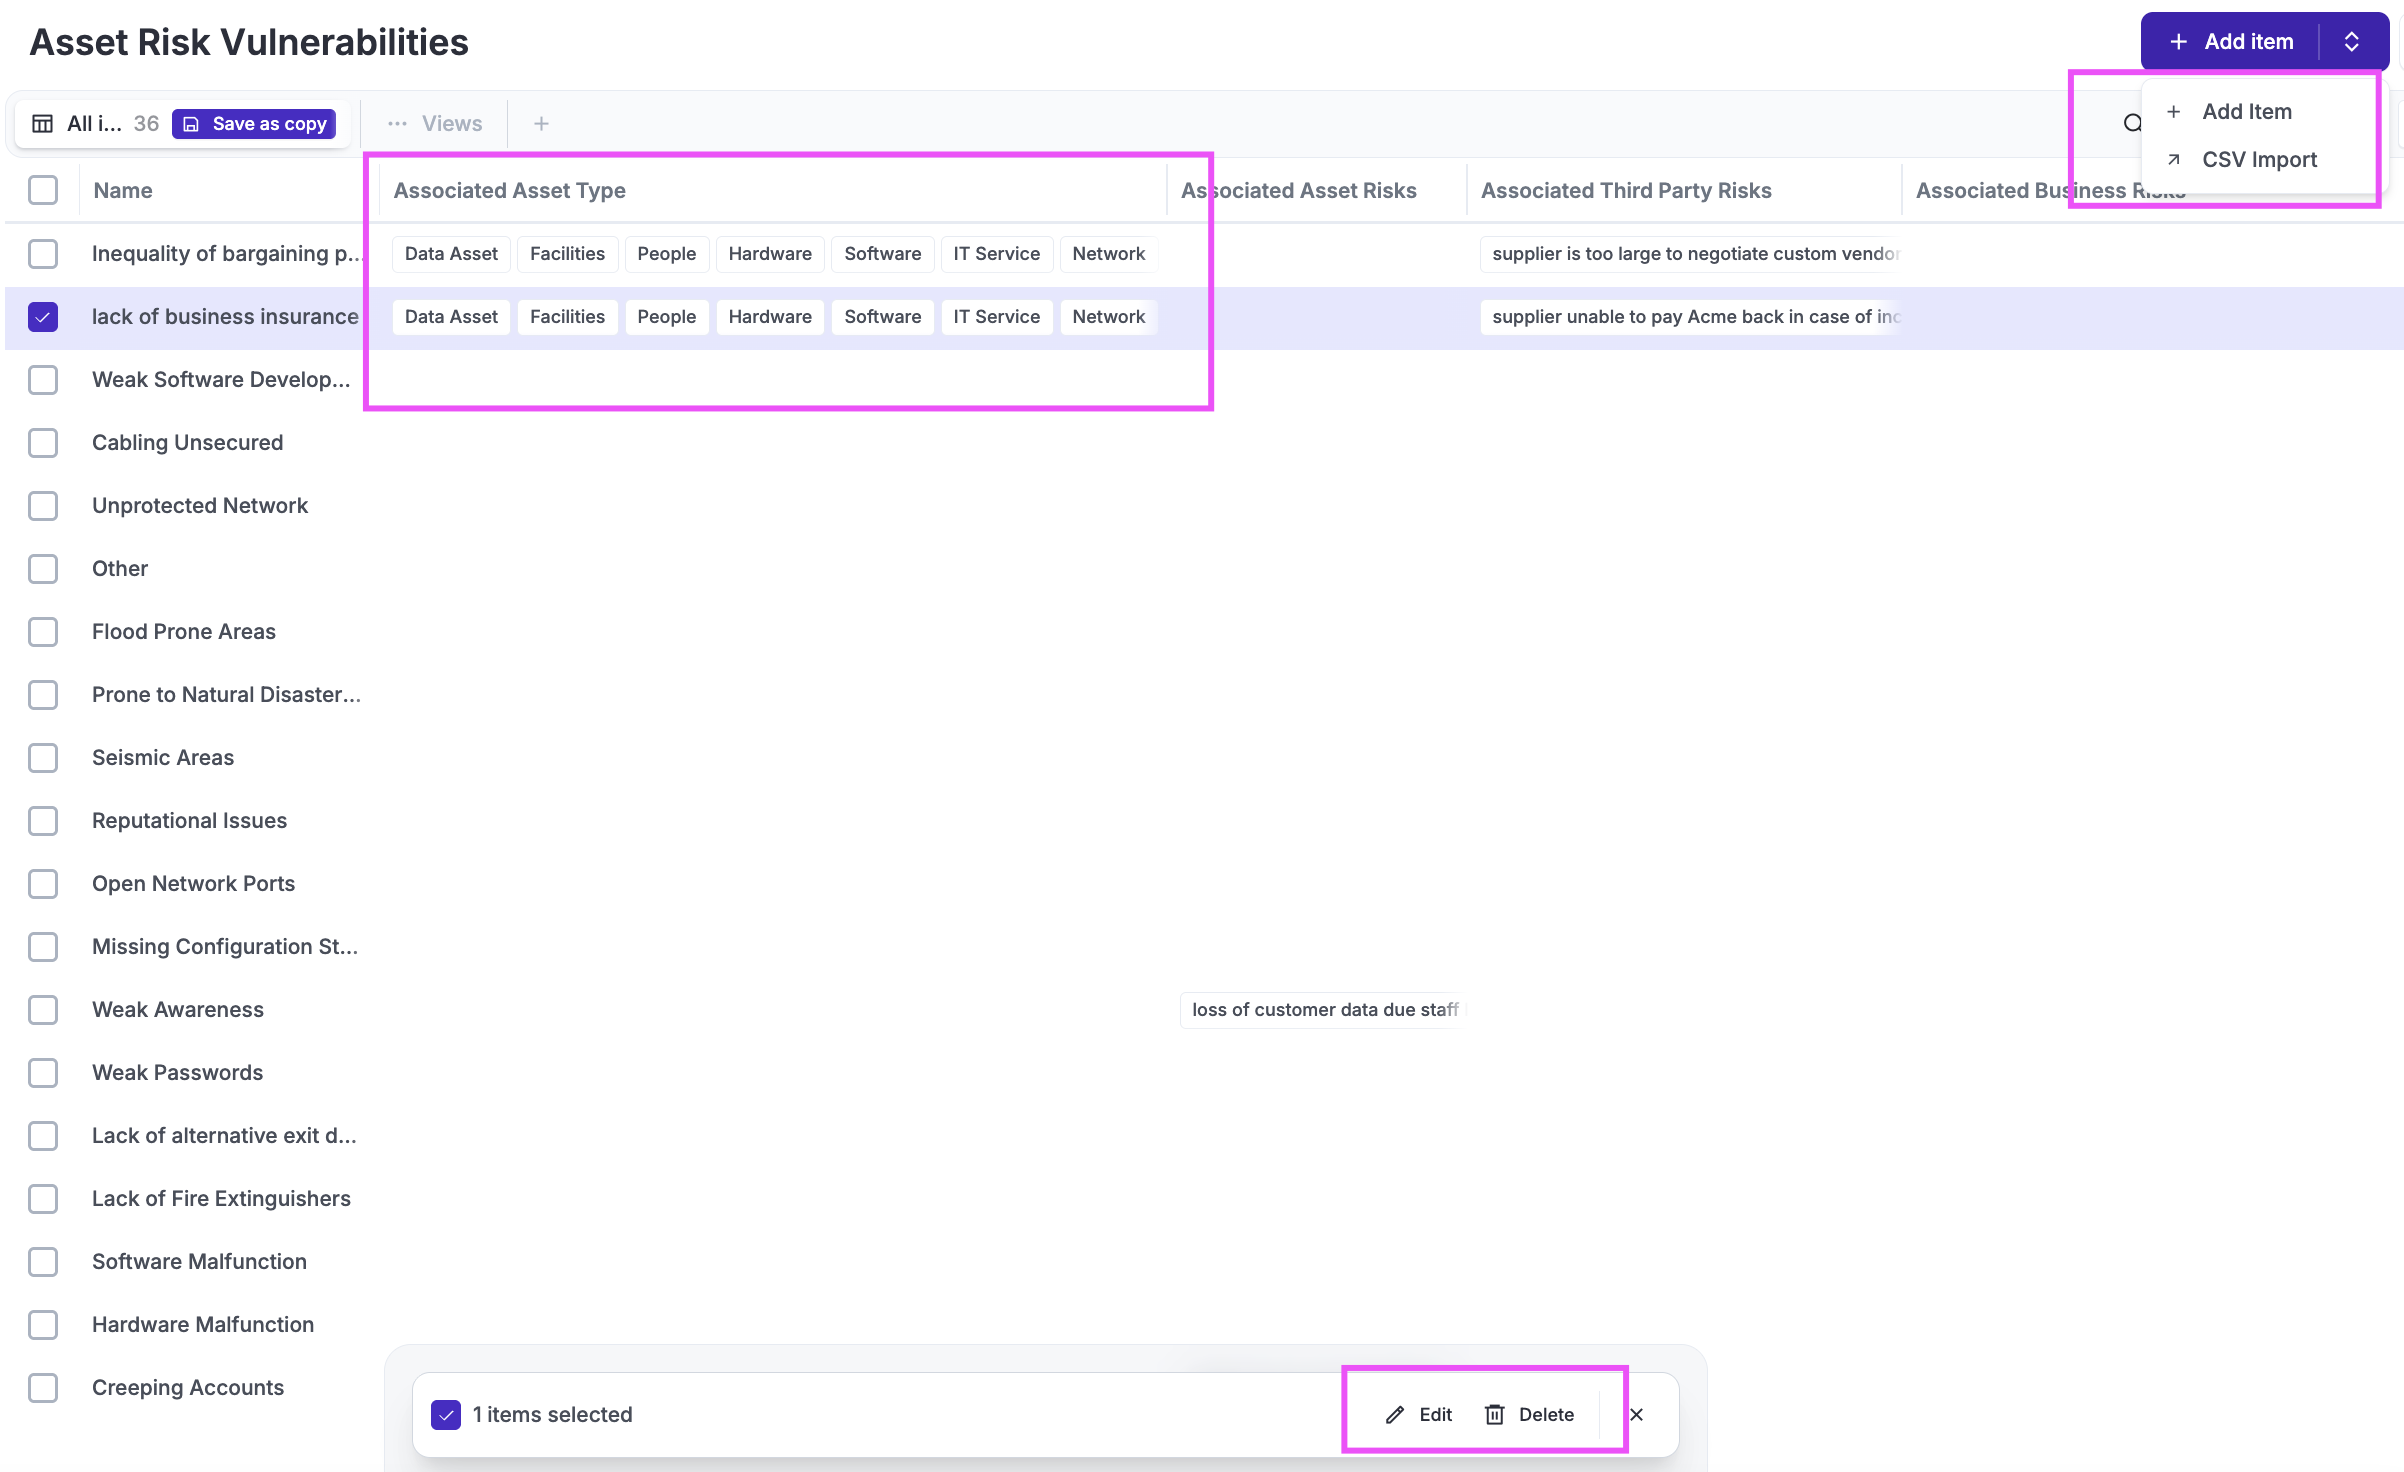
When documenting Risks, you may optionally record Threats and Vulnerabilities, as these fields can be hidden using customization settings. They can be documented either as free text or by using tags. If tags are used, Eramba’s built-in tag databases can be managed under Settings / Threats and Settings / Vulnerabilities.
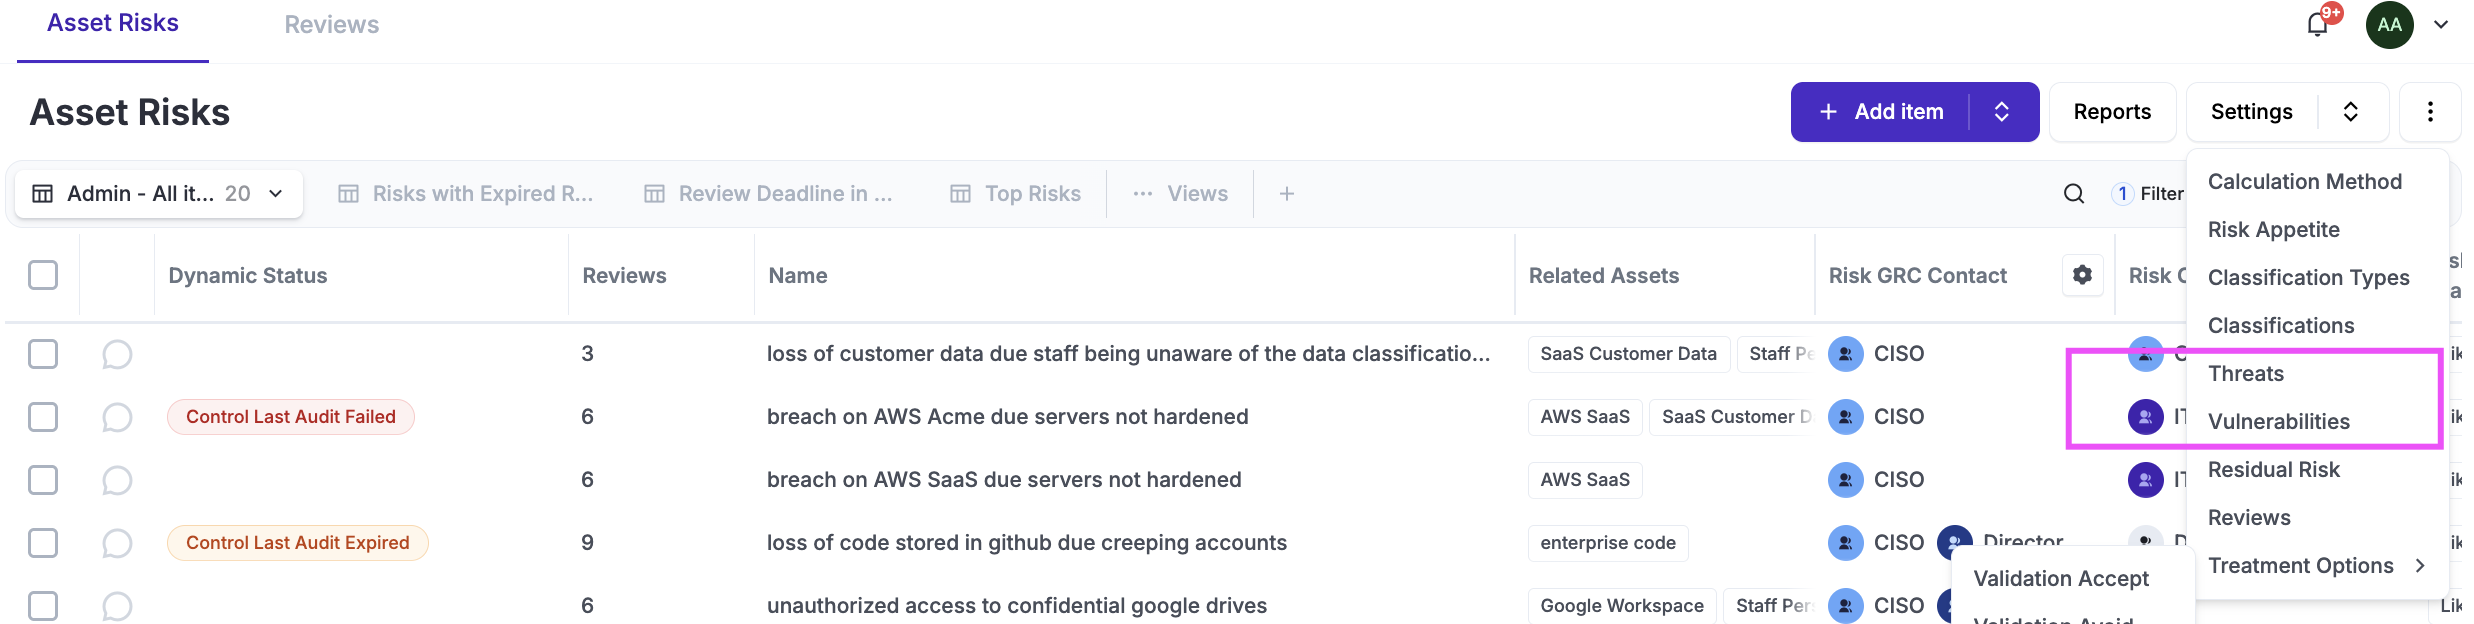
These tags can be associated with Asset Management / Assets / Settings / Asset Types so that, when an Asset is selected on a Risk, all related tags are automatically displayed. Tags can be added (individually or via CSV import), edited, and deleted.
Identification Risks & Treatment
Eramba helps you with the documentation of the risk, its treatment, sign-off, recurrent reviews, etc. The identification of risks is something that you need to perform based on how your company prefers to operate. While templates are helpful for inspiration, only you know the problems your company has. If you care about reflecting the reality of your company, the only way is to talk to people, understand what they do, and identify what can go wrong.
Eramba focuses on scenario-based risks—for example, your "Finance department has no control over how their banking application roles and user accounts are managed, leading to potential issues". No agent, AI, or template will know if that happens or not. A common missconception is to document issues rather than Risks. For exanple identifying “holes” in your AWS security groups is not a risk in eramba; it is a failed implementation and operation of an Internal Control tied to a risk scenario most likely called “Unauthorized access to networks due to lack of consistent security group practices in AWS.”
We do not advocate for a 'Best Practice' when it comes to GRC as it is a governance practice much like Sales or Marketing; there is no single 'correct' way, since it must adapt to specific needs, resources, culture, and more. In this guide, we explain one method (of many) for identifying risks and their treatment that works for most organizations. You can follow this or any other you feel works best for you and that is perfectly fine so as long you identify what ermaba needs (assets, riks, controls, etc).
We suggest an interview (sometimes questionaires also work, but you still need the interview in the end) based approach with the people that actually knows what is going on and can easily tell what can (or is) go (going) wrong:
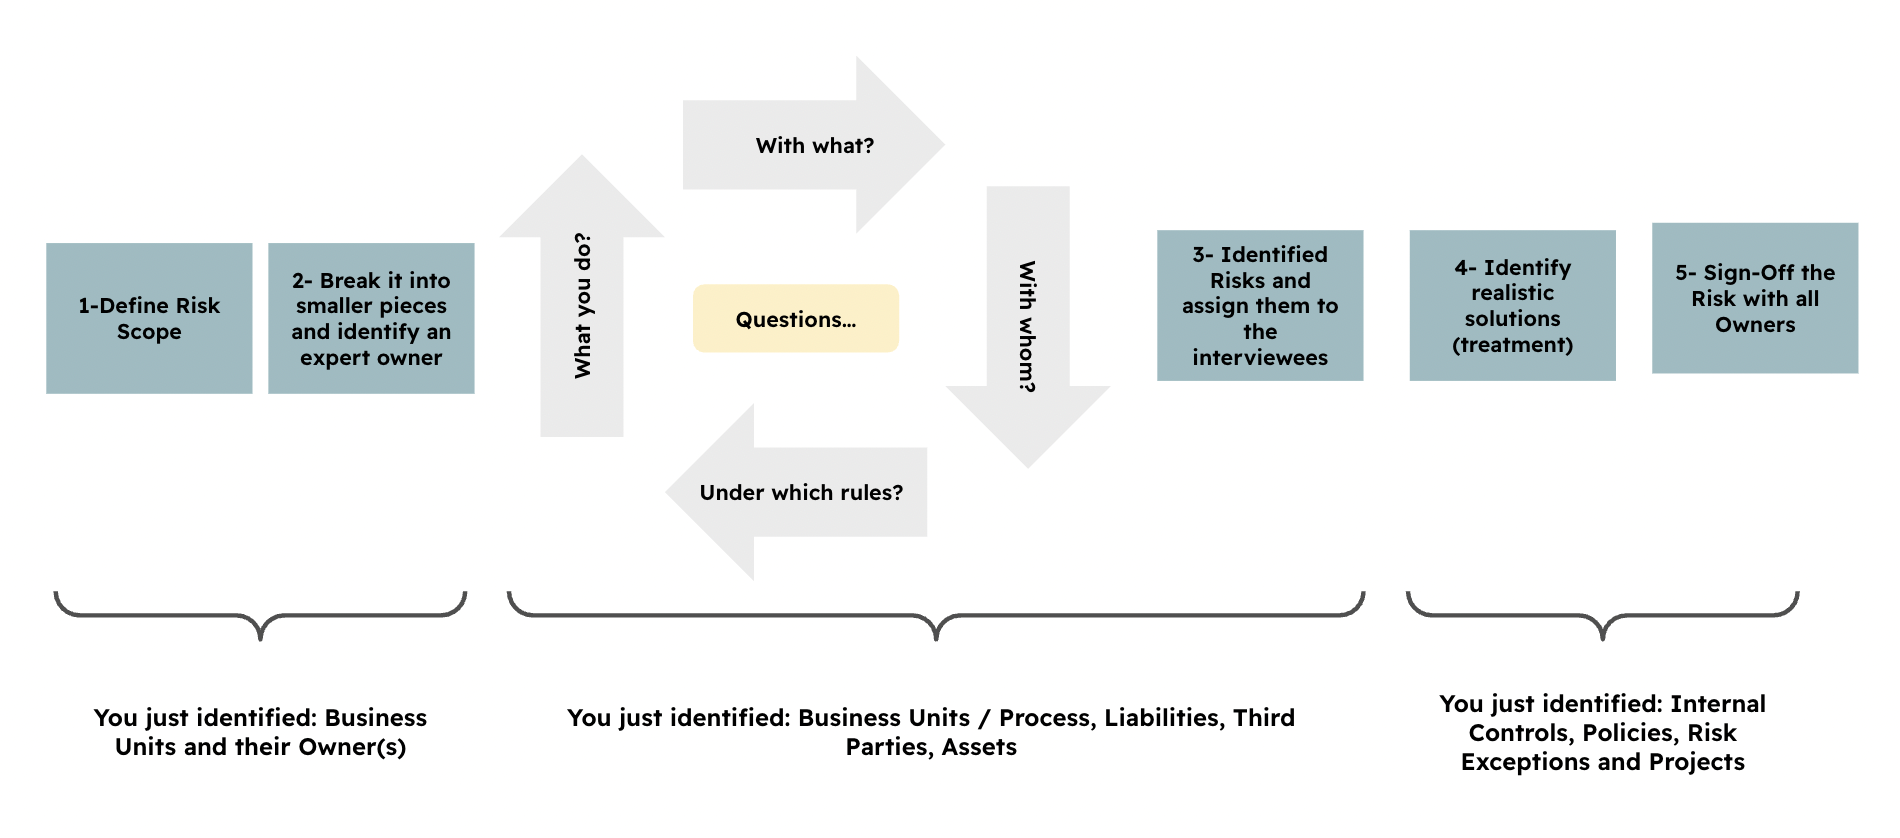
The overall logic for these interviews is as follows:
-
Segment your scope: break it down into manageable chunks (for example, by department) and identify owners for each “chunk,” typically one or two managers. You should make sure the scope is clear to your senior management, particularly what has been left out of scope. This will become "Business Units" in eramba.
-
Interview these owners and ask the four basic questions that will lead to identifying what they actually do and what problems exist. They are the experts in their field, not you. This conversation will become "Assets", "Third Parties", "Liabilities" and "Business Processes".
-
Identify risks by letting them raise the ones they know of, and also based on incidents that happened in the past. These will be your risk scenarios ("Risks") in Eramba, and they will tie to the items identified in the previous step.
-
Identify feasible, real, owned “Solutions.” If there is no money, then there is no solution, so inventing solutions will take you away from your goal, which is to reflect reality. In Eramba, this will become “Internal Controls,” “Policies,” “Risk Exceptions,” and “Projects.”
At this point you have implemented all modules in the scope of Risk.
-
Every module involved that has an item also has an owner. We want them all to contribute and sign off on every item to ensure that no one can back off from what was identified and agreed. This is vital; the day the risk becomes real, these records will become very important.
This exercise is as straightforward as it seems and it has been used in mega large, small, public and private organisation with success. The interviewer (typically from the GRC team) acts as a facilitator rather than dictating which risks exist.
Implementation
The process by which you implement this module in eramba is defined in clear stages that you must not skip or take lightly.
As part of the implementation, you will first create a “test” Risk that will help you familiarize yourself with the module and ensure basic configurations are applied (views, customisations, etc.) on every module involved.

Access Management
In order to complete these tasks, you need to understand how Access Management works
It is critical to get this right before implementing the Risk Management use case, as correcting it later can be complex and time-consuming. The following steps must be completed:
-
Log in to Eramba for the first time and set the Admin password and email (do not use a personal email address). See our Install Guide (choose the one that applies for you) for details.
-
Create a group for your GRC department (name it according to your department).
-
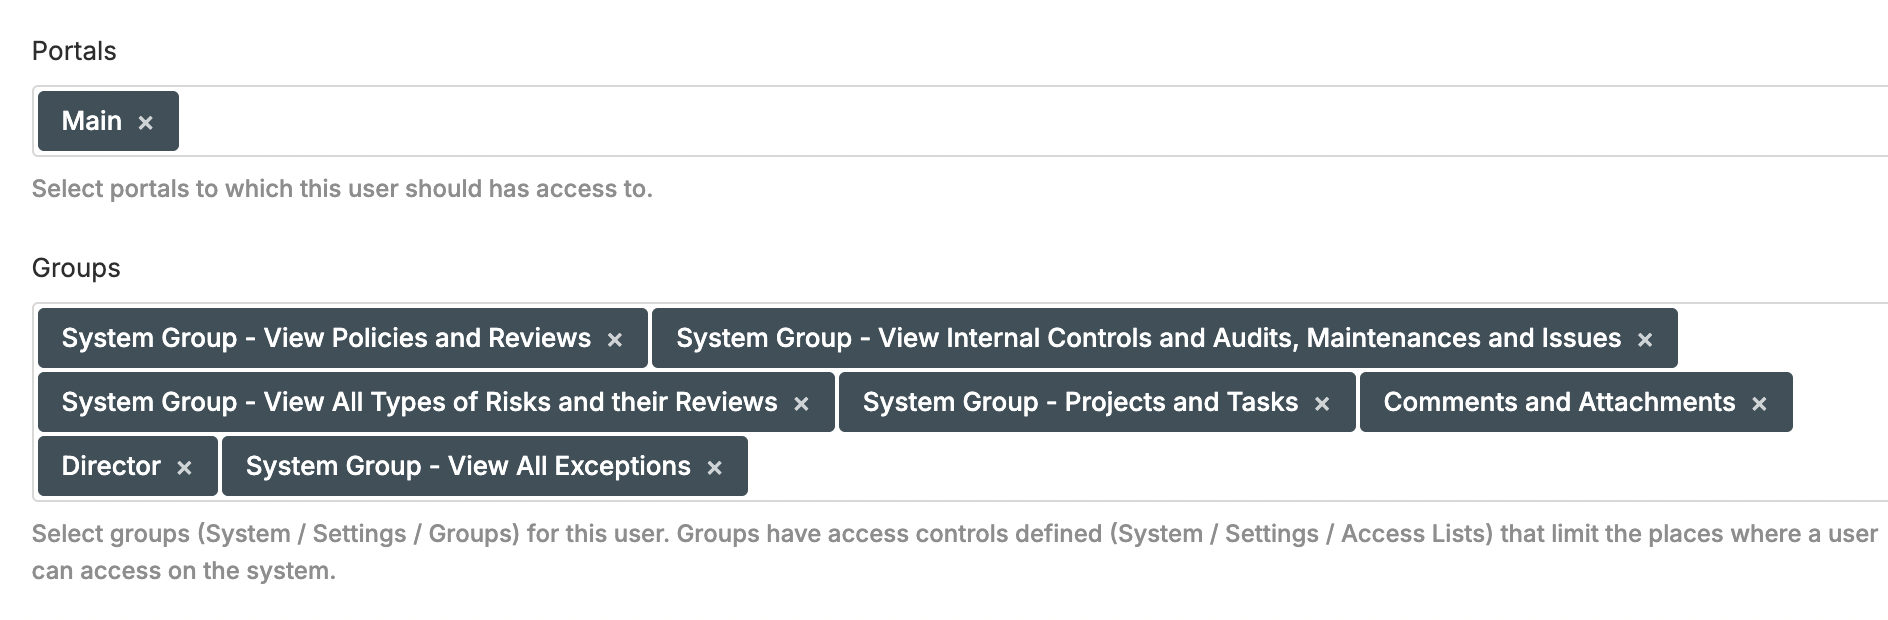
Create user accounts for the GRC team, assign them to the group created in the previous step, and grant Admin privileges. Ensure that no portals are enabled other than Main. Do not create user accounts for anyone outside the implementation team. User accounts for the rest of the organization should be created after the implementation is completed.
-
Create a dummy user account, assign it to the following groups: View Risks, View Projects, View Internal Controls, View Policies, View Exceptions, and enable the Main portal only.
-
Log out as Admin, from now on always login with your personal account
-
Create one Group for every Department in the scope of your Risk program
-
Optional: Set up SAML, Google OAuth, or LDAP connectors and, if desired, update the Authentication settings to use these connectors in order to authenticate user accounts against a remote directory.
Risk Configurations
In order to complete these tasks, you need to understand how Risk Classifications works
-
Define whether you will use a Single Risk Matrix (recommended) or Multiple Risk Matrices (not recommended)
-
Configure the Classification Types for the risk matrix (for example, Likelihood and Impact). A single matrix requires two classification types, while a multiple matrix setup requires at least three (one Likelihood and two or more Impact types).
-
Configure the Classifications for each previously type (for example, High, Medium, Low)
-
Select a risk calculation method, ensuring it is compatible with the chosen matrix type
-
Configure the Risk Appetie / Threshold settings so your matrix has all its cells configured
Identify Risks
In order to implement the Risk module, it is required to first identify Risks. We recommend reviewing our guide for Risk Identification.
The process of Risk identification discussed on this guide helps you identify all the diffferent components that make a Risk. While in this guide we create a sample Asset Risk, the same process can be applied to a Third Party or Business Risk.
Our sample Risk:
-
Risk Scenario: Laptops can be Lost or Stolen and data can be lost
-
Organization / Business Unit: IT
-
Asset Management / Asset: Laptops
-
Liability, Third Party: None
Solution (Treatment):
-
Control Catalogue / Internal Control: End-Point Security Controls, End-Point Centralized Authentication
-
Control Catalogue / Policy: End-Point Security Standards
-
Security Operations / Project: End-Point Security for Mac Computers
-
Risk Management / Exception: Linux Computers not Secured
Create Sample Asset Risk
In order to complete these tasks, you need to understand how Assets, Business Units.
The tasks required to create this Risk begins by creating the inputs to the Risk:
-
Create a Business Unit called "IT", make sure you assign the BU to the right "Group"
-
Create an Assett Called “Laptops.” Make sure you assign the asset to the right “Group.” The “Type” of asset is “Hardware.” The related Business Unit is the one created in the previous step.
-
Create a Risk called "Laptops can be Lost or Stolen and data can be lost", Make sure the “Risk Originator” is the right “Group.” You can set the “Next Review” date to two days from today. Under the “Analysis” tab, select the “Asset” created before. Under the “Treatment” tab, set the “Treatment” option to “Mitigate.” You will need to classify the risk in both tabs.
You have now created the Risk and its context elements (highlighted in blue in the diagram below). The next step is to identify and create the “Solutions” (or treatment) highlighted in orange. We simply follow the proposed Risk Identification process explained in this guide.

Create Sample Solutions (Treatment)
In order to complete these tasks, you need to understand how Internal Controls and Policies work. Optionally, but highly recommended, is that you also understand how Projects and Exceptions work.
Now is time to create the solutions to the risk, they will later be associated as "Treatment" to your Risk:
-
Create a Control Catalogue / Policy called "End-Point Security Standards". Make sure the GRC Contact is the “GRC” group created before and the Policy Reviewer is the dummy account created before. Set the “Next Review” date to two days from today. Complete the policy with any details you want; this is just a practice item. Set the portal permissions to “Private.”
-
Create Control Catalogue / Internal Controls “End-Point Security Controls" and link the Policy “End-Point Security Standards” to the Internal Control just created. Make sure the GRC Contact is your GRC group and the Control Operator is the “Dummy” account. Ignore Audits and Maintenances for now.
-
Create a Security Operations / Project "End-Point Security for Mac Computers", Make sure the “Project Owner” is the “Dummy” account and the “GRC Contact” is your GRC group. Set the “Deadline” to two days from today and the project as “Ongoing.”
-
Create an Risk Management / Exception called "Linux Computers not Secured", Make sure the “GRC Contact” is your GRC group and the “Requestor Contact” is the dummy account. Set the deadline to two days from today and the “Status” to “Open.” Link the Risk created before to the Exception.
-
Link the Internal Controls, Policy, Exception, and Project to the Risk created before.
You should now have a decent idea of how all these different modules work and tie together.
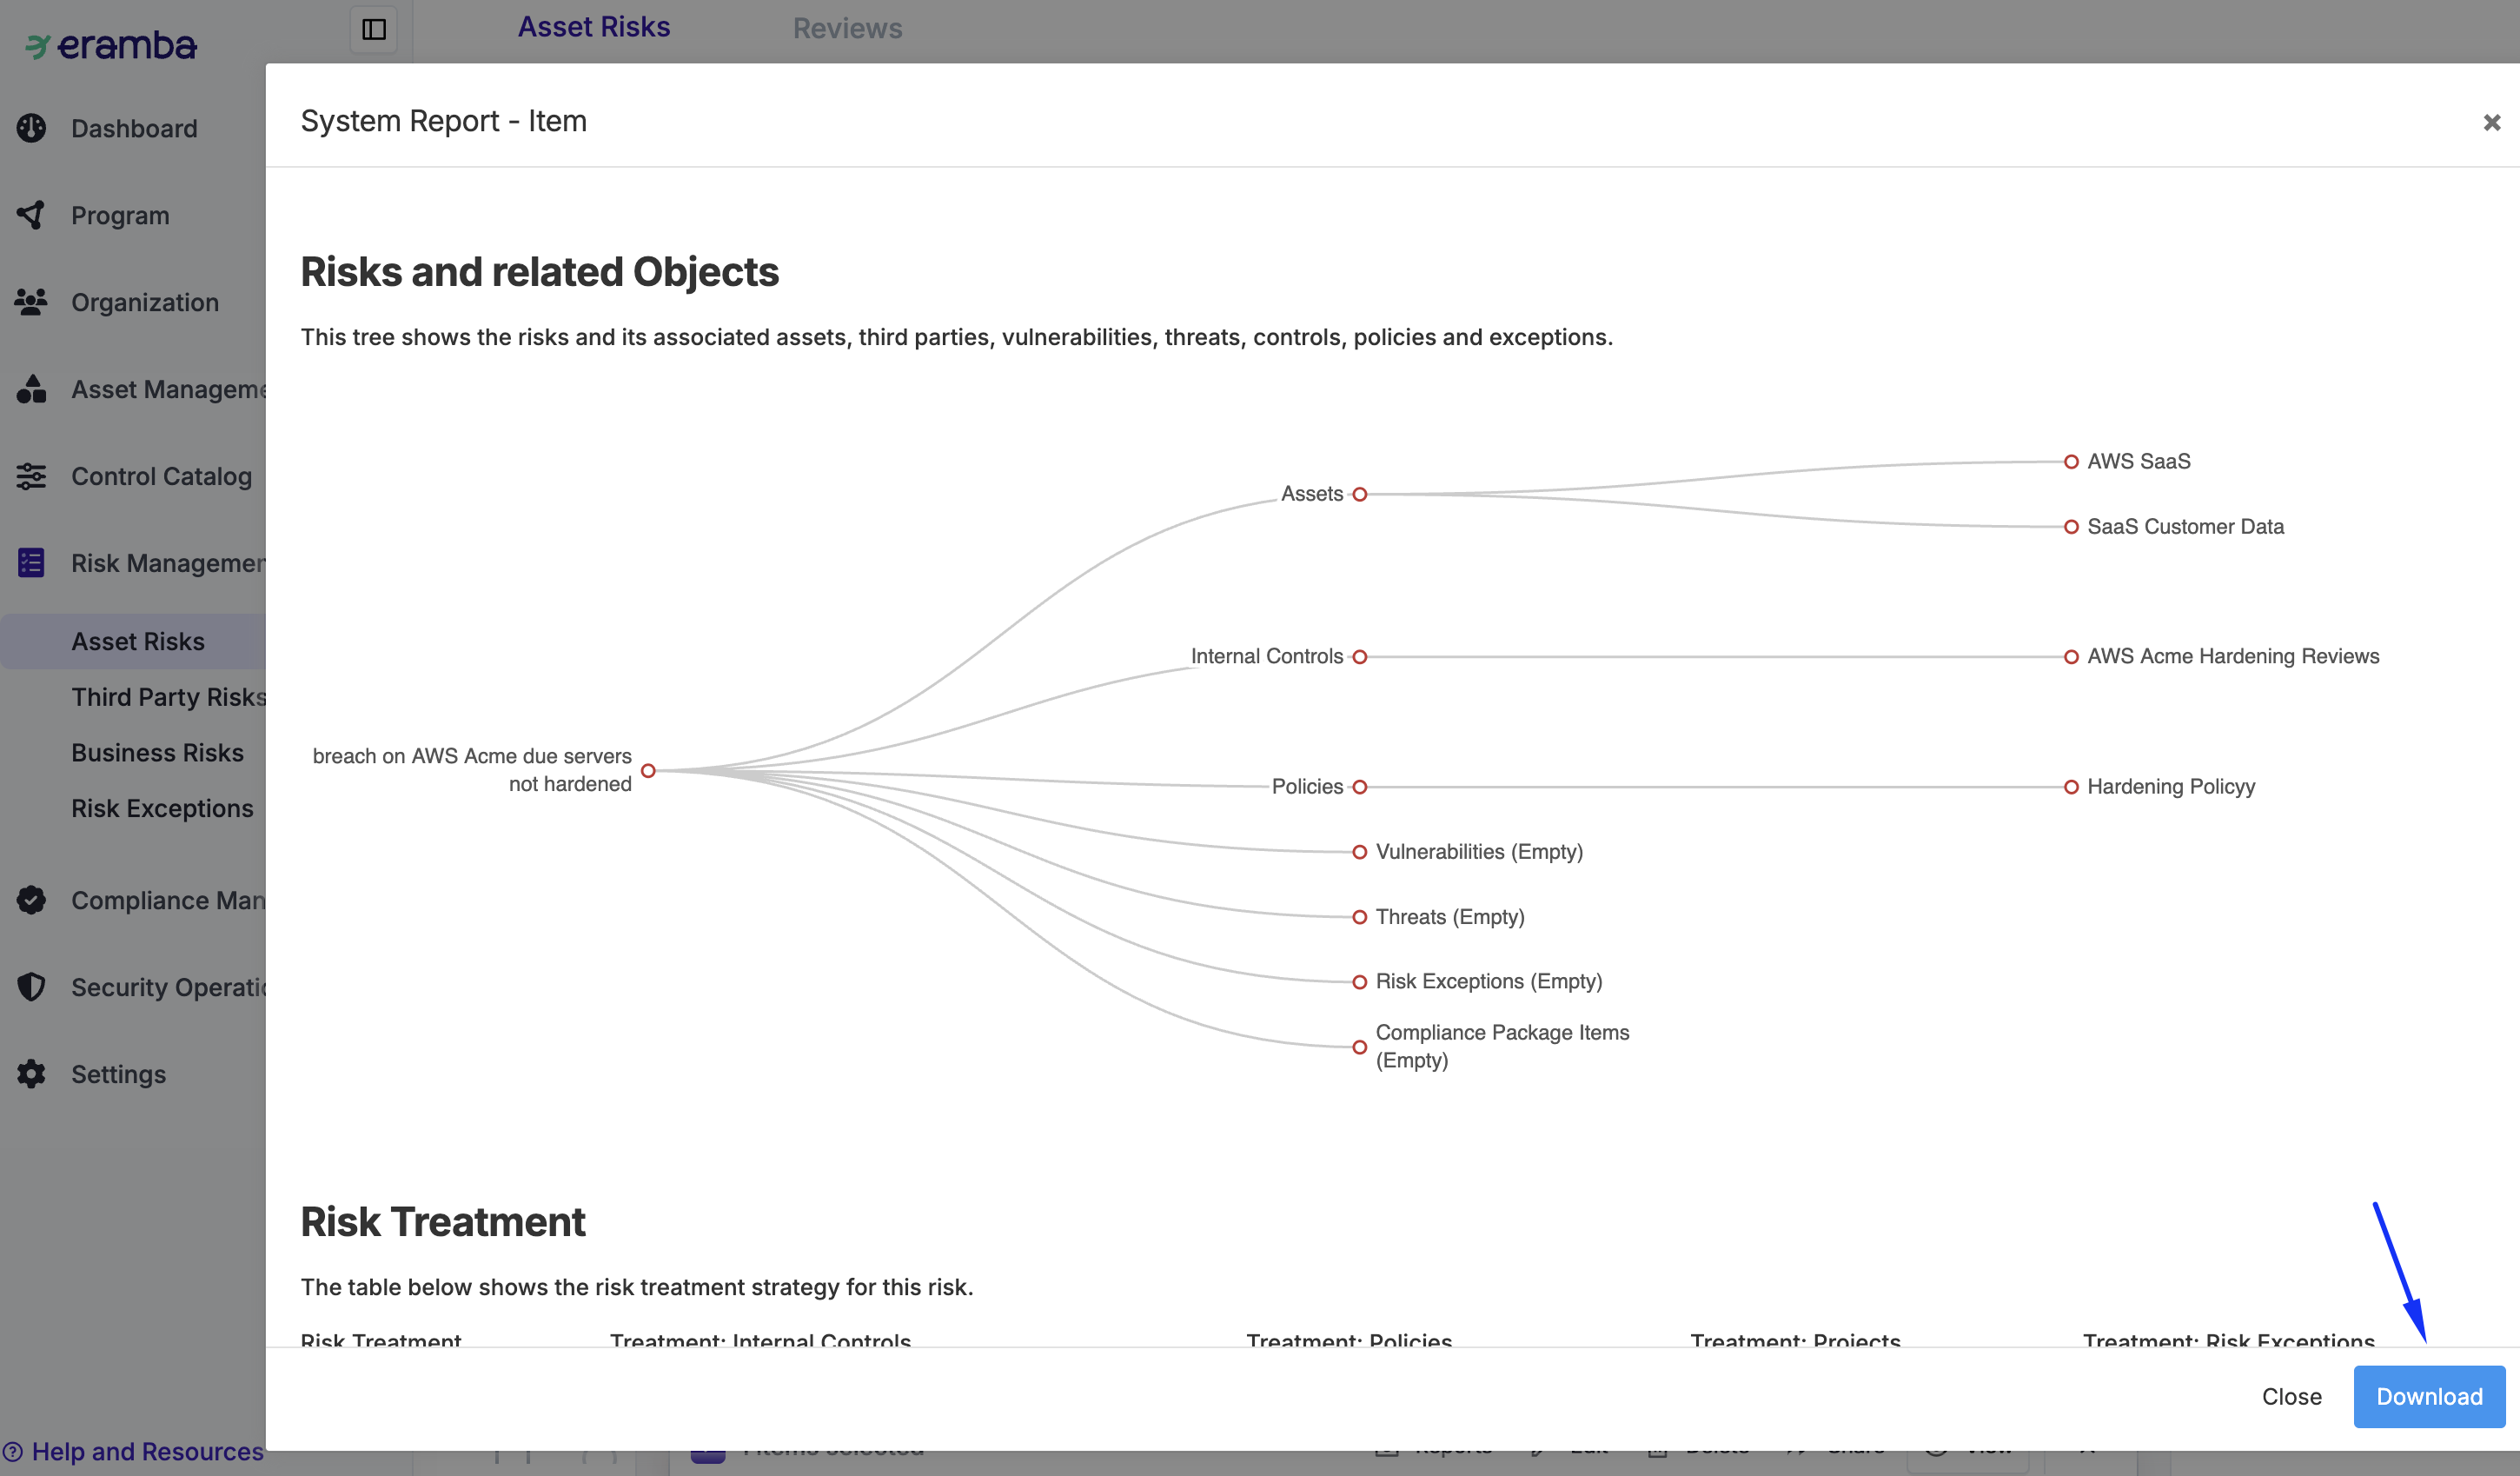
Basic Item Report
In order to complete these tasks, you need to understand how Reporting work in detail.
After your first Risk:
-
Click on the Risk by selecting the checkbox, and then open the built-in “System” Item Report.
-
While this is a basic pre-defined report, it should allow you to see if the risk components are correctly shown.
-
Export the report as a PDF; you will need it later for the Risk sign-off phase.
Risk Sign-Off
Once you create a "Test" Risk is very important that is properly signed off, accountability is really critical in Risk management (consider what will happen when the Risk becomes a reality).
Steps:
-
Import the PDF of the Item Report you obtained in the previous steps into the “Initial” review record.
-
Both the GRC Contact and the Risk Originator Contact must add a comment to the “Initial” review record. You can get a direct link to the comment and attachment by using the “Share” button and sharing it with the “dummy” account. Then, using two separate browsers, you can simulate the reviewer and GRC owner experiences.
You can use notifications that trigger when a Risk or a Risk Review (Completed) is created to inform those involved. The Risk notification will include specific details of the risk, while the Risk Review Completed notification will request feedback from users via a link in the email.
The same sign-off process is often applied to all related items (Assets, Business Units, Controls, etc.). However, this is an optional, labor-intensive task that we do not recommend performing.
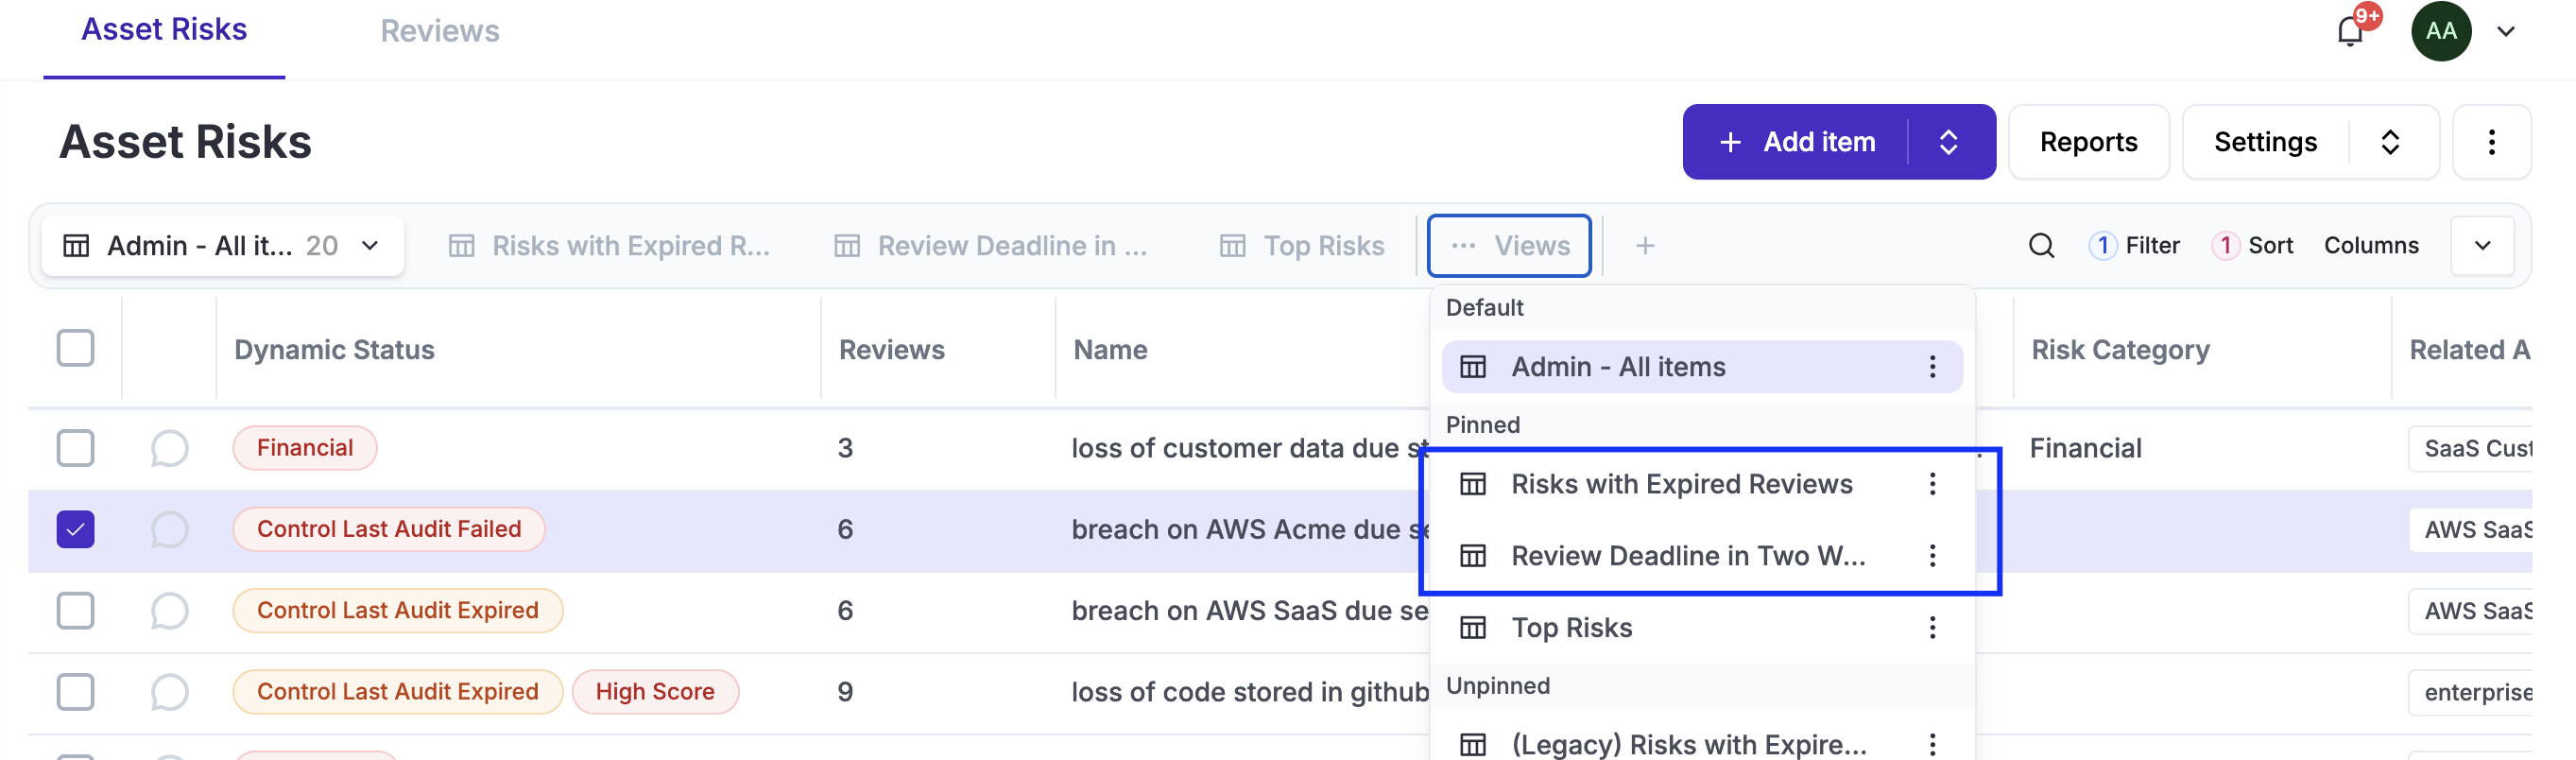
Basic Module Configurations
In order to complete these tasks, you need to understand how the user interface and customisations work in detail.
Apply the following basic configurations to all modules involved so far: Risk Management / (The one you are using), Control Catalogue / Policies, Control Catalogue / Internal Controls, Risk Management / Risk Exceptions, Security Operations / Projects:
-
Using customisations, make sure you hide as many fields as possible, leaving the form as lean as possible.
-
Adjust the default "All Item" view by adjusting columns, sorting, etc., and set it as “Default for Me.”
-
Clone the previous view and set it as “Default for Others.”
-
Optional - Pin “Template” views, which are hidden by default.
-
Create your own custom views.
Basic Weekly Reports
In order to complete these tasks, you need to understand how Views and Notifications work in detail.
The idea of this section is to enable Report notifications for all four solution modules plus the Risk module, these report notifications will notify you of expired and soon to be expired items that need your attention. For each one of the following modules: Control Catalogue / Policies, Control Catalogue / Internal Controls, Compliance Management / Compliance Exceptions, Security Operations / Projects and Risk Management / (Risk module in use):
-
Pin the views “Expired…” and “Deadline in the next couple of weeks.” (and any other view you wish to send over using reports)
-
Enable the pre-defined report notifications; do not forget to adjust the recipient (typically your GRC group) and the frequency.
-
Optional - this same task can be performed on all other related modules (Policies, Internal Controls, Etc)
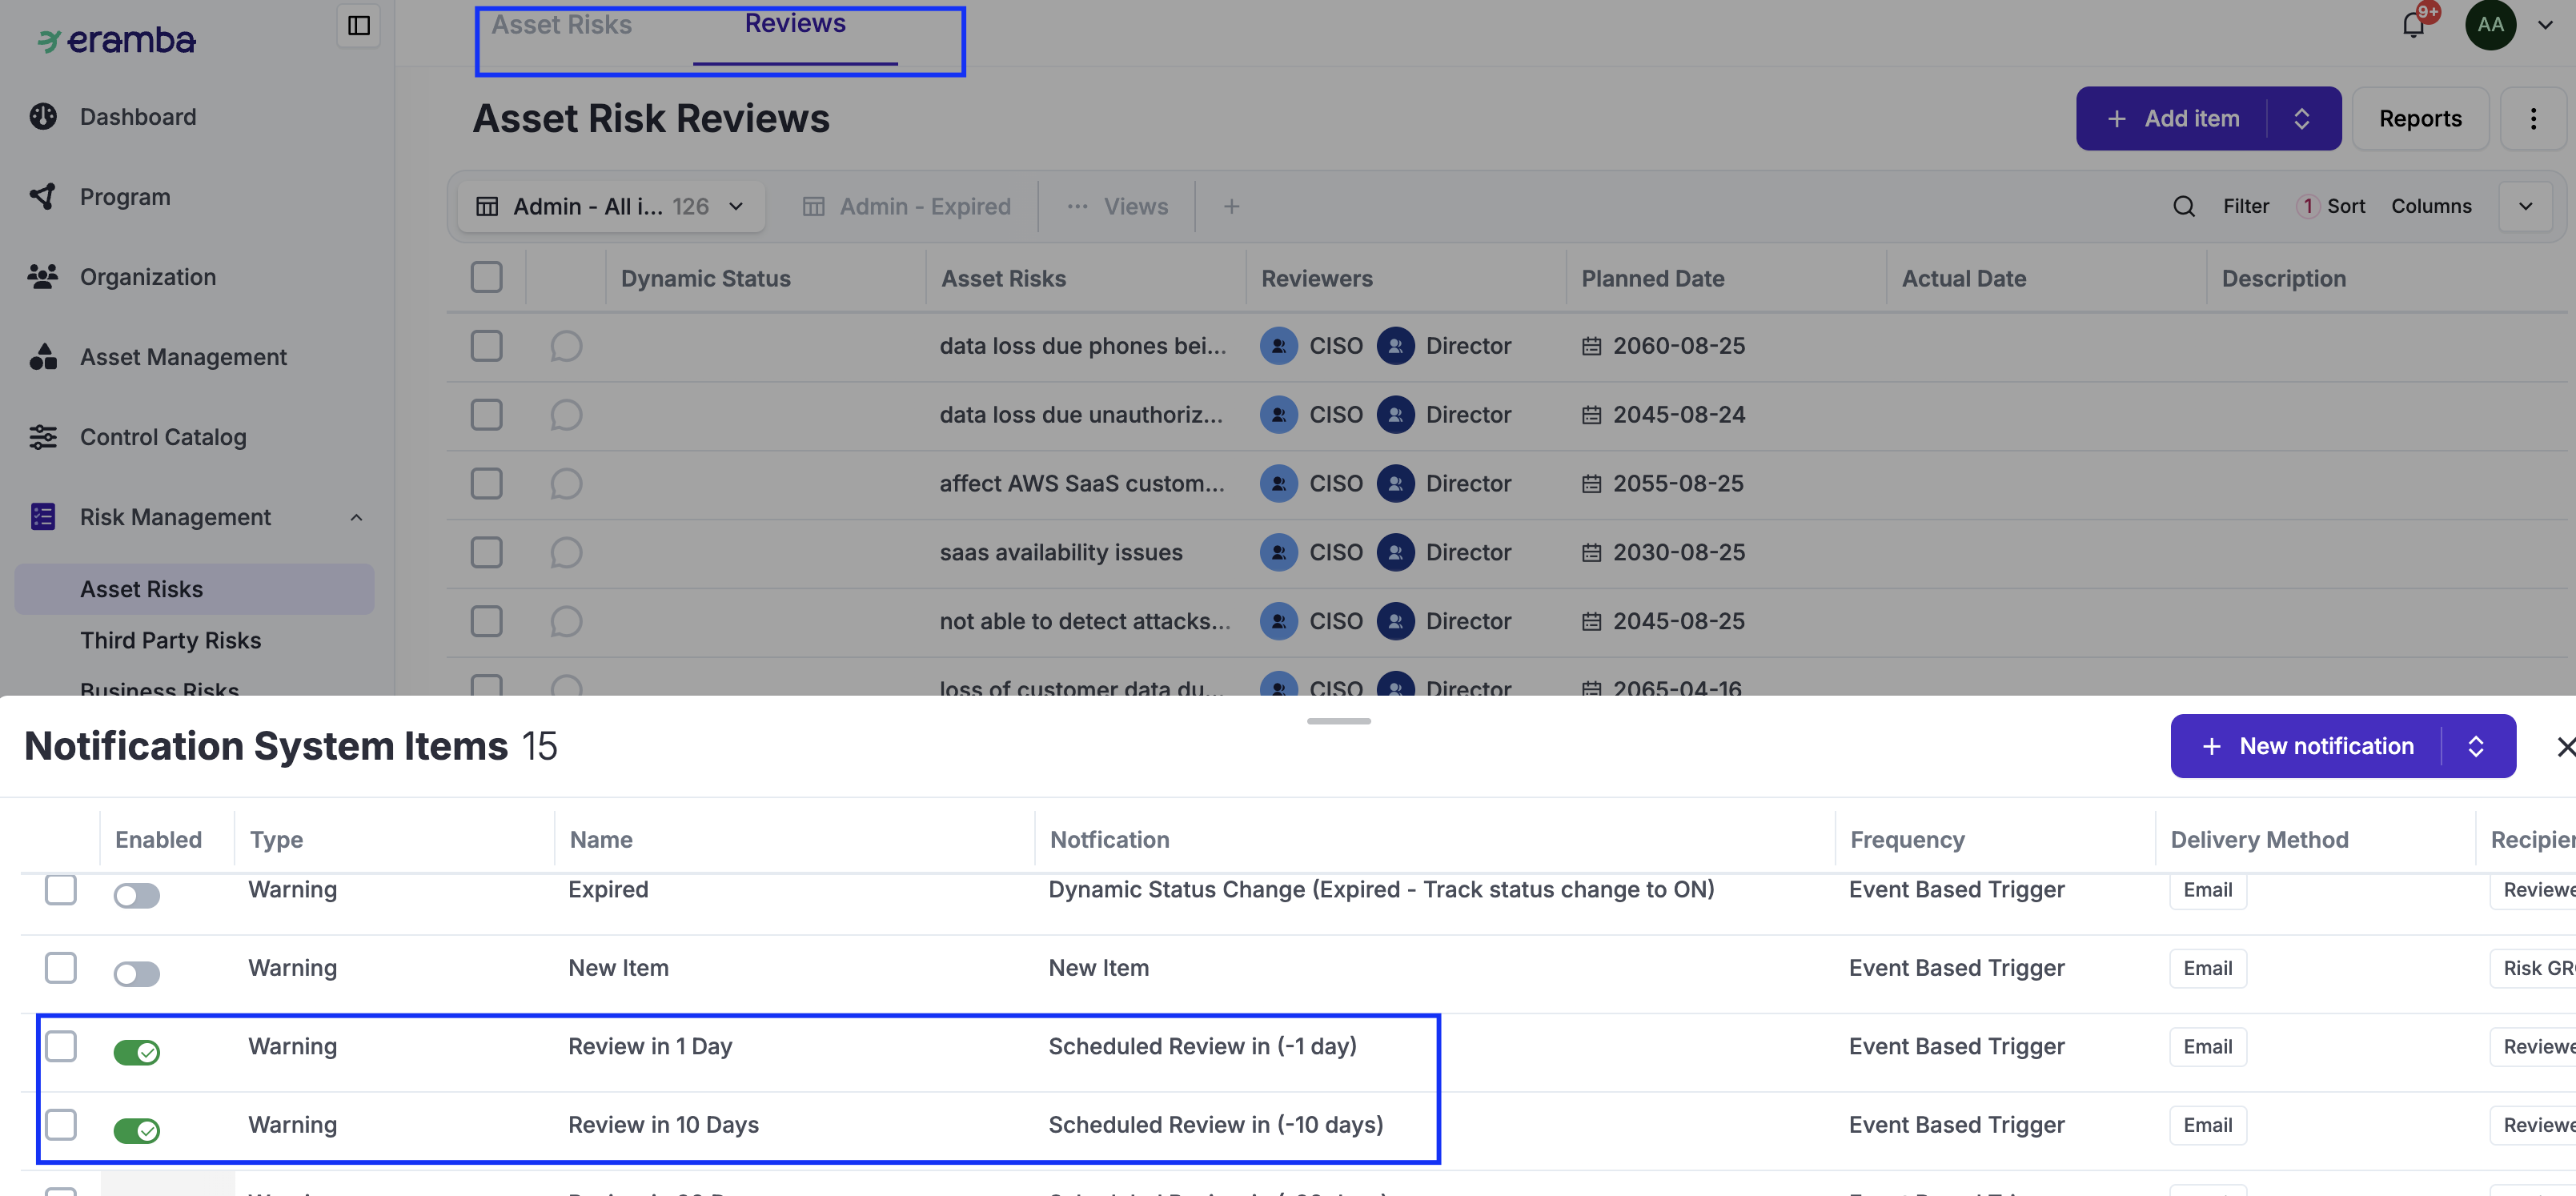
Warning Notifications
In order to complete these tasks, you need to understand how Notifications work in detail.
For each one of the following modules Control Catalogue / Policies / Reviews, Control Catalogue / Internal Controls / Audits, Risk Management / Risk Exceptions, Security Operations / Projects and Risk Management / (Risk module used) / Reviews define the type of "Feedback" you wish to obtain from the departments inr your organisations:
-
Enable the “-1 Deadline” warning notifications at Risk Management / Risk Module / Review Tab, making sure you adjust the Subject and Body to reflect exactly what your intentions are.
-
Enable the “Comments & Attachments” notification at Risk Management / Risk Module / Review Tab. Write a sample comment on your Review to trigger the notification. You might need to go to Settings / System & Maintenance / Email Queue Records / Flush Email Queue to trigger delivery of all emails (otherwise you might need to wait up to one hour).
-
Click on the email received using an Incognito window and log in as Dummy. You should be able to see and respond to the comment. This test is aimed at testing the permission rights for the staff responsible for providing you with feedback on the reviews.
-
For every sample item created in this guide, we have set the deadline to two days from today. At midnight, the notification you just enabled should detect the item you created and send emails to your dummy account. You can then test that account’s permissions and make sure it can provide feedback correctly.
- After you receive the email and login with the dummy account, correct any missing or incorrectly assigned permissions, ensuring the dummy account can perform all the intended tasks.
- Optional - this same task can be performed on all other related modules (Policies, Internal Controls, Etc)
Roll Out of Accounts
In order to complete these tasks, you need to understand how Access Management work in detail.
This involves the creation of user accounts for each department created during the “Access Phase”. This will help these people log in to Eramba and see Compliance Requirements, Internal Controls, Policies, Projects and Exceptions assigned to them, provide feedback for Risks, and perform any other tasks you wish them to perform.
To create an account:
-
Go to System / Settings / Organization & Access
-
Create user accounts with the same group settings as the “Dummy” user; just include the “Group” for the department that the person belongs to.
You can repeat this process for every group (department) in your organisation. If you had previously created a notification, they will receive it as soon as you create an account for them.
Internal Control Audits
In order to complete these tasks, you need to understand how Internal Controls and in particular Audits work in detail. Our recommendation is that you always start with a “dummy” control to test your understanding of the module and its notifications, and only once you feel comfortable.
The objective of this phase is to define testing for the controls you have identified:
-
For every Internal Control you created, decide whether you want to test it or not.
-
If you want to test it, decide whether you will use manual or automated testing.
-
Configure audits.
Optional - Using CSVs Imports
This step is optional and only applies if you already have a list of risks for your organization in a spreadsheet and would like to import them into eramba. You still are required to perform the steps previously described to create one item on every module.
If you already have a spreadsheet-based risk register, you must ensure that your risk calculation method is compatible with eramba; otherwise, the import process will not work.
The most common issue is that a single (or multi-tab) spreadsheet differs from eramba's Risk import structure. Because eramba requires multiple modules—each with its own specific attributes—you cannot perform a single upload. Your task is to break down your existing spreadsheet into the various CSV imports that eramba requires.
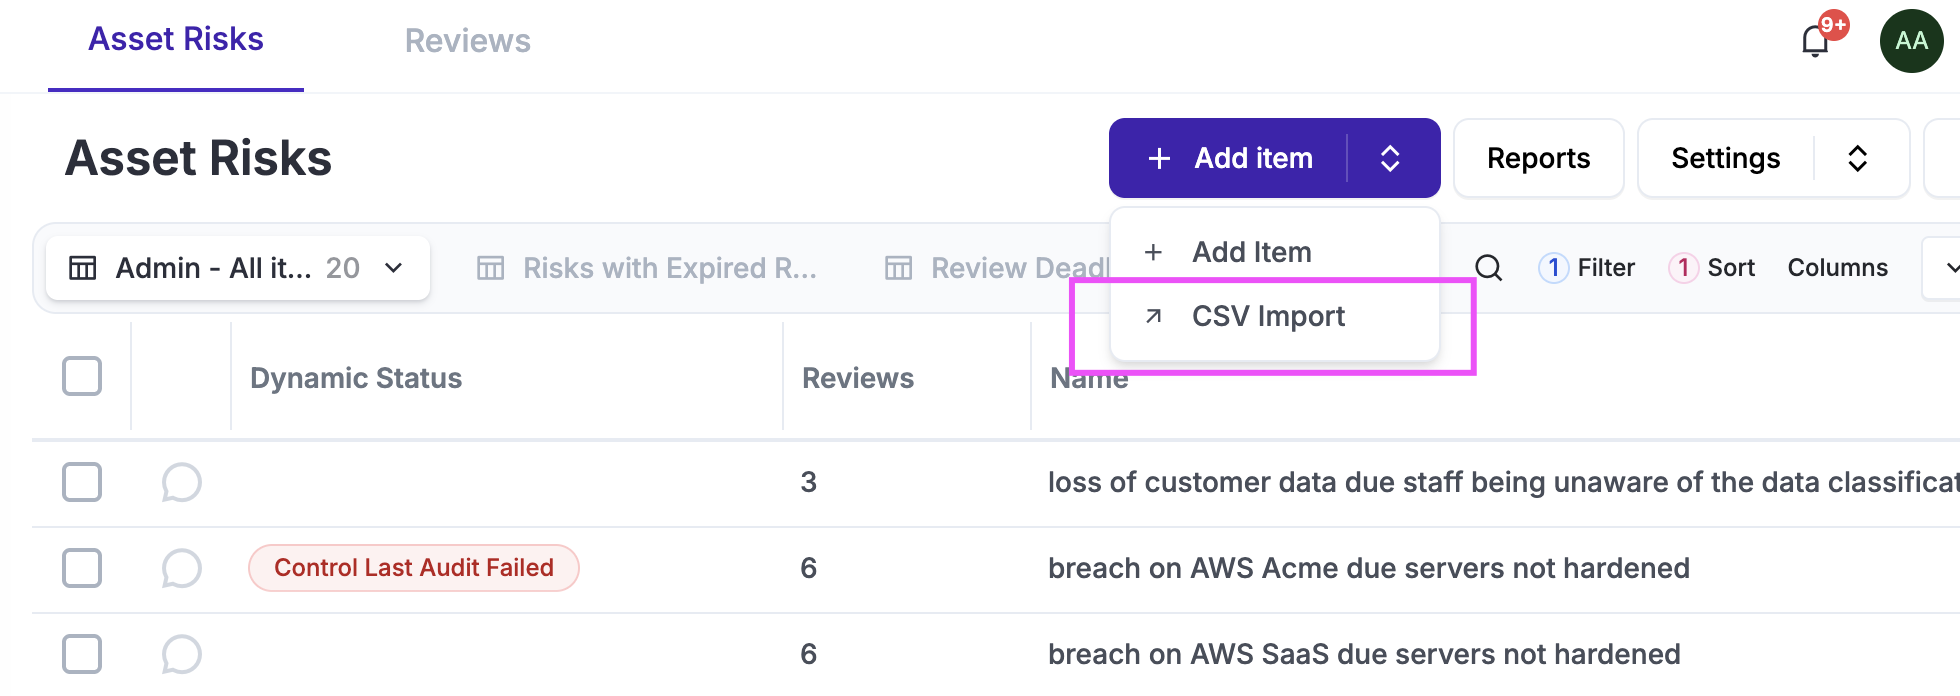
Please make sure you review how the CSV Import common functionality works before you attempt any of this.
If you want to import Risks from a spreadsheet into Eramba, some preparation is required to ensure the import works correctly:
-
Create Business Units in eramba using forms
-
Prepare a Spreadsheet with one tab for each one of the following modules: Assets, Third Parties, Risks, Internal Controls, Policies, Projects and Exceptions
-
Import on each tab the CSV Import template from eramba, review the CSV Import common feautre to learn how to work with these imports.
-
Copy/paste the columns from your risk register into the CSV sheets you prepared in the previous step. This will quickly highlight which fields your spreadsheet has that eramba does not, as well as which fields eramba requires that your spreadsheet is missing. You will need to fill these gaps to proceed. If your spreadsheet contains essential data that eramba does not support by default, you can use the Common Customization functionality to create the missing fields.
Once your spreadsheets are completed, import them in the following order:
-
Assets and/or Third Parties
-
Policies
-
Internal Controls
-
Projects
-
Exceptions
-
Risks
Optional - Advanced Module Customisations
In order to complete these tasks, you need to understand how customisations, Dynamic Statuses, and Reports work in detail. This is an optional step.
As you identify Internal Controls and Policies as part of the Risk Identification phase, you often do not know exactly if these items are “mature” or not, meaning if they are really solutions. Sometimes it is a good idea to create a simple custom field with a dropdown called “Maturity” with basic options: Unknown (Default), OK, NOT OK. Then, using Dynamic Statuses, views, and reports, you can track the percentage of these items.
On the Control Catalogue / Policies, Control Catalogue / Internal Controls modules:
-
Create a custom field with the fields mentioned above (or whatever you want to call them).
-
Create two Dynamic Statuses, one for “Unknown” and the other for “Not OK.”
-
Create two views where each filters items against those Dynamic Statuses you created.
-
Create a Section Report that shows those two Dynamic Statuses in a report.
-
Adjust the landing dashboard with a chart showing those two statuses.
Risk Management / (Risk Module you are using):
-
Create two Dynamic Statuses that inherit the statuses created in the Policy and Internal Control modules.
-
Create two views for these statuses, showing the affected Risks.
Reporting
In order to complete these tasks, you need to understand how Reporting work in detail.
Start by:
- Customising your landing dashboard.
For every module involved:
-
Create a Section Report.
-
Configure a Report notification to send it over email regularly.
-
Create an Item Report.
Operations
The operational side of things after Risks are created involves keeping both the Context and the "Solutions" updated. These activities all take place in this phase at the intervals you define for each of them.
Risks
The key operational task in relation to risk is to perform risk reviews.
Ad-Hoc Review
-
Go to the Risk / Review Tab
-
Click Add, select the Risk
-
Complete the Review form
-
Add comments and attachments to the Review
Scheduled Review
-
Go to the Risk module, select the Risk and click on the Review counter
-
Edit the only review that is incomplete
-
Complete the Review form, select the next Review Date
-
Add comments and attachments to the Review
Solutions
A key operational task outside the Risk module is to review and test all items related to your risks. Review each module's documentation to make sure you understand how it works.
-
Audit your internal controls (Internal Control documentation)
-
Review your policies (Policy documentation)
-
Review your projects (Project documentation)
-
Review your exceptions (Exception documentation)
Common Features
Customisation
There are many possibilities when it comes to notifications. It essential to understand the customisation common feature before making configuration decisions.
The most common examples for the Risk modules (see the Internal Control, Policy, Assets, etc. guides for examples applicable to those modules that are involved with Risks) are listed below:
-
Risk Management / Risk (all three): Risk Origin (vendor, data, cloud, busines, etc) or Category (operational, financial, etc)
Dynamic Status
There are many possibilities when it comes to Dynamic Stauses, in particular using them in combination with Custom Fields, Notifications, Reports and Automations. It essential to understand the Dynamic Status common feature before making configuration decisions.
The most common examples for the Risk modules (see the Internal Control, Policy, Assets, etc. guides for examples applicable to those modules that are involved with Risks) are listed below:
-
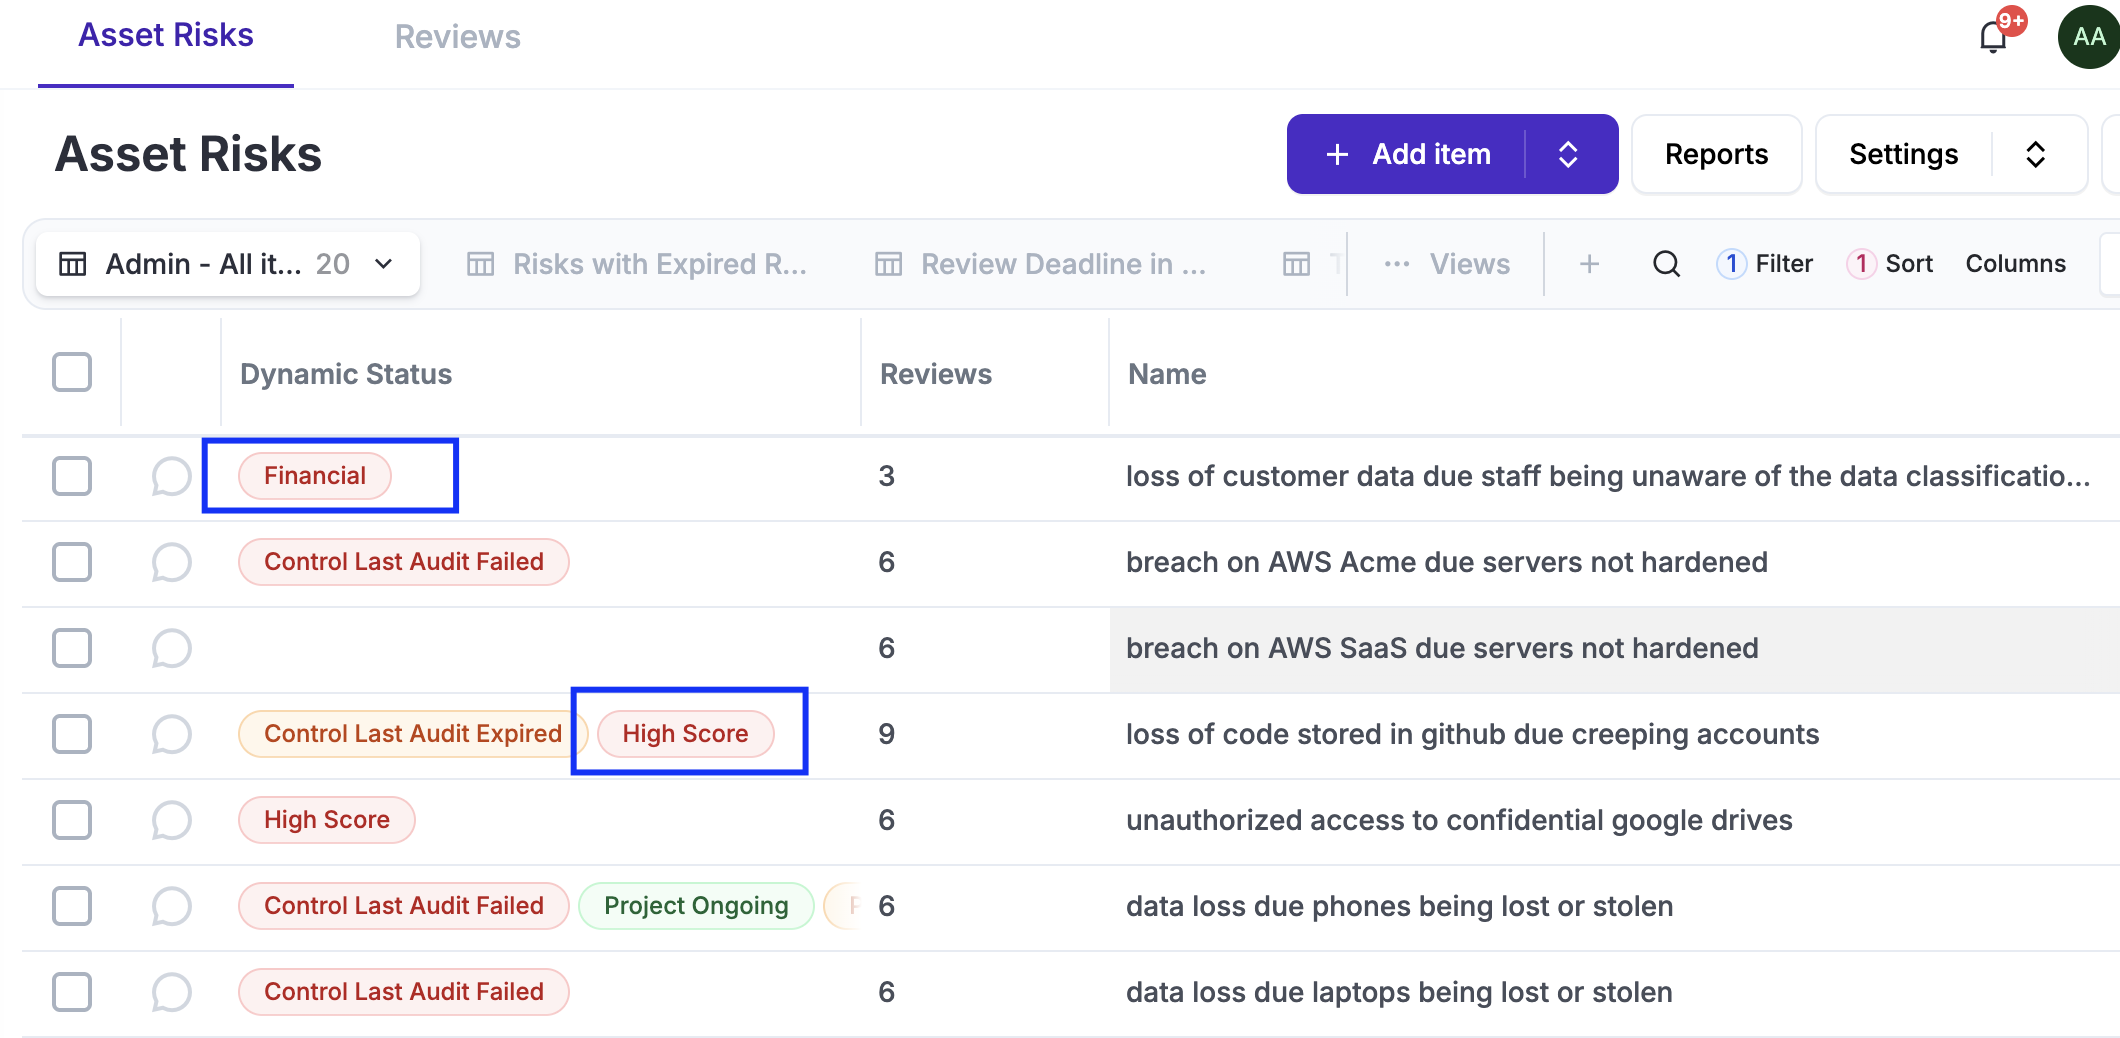
Risk Management / Risk (all three): multiple statuses are created by default (expired, no treatment, missing reviews, etc.), but you can add custom ones, for example highlighting the risk category (from the customisation) or if the risk is above a certain score.
Views
Views are essential as is the main interface with data in eramba, you will most likely adjust them to suit your needs. It essential to understand the User Interface guide before making configuration decisions.
You will create default views for yourself on most modules, typically grouping data using filters, often based on custom fields. Eramba ships with multiple default views (Expired Risk, Risk Reviews in the comming weeks, Etc) but you can also create custom views such as Top Ten Risks, Financial Risks, Etc

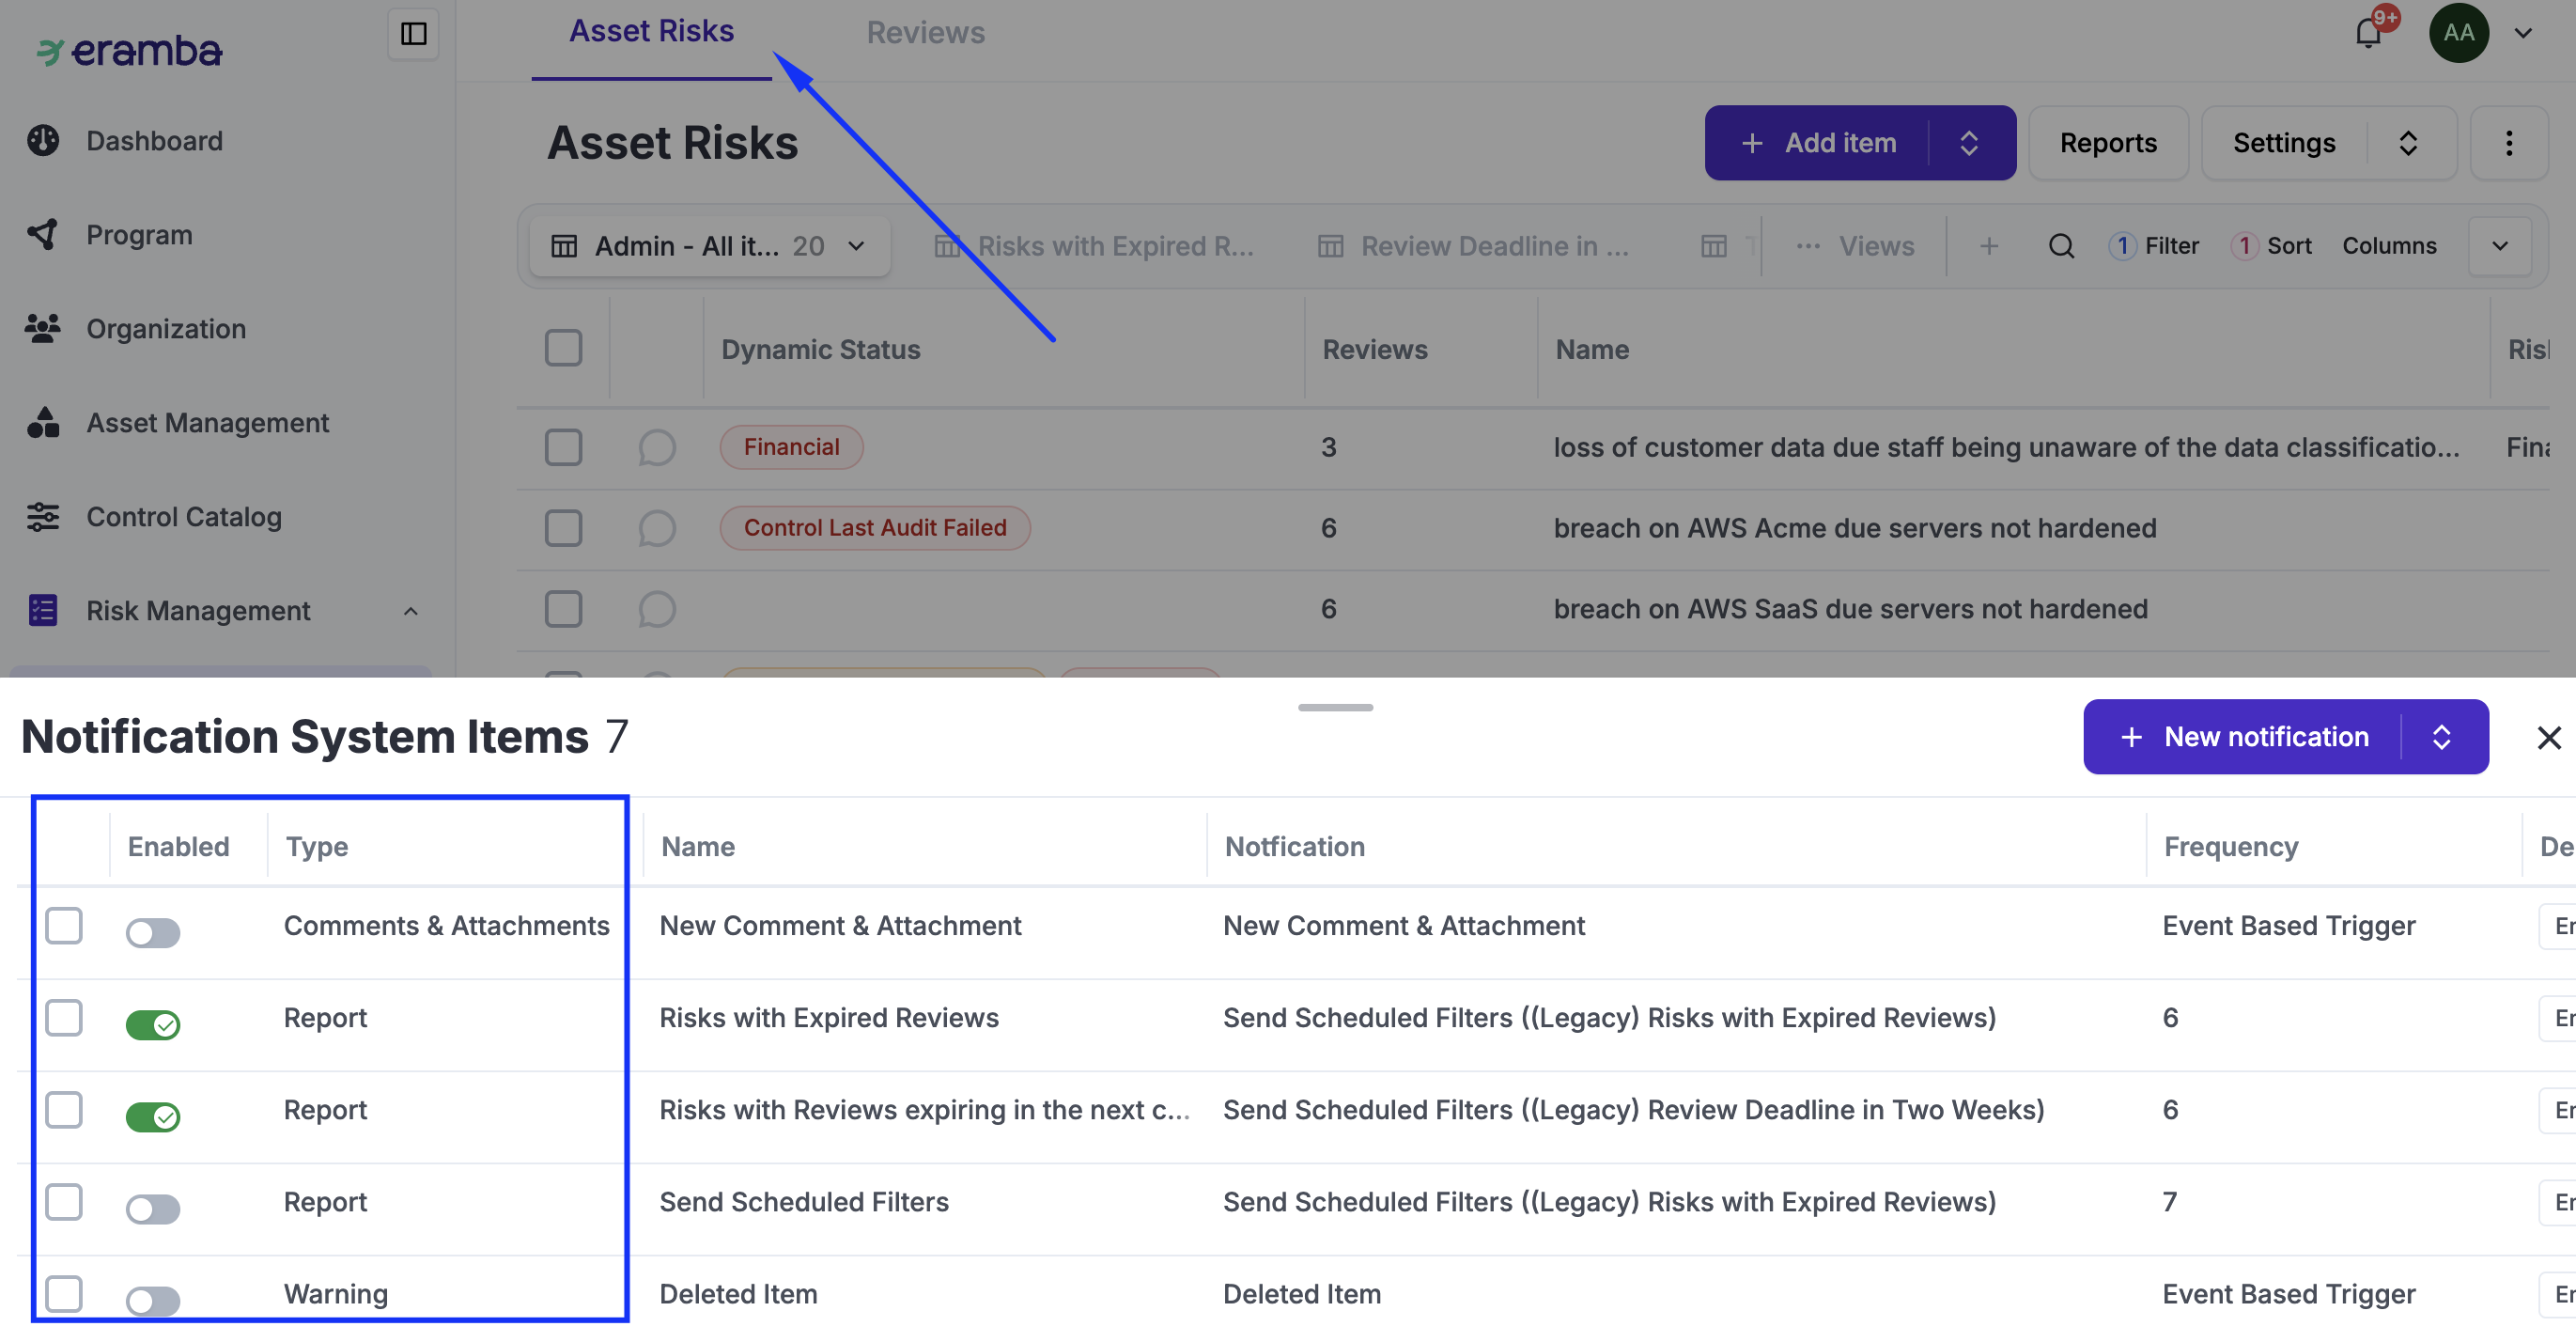
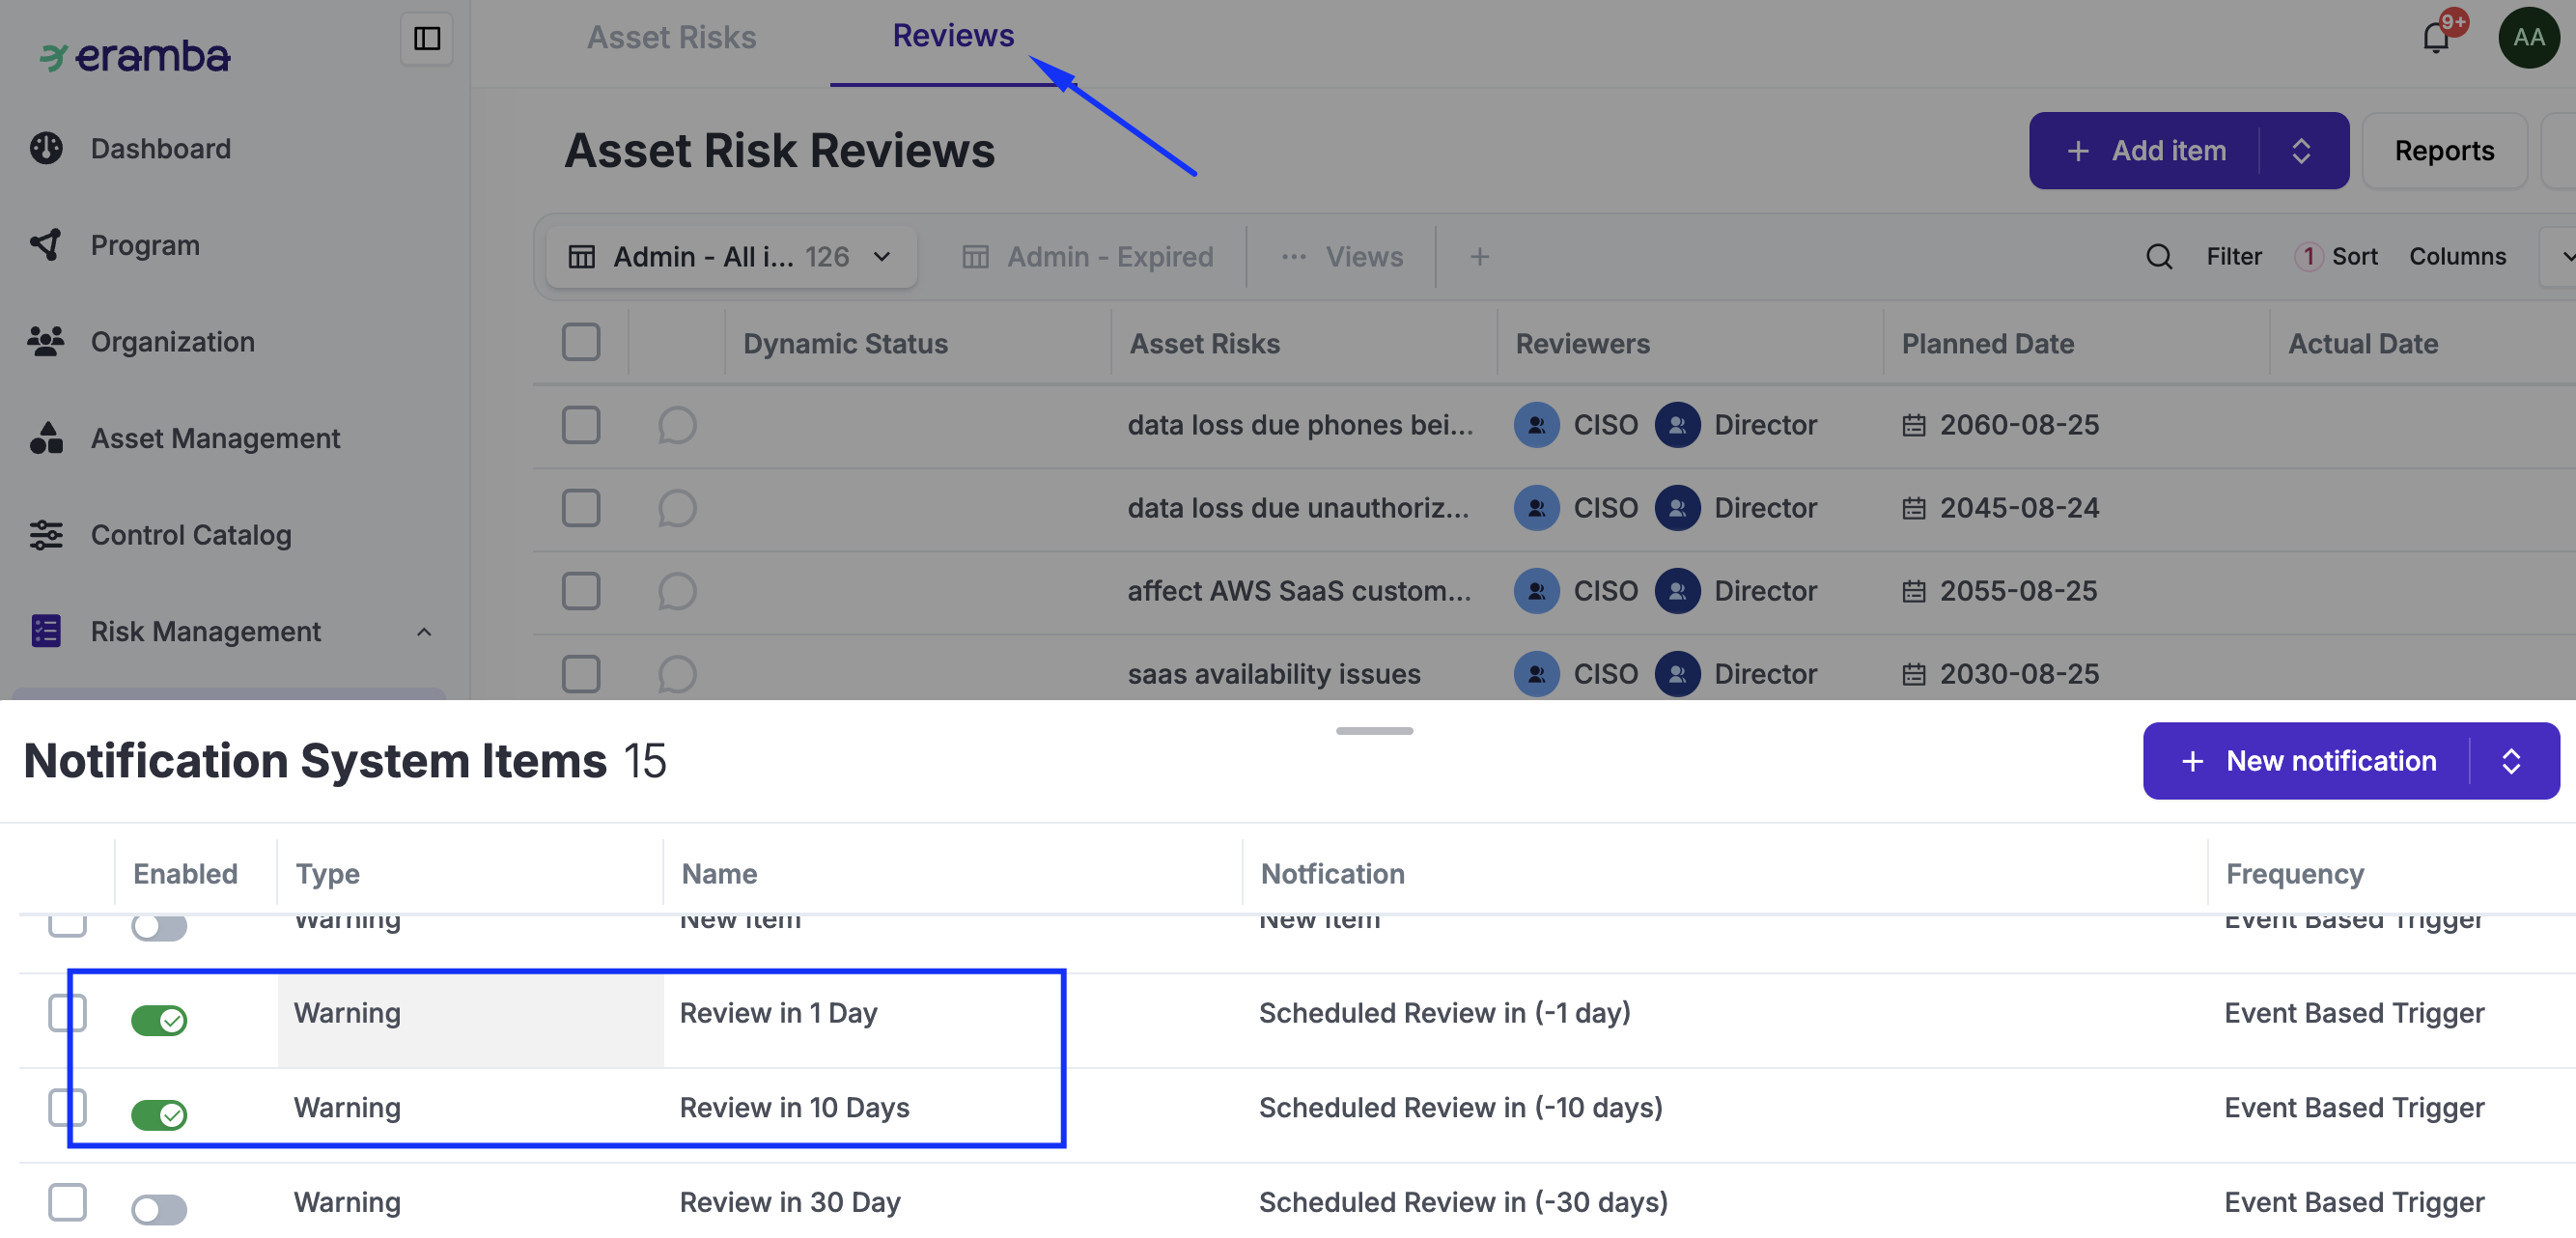
Notifications
There are many possibilities when it comes to notifications. It essential to understand the notification common feature before making configuration decisions.
The most common examples for the Risk modules (see the Internal Control, Policy, Assets, etc. guides for examples applicable to those modules that are involved with Risks) are listed below:
-
Risk Management / Risk (all three):
-
Report: Risk wiht Expired Reviews, Risks with Reviews due in next couple of weeks
-
-
Risk Management / Risk (all three) / Reviews:
-
Report: Reviews Due in 14 Days
-
Warning: -1, -10, Etc Days Before the planned Review, Completed Review, New Planned Review, Etc
-
Comments & Attachments: On every Comment/Attachment created
-
Is very important that while you "Enable" these pre-defined notifications you also adjust the Subejct and Body to reflect exacly what you need to communicate to the recipients.
Automations
There are many possibilities when it comes to notifications. It essential to understand the Automation common feature before making configuration decisions.
We are updating the documentation, please be patient!